European Windows 2012 Hosting BLOG

BLOG about Windows 2012 Hosting and SQL 2012 Hosting - Dedicated to European Windows Hosting Customer

European Windows 2012 Hosting - France :: Look Further Windows 2012 Powershell 3.0

clock September 24, 2013 08:34 by author Scott

Now that Windows 8 and Windows Server 2012 is available, the same is true for Windows PowerShell 3.0 since it is included in the operating system. Windows PowerShell will also be available for down level operating systems (Windows 7, Windows Server 2008 and Windows Server 2008 R2) shortly, as part of the Windows Management Framework (WMF). In addition to PowerShell, new versions of Windows Management Instrumentation (WMI) and Windows Remote Management (WinRM) is included in the WMF.

What is new?

PowerShell 2.0 brought a whole set of new features including background jobs, remoting and the PowerShell ISE. In PowerShell 3.0 there have been made a great number to these features as well as many new ones. I will go through some of the major news:

Workflows – Based on the Windows Workflow Foundation the PowerShell team have brought workflows into PowerShell. A workflow is a sequence of automated steps or so called activities which performs tasks or receives data from managed devices. This makes it possible for IT Professionals to perform automated tasks against a wide variety of devices, for example software installation. A practical example is the installation and configuration of a Windows Server Failover Cluster, where installation and configuration can be orchestrated from a workflow. Among the feature set of a workflow is the ability to suspend and resume execution, no matter if the reason is planned or a temporary network outage. You can see examples and read more about this feature in this article on the PowerShell team blog.

Enhancements to PowerShell Remoting - Robust sessions is a new feature in PowerShell Remoting which makes it possible for a PowerShell Remoting session, a so-called “PSSession”, to survive a temporary network outage. Delegated administration is another new feature in remoting, where a RunAsAccount can be configured on a remoting endpoint. This makes it possible to delegate tasks to for example helpdesk user, without needing to delegate tasks on the backbone application itself.

Simplified syntax – Especially for beginners, the syntax for various parts of PowerShell might be hard to remember and understand. An example of this is the syntax for the –FilterScript parameter of Where-Object and the –Process parameter of Foreach-Object, which both accepts a so-called script block. In version 1.0 and 2.0 of PowerShell we had to use the $_.propertyname syntax inside this scriptblock. For example Get-Service | Where-Object {$_.Status –eq ‘Running’}. In version 3.0, this still works, but there is an alternate more user friendly syntax as well: Get-Service | Where-Object Status –eq ‘Running’. Here we can see that we did not have to use the curly brackets or the $_. syntax. You should note that you have to use the existing syntax if you are doing more than one comparison, however, this makes it much easier for beginners who are likely to do a single comparison in the beginning. Also experienced users will enjoy this feature since it requires less typing.

More user friendly – A lot of enhancements have been made to make PowerShell more user friendly. A common mistake for new users is not loading the required module for the cmdlet they want to run. For example, if you run Get-ADUser without first running Import-Module ActiveDirectory, you would get an error message stating that Get-ADUser is not recognized. In PowerShell 3.0 there is a new feature called module autoloading, which automatically loads the required module for the cmdlet which is being run. Another features in terms of user friendliness is the new cmdlet Show-Command, as well as the Intellisense feature in PowerShell ISE. You can read more about these two features in this and this article on the PowerShell team blog.

Windows PowerShell Web Service – makes it possible to expose a set of PowerShell cmdlets as a Restful Endpoint via OData (Open Data Protocol). This makes it possible to run PowerShell cmdlets from both Windows and non-Windows devices. Note that this feature is more targeted against advanced users and developers.

Windows PowerShell Web Access – If you have used Microsoft Exchange Server`s webmail functionality, OWA, this feature will look familiar. The sign in page for PowerShell Web Access looks very similar to the OWA sign in page. When logged in, you will be presented with a PowerShell session. This makes it easy to use PowerShell both from a web browser on your computer as well as from mobile devices such as an Iphone or Windows Phone. Note that this feature requires Windows Server 2012. You can find instructions on how to configure this feature in this article on Microsoft TechNet.

Updateable help – Until PowerShell 3.0 the help files that is parsed when you are using the Get-Help cmdlet has been a part of the installation. Updating these files have not been possible, since rolling out help files through the channels for updating the operatingsystem (Windows Update, WSUS) could not be justified. Due to this reason, it was not possible for the PowerShell team to correct errors and enhance the help files after the product had shipped. To overcome this limitation, a new feature named updateable help has been added in version 3.0. There is a new cmdlet called Update-Help you can execute in order to update the help files. If you need to download the files in order to bring them over to a computer not connected to the internet you can use the Save-Help cmdlet. You can read more about updateable help in this article by PowerShell MVP Don Jones.

Microsoft Script Explorer – Technically this is not a part of PowerShell 3.0, but rather a standalone download released in the same timeframe as PowerShell 3.0. Using Script Explorer you can search for scripts and other resources on both Microsoft TechNet as well as 3rd party repositories and local UNC-paths, for example a company repository. Script Explorer can either be run as a standalone application or integrated into the PowerShell ISE as an add-on. By integrating it to the ISE you can copy scripts you find directly in to the editor. Script Explorer will also support Windows PowerShell 2.0.

In addition to the above mentioned features, there has been made a great number of bug fixes and enhancements based on feedback from Microsoft Connect.


European Windows 2008 R2 Hosting - Spain :: How to Determine I/O Usage on the Server?

clock September 18, 2013 11:29 by author Scott

Have you ever imagine what process that consume I/O usage on our server? I searched on on forums but I cant find definitely the answer. I still doubt about the answer. I try to find myself and make some experience.  In this post, I will show some analysis how can we determine the I/O usage on our server.

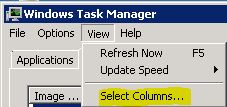
The easiest way to get a quick view into your I\O usage is to use Task Manager.  I will show you how to find that information.  First you need to open up Task Manager.  To do this, right click the task bar and choose Start Task Manager.  When you have it running, click the Processes tab.  Then from the menu choose View -> Select Columns… 

This will bring up the Select Process Page Columns.  Scroll down to the bottom and put a check beside I/O Reads, I/O Writes, I/O Read Bytes, and I/O Write Bytes. 

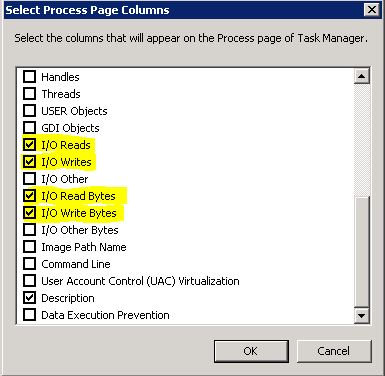
Click OK when you are finished and the columns will be added to Task Manager.  You should note that the numbers listed in Task Manager are totals for each of those items since the last boot of the system. 

Here is a description of the columns of the counters that were added to Task Manager above.

I/O Reads -  The number of read input/output operations generated by a process, including file, network, and device I/Os. I/O Reads directed to CONSOLE (console input object) handles are not counted.

I/O Writes – The number of write input/output operations generated by a process, including file, network, and device I/Os. I/O Writes directed to CONSOLE (console input object) handles are not counted.

I/O Read Bytes – The number of bytes read in input/output operations generated by a process, including file, network, and device I/Os. I/O Read Bytes directed to CONSOLE (console input object) handles are not counted.

I/O Write Bytes – The number of bytes written in input/output operations generated by a process, including file, network, and device I/Os. I/O Write Bytes directed to CONSOLE (console input object) handles are not counted.

You can look at the new columns that are showing up in Task Manager and see the processes that have used the most I/O since the last reboot of the server.  Often this is all the information you need to narrow down the top I/O usage per process.

Sometimes using Task Manager is not enough to help you narrow down the usage.  Maybe you need to know what is using the I\O right now or want to paint a picture of I\O usage over the next 7 days.  That is a good job for Performance Monitor.  Before we look at how to add the counters to Performance Monitor, here is the mapping of the Task Manager Columns that were described above and their corresponding Performance Monitor Counters:

Task Manager

Performance Monitor

I/O Reads

Process\I/O Read Operations/sec

I/O Writes

Process\I/O Write Operations/sec

I/O Read Bytes

Process\I/O Read Bytes/sec

I/O Write Bytes

Process\I/O Write Bytes/sec

To start up Performance Monitor click the Start button.  In the 'Search programs and files' text box enter perfmon. 

Select perfmon that shows up in the results to open up Performance Monitor.  Once you have it open, select Performance Monitor from the left menu so that it is highlighted.  That will start allowing Performance Monitor to collect information.  Next click the green Plus icon to add a counter. 

When the Add Counters dialog window comes up, look for the Process object and click the plus to the right of it.  That will expand the counters that are under the Process object.  Based on the information that you got from Task Manager above, you can now add the appropriate counter.  You will notice that when you select a counter it also wants to know if you want the _Total (the total amount from all processes for that counter), 'all instances' which will add all the instances to Performance Monitor, or a specific process.  I recommend that you set the counter up for one or more specific processes that you previously found with the total highest I/O listed in Task Manager.  Choosing 'all instances' will make it hard to read the results and might cause some additional resource usage on your server. 

Using this information you should now be able to track down what is using the most I/O on your system.

NOTE:  The step by step instructions in this article are based on Windows 2008 R2.  The I/O information pertains to earlier Operating Systems as well but the actual steps might be different.


About HostForLIFE.eu

HostForLIFE.eu is European Windows Hosting Provider which focuses on Windows Platform only. We deliver on-demand hosting solutions including Shared hosting, Reseller Hosting, Cloud Hosting, Dedicated Servers, and IT as a Service for companies of all sizes.

We have offered the latest Windows 2016 Hosting, ASP.NET Core 2.2.1 Hosting, ASP.NET MVC 6 Hosting and SQL 2017 Hosting.


Tag cloud

Sign in