We believe that some of you’re looking for this new features on LightSwitch 2013. We also support the latest Visual Studio LightSwitch 2013. You can take a look our hosting plan. In today post I will show what’s new on Visual Studio LightSwitch 2013.

Targeting .NET 4.5
A LightSwitch solution is composed of a server-side project based on ASP.NET and client projects based on either Silverlight (desktop), the new HTML client, or both. Until Visual Studio 2012 Update 3 (the latest update available when this article was written), the server project targeted .NET Framework 4.0. In Visual Studio 2013, the server project targets .NET Framework 4.5, enabling developers to take advantage of all the benefits of the latest version of ASP.NET and the .NET platform.
New Structure and Solution Explorer Enhancements
There are many important changes in how LightSwitch projects are created and structured in Visual Studio 2013. The first important change is that every screen and every table is now represented by a file with the .lsml extension. These files are based on the XML markup language, and they make it easier to give projects a better organization.
Please take a look this image below:
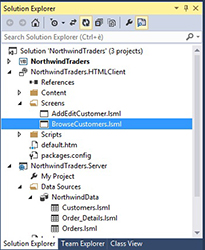
Every .lsml file has a code-behind file. For instance, a screen in the Silverlight client can have a Visual Basic or C# code-behind file, whereas in the HTML client .lsml files have JavaScript code-behind files. On the server side, table definition files with the .lsml extension always have VB or C# code-behind files, depending on which programming language you chose when creating the project.
The new project structure also affects Solution Explorer in other areas. Visual Studio 2013 no longer offers Logical view and File view; you simply have the usual classic view of any kind of project you can open in Visual Studio. This change makes the LightSwitch development environment even simpler and provides a more logical approach. You can compare the new view to an extended File view. You also can take advantage of all the best tools offered by Solution Explorer since Visual Studio 2012 (a blog post on MSDN explains the details), such as search, scoping, and duplicate views.
Improved Team Development
Another important improvement thanks to the new project structure affects team development. If you've had a chance to work with Team Foundation Server and source control over a LightSwitch application, you know how painful merging changes can be. In previous versions of LightSwitch, not all elements in the solution were managed by the source control engine. Now that everything is basically a file, every element is added to source control, allowing Team Foundation Server to manage the application changes correctly, thereby enabling team members to be more productive and efficient.
Easier Navigation
Switching between designers and visual elements is a frequent task. To make this common task easier, LightSwitch now offers the following options:
- Navigation buttons are available on the left end of the standard toolbar. With these buttons, you can easily go back and forward to elements you worked with previously.
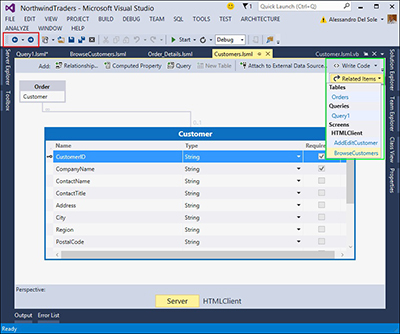
- The Related Items drop-down list, available at the upper-right corner of any designer allows for easy navigation to screens, entities, and queries that have a relationship with the item you're currently viewing.
Enhanced Views with Multiple Designers
One of the biggest limitations in previous editions of the IDE in LightSwitch was the inability to open multiple designers concurrently. This feature was requested frequently, as you often need to copy-and-paste items from one screen or table to another.
HTML Client: JavaScript IntelliSense and DOM Explorer Improvements
At a higher level, Visual Studio 2013 has added several improvements to the JavaScript code editor and the DOM Explorer window. Because such improvements are part of Visual Studio, the LightSwitch development experience can take advantage of them as well. The code editor for JavaScript has been dramatically improved; for instance, all the occurrences of an identifier are now highlighted, and a navigation bar at the upper-right corner makes it easier to browse methods and declarations, as shown in image below.
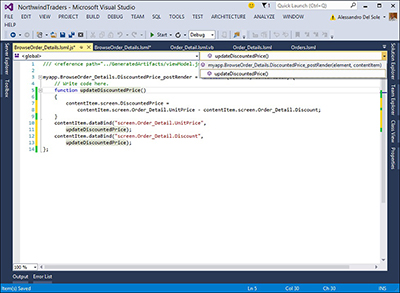
Another great new improvement in the coding experience is the new auto brace complete. With this feature, Visual Studio 2013 automatically adds closing quotes, parentheses, brackets, and braces for you as you type code.
The DOM Explorer window allows for inspecting the Document Object Model (DOM) of an HTML page while it's being shown—a particularly handy feature at debugging time. In Visual Studio 2013, DOM Explorer highlights in yellow the parts of the HTML page that are being rendered; such highlights are very useful for understand the rendering progress. DOM Explorer also now supports direct editing, meaning that you can add new HTML attributes to the code while inspecting the page. The right side of the window provides additional tools for inspecting styles and layout properties, including events
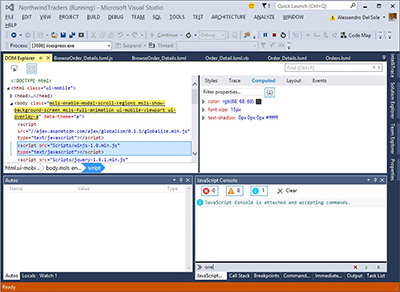
The JavaScript interactive console now supports IntelliSense, which makes testing code a faster and sharper task.
Intrinsic Database Management with Linked Database Projects
When you create tables in a LightSwitch application, a SQL Server database (the intrinsic database) is created for you. Then you can publish the database along with the application via the deployment wizard or with SQL scripts. Visual Studio 2013 brings an interesting new opportunity: You can link the intrinsic database to a SQL Server database project. This feature opens an incredible number of scenarios, such as writing custom scripts or adding stored procedures into the intrinsic database.
Looking forward to try this new feature? Please check http://www.hostforlife.eu. We have offered the latest Visual Studio 2013 hosting on our hosting environment.