European Windows 2012 Hosting BLOG

BLOG about Windows 2012 Hosting and SQL 2012 Hosting - Dedicated to European Windows Hosting Customer

European SQL 2017 Hosting :: How To Call A Web Service From SQL Server?

clock April 24, 2019 11:27 by author Peter

In this blog, I have shown the process of calling web services through a stored procedure in SQL Server database. Also, I have explained how to call a stored procedure with a SOAP Envelope.

Step 1
Create a stored procedure in your SQL Server.
  CREATE proc [dbo].[spHTTPRequest]    
        @URI varchar(2000) = 'http://localhost:55253/',         
        @methodName varchar(50) = 'Get',    
        @requestBody varchar(8000) = '',    
        @SoapAction varchar(255),    
        @UserName nvarchar(100), -- Domain\UserName or UserName    
        @Password nvarchar(100),    
        @responseText varchar(8000) output   
  as   
  SET NOCOUNT ON   
  IF    @methodName = ''   
  BEGIN   
        select FailPoint = 'Method Name must be set'   
        return   
  END   
  set   @responseText = 'FAILED'   
  DECLARE @objectID int   
  DECLARE @hResult int   
  DECLARE @source varchar(255), @desc varchar(255)    
  EXEC @hResult = sp_OACreate 'MSXML2.ServerXMLHTTP', @objectID OUT   
  IF @hResult <> 0    
  BEGIN   
        EXEC sp_OAGetErrorInfo @objectID, @source OUT, @desc OUT   
        SELECT      hResult = convert(varbinary(4), @hResult),    
                    source = @source,    
                    description = @desc,    
                    FailPoint = 'Create failed',    
                    MedthodName = @methodName    
        goto destroy    
        return   
  END   
  -- open the destination URI with Specified method    
  EXEC @hResult = sp_OAMethod @objectID, 'open', null, @methodName, @URI, 'false', @UserName, @Password   
  IF @hResult <> 0    
  BEGIN   
        EXEC sp_OAGetErrorInfo @objectID, @source OUT, @desc OUT   
        SELECT      hResult = convert(varbinary(4), @hResult),    
              source = @source,    
              description = @desc,    
              FailPoint = 'Open failed',    
              MedthodName = @methodName    
        goto destroy    
        return   
  END   
  -- set request headers    
  EXEC @hResult = sp_OAMethod @objectID, 'setRequestHeader', null, 'Content-Type', 'text/xml;charset=UTF-8'   
  IF @hResult <> 0    
  BEGIN   
        EXEC sp_OAGetErrorInfo @objectID, @source OUT, @desc OUT   
        SELECT      hResult = convert(varbinary(4), @hResult),    
              source = @source,    
              description = @desc,    
              FailPoint = 'SetRequestHeader failed',    
              MedthodName = @methodName    
        goto destroy    
        return   
  END   
  -- set soap action    
  EXEC @hResult = sp_OAMethod @objectID, 'setRequestHeader', null, 'SOAPAction', @SoapAction    
  IF @hResult <> 0    
  BEGIN   
        EXEC sp_OAGetErrorInfo @objectID, @source OUT, @desc OUT   
        SELECT      hResult = convert(varbinary(4), @hResult),    
              source = @source,    
              description = @desc,    
              FailPoint = 'SetRequestHeader failed',    
              MedthodName = @methodName    
        goto destroy    
        return   
  END   
  declare @len int   
  set @len = len(@requestBody)    
  EXEC @hResult = sp_OAMethod @objectID, 'setRequestHeader', null, 'Content-Length', @len    
  IF @hResult <> 0    
  BEGIN   
        EXEC sp_OAGetErrorInfo @objectID, @source OUT, @desc OUT   
        SELECT      hResult = convert(varbinary(4), @hResult),    
              source = @source,    
              description = @desc,    
              FailPoint = 'SetRequestHeader failed',    
              MedthodName = @methodName    
        goto destroy    
        return   
  END   
  /*   
  -- if you have headers in a table called RequestHeader you can go through them with this   
  DECLARE @HeaderKey varchar(500), @HeaderValue varchar(500)   
  DECLARE RequestHeader CURSOR  
  LOCAL FAST_FORWARD   
  FOR  
        SELECT      HeaderKey, HeaderValue   
        FROM RequestHeaders   
        WHERE       Method = @methodName   
  OPEN RequestHeader   
  FETCH NEXT FROM RequestHeader   
  INTO @HeaderKey, @HeaderValue   
  WHILE @@FETCH_STATUS = 0   
  BEGIN  
        --select @HeaderKey, @HeaderValue, @methodName   
        EXEC @hResult = sp_OAMethod @objectID, 'setRequestHeader', null, @HeaderKey, @HeaderValue   
        IF @hResult <> 0   
        BEGIN  
              EXEC sp_OAGetErrorInfo @objectID, @source OUT, @desc OUT  
              SELECT      hResult = convert(varbinary(4), @hResult),   
                    source = @source,   
                    description = @desc,   
                    FailPoint = 'SetRequestHeader failed',   
                    MedthodName = @methodName   
              goto destroy   
              return  
        END  
        FETCH NEXT FROM RequestHeader   
        INTO @HeaderKey, @HeaderValue   
  END  
  CLOSE RequestHeader   
  DEALLOCATE RequestHeader   
  */    
  -- send the request    
  EXEC @hResult = sp_OAMethod @objectID, 'send', null, @requestBody    
  IF    @hResult <> 0    
  BEGIN   
        EXEC sp_OAGetErrorInfo @objectID, @source OUT, @desc OUT   
        SELECT      hResult = convert(varbinary(4), @hResult),    
              source = @source,    
              description = @desc,    
              FailPoint = 'Send failed',    
              MedthodName = @methodName    
        goto destroy    
        return   
  END   
  declare @statusText varchar(1000), @status varchar(1000)    
  -- Get status text    
  exec sp_OAGetProperty @objectID, 'StatusText', @statusText out   
  exec sp_OAGetProperty @objectID, 'Status', @status out   
  select @status, @statusText, @methodName    
  -- Get response text    
  exec sp_OAGetProperty @objectID, 'responseText', @responseText out   
  IF @hResult <> 0    
  BEGIN   
        EXEC sp_OAGetErrorInfo @objectID, @source OUT, @desc OUT   
        SELECT      hResult = convert(varbinary(4), @hResult),    
              source = @source,    
              description = @desc,    
              FailPoint = 'ResponseText failed',    
              MedthodName = @methodName    
        goto destroy    
        return   
  END   
  destroy:    
        exec sp_OADestroy @objectID    
  SET NOCOUNT OFF   
      
  GO   


The Stored Procedure takes the following parameters.
  @URI: the URI of the web service
  @MethodName: this would be ‘GET’ or ‘POST’
  @RequestBody: this is the SOAP xml that you want to send
  @SoapAction: this the operation that you want to call on your service
  @UserName: NT UserName if your web service requires authentication
  @Password: the password if using NT Authentication on the web service
  @ResponseText: this is an out parameter that contains the response from the web service


Step 2
Make the setting in SQL for it.
  Use master 
  sp_configure 'show advanced options', 1  
   
  GO  
  RECONFIGURE;  
  GO  
  sp_configure 'Ole Automation Procedures', 1  
  GO  
  RECONFIGURE;  
  GO  
  sp_configure 'show advanced options', 1  
  GO  
  RECONFIGURE; 


Step 3

Call the stored procedure (Here is a sample call to my service).
  declare @xmlOut varchar(8000) 
  Declare @RequestText as varchar(8000); 
  set @RequestText= 
  '<soapenv:Envelope xmlns:soapenv="http://schemas.xmlsoap.org/soap/envelope/" xmlns:tem="http://tempuri.org/"> 
     <soapenv:Header/> 
     <soapenv:Body> 
        <tem:CreateOrder> 
           <!--Optional:--> 
           <tem:OrderRequest> 
              <tem:OrderId>200</tem:OrderId> 
              <!--Optional:--> 
              <tem:OrderName>something</tem:OrderName> 
           </tem:OrderRequest> 
        </tem:CreateOrder> 
     </soapenv:Body> 
  </soapenv:Envelope>' 
  exec spHTTPRequest 
  'http://localhost/testwebservices/helloworldservice.asmx', 
  'POST', 
  @RequestText, 
  'http://tempuri.org/CreateOrderForMe',   -- this is your SOAPAction: 
  '', '', @xmlOut out 
  select @xmlOut  


Make sure your SOAP action is correct. Copy this action from your services. It will show up when your service is RUN.


European SQL 2017 Hosting :: How to Create Registration Form in ASP.NET with SQL Server Database

clock March 19, 2019 11:25 by author Scott

In this post we will see how to create ASP.NET Registration form and save its data in MS SQL Database. It will be quite simple form with values like Employee Id, Employee name, Date of Birth, Country, State, City names and more. We will be also adding Profile Image of the user and saving it to ASP.NET Project’s folder to complete our Registration form data. So let’s see.

I’m also using AJAX to create this registration form in ASP.NET. You can add it to your project by using Visual Studio’s Nuget Manager Console.

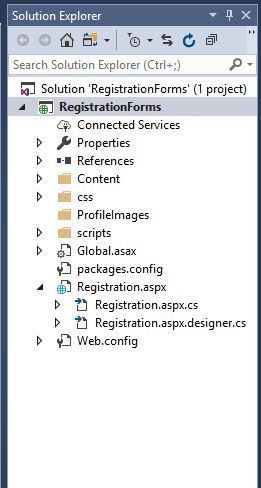
First create a new ASP.NET web project in Visual studio. I’m using Visual studio 2017 to create this registration form for ASP.NET.

Now add a new ASPX form with name Registration.aspx and edit it as below:

Registration.aspx:

<%@ Page Language="C#" AutoEventWireup="true" CodeBehind="Registration.aspx.cs"
Inherits="RegistrationForms.Registration" ValidateRequest="true"%>

<%@ Register Assembly="AjaxControlToolkit" Namespace="AjaxControlToolkit" TagPrefix="ajax" %>
<!DOCTYPE html>

<html xmlns="http://www.w3.org/1999/xhtml">
<head runat="server">
<link href="css/bootstrap.min.css" rel="stylesheet" />
<style>
.borderless td, .borderless th {
border: none;
border-color: Red;
}

.table-condensed > thead > tr > th, .table-condensed > tbody > tr > th, .table-condensed > tfoot > tr > th, .table-condensed > thead > tr > td, .table-condensed > tbody > tr > td, .table-condensed > tfoot > tr > td {
padding: 3px;
}

input, select {
border-radius: 3px;
padding: 1px;
border: 1px solid darkgray;
}

.btnCoral {
background-color: crimson;
color: #fff;
}

body {
/* Permalink - use to edit and share this gradient: http://colorzilla.com/gradient-editor/#1e5799+0,2989d8+50,207cca+51,7db9e8+100;Blue+Gloss+Default */
background: #1e5799; /* Old browsers */
background: -moz-linear-gradient(top, #1e5799 0%, #2989d8 50%, #207cca 51%, #7db9e8 100%); /* FF3.6-15 */
background: -webkit-linear-gradient(top, #1e5799 0%,#2989d8 50%,#207cca 51%,#7db9e8 100%); /* Chrome10-25,Safari5.1-6 */
background: linear-gradient(to bottom, #1e5799 0%,#2989d8 50%,#207cca 51%,#7db9e8 100%); /* W3C, IE10+, FF16+, Chrome26+, Opera12+, Safari7+ */
filter: progid:DXImageTransform.Microsoft.gradient( startColorstr='#1e5799', endColorstr='#7db9e8',GradientType=0 ); /* IE6-9 */
}

.parent-container {
background-color: black;
width:70%;
}

.container {
background-color: white;
margin:2px;
width:auto;
}

</style>
<title>Registration Form</title>
</head>
<body>
<form id="form1" runat="server">
<asp:ScriptManager runat="server" />
<div class="parent-container">
<div class="container">
<table class="table-condensed borderless">
<tr>
<td align="center" colspan="2">
<h2 style="background-color: black; color: White; padding: 5px;">REGISTRATION FORM</h2>
</td>
</tr>
<tr>
<td align="right">EMP Id:</td>
<td align="left">
<asp:TextBox runat="server" ID="txtEmpId" />
<asp:RequiredFieldValidator runat="server" ControlToValidate="txtEmpId" ErrorMessage="*" ForeColor="Red"
ValidateRequestMode="Enabled"/>
</td>
</tr>
<tr>
<td align="right">Name:</td>
<td align="left">
<asp:TextBox runat="server" ID="txtName" />
<asp:RequiredFieldValidator runat="server" ControlToValidate="txtName" ErrorMessage="*" ForeColor="Red" />
</td>
</tr>
<tr>
<td align="right">Date of Birth:</td>
<td align="left">
<asp:TextBox runat="server" ID="txtDOB" />
<ajax:CalendarExtender runat="server" Format="yyyy-MM-dd" TargetControlID="txtDOB" />

<asp:RequiredFieldValidator runat="server" ControlToValidate="txtDOB" ErrorMessage="*" ForeColor="Red" />
</td>
</tr>
<tr>
<td align="right">Address:</td>
<td align="left">
<asp:TextBox runat="server" ID="txtAddress" />
<asp:RequiredFieldValidator runat="server" ControlToValidate="txtAddress" ErrorMessage="*" ForeColor="Red" />
</td>
</tr>
<tr>
<td align="right">Country:</td>
<td align="left">
<asp:DropDownList runat="server" ID="ddCountry"
AutoPostBack="true" OnSelectedIndexChanged="ddCountry_SelectedIndexChanged" /></td>
</tr>
<tr>
<td align="right">State:</td>
<td align="left">
<asp:DropDownList runat="server" ID="ddState"
AutoPostBack="true" OnSelectedIndexChanged="ddState_SelectedIndexChanged" /></td>
</tr>
<tr>
<td align="right">City:</td>
<td align="left">
<asp:DropDownList runat="server" ID="ddCity" /></td>
</tr>
<tr>
<td align="right">Pincode:</td>
<td align="left">
<asp:TextBox runat="server" ID="txtPincode" />
<asp:RequiredFieldValidator runat="server" ControlToValidate="txtPincode" ErrorMessage="*" ForeColor="Red" />
</td>
</tr>
<tr>
<td align="right">Date of Joining:</td>
<td align="left">
<asp:TextBox runat="server" ID="txtDOJ" />
<ajax:CalendarExtender runat="server" Format="yyyy-MM-dd" TargetControlID="txtDOJ" />
<asp:RequiredFieldValidator runat="server" ControlToValidate="txtDOJ" ErrorMessage="*" ForeColor="Red" />
</td>
</tr>
<tr>
<td align="right">Department:</td>
<td align="left">
<asp:DropDownList runat="server" ID="ddDepartment" /></td>
</tr>
<tr>
<td align="right">Role:</td>
<td align="left">
<asp:DropDownList runat="server" ID="ddRole">

<asp:ListItem Text="USER" Value="USER" />
<asp:ListItem Text="ROLE" Value="ROLE" />

</asp:DropDownList></td>
</tr>
<tr>
<td align="right">Profile Pic:</td>
<td align="left" valign="middle">
<asp:FileUpload runat="server" ID="fileUpload" />
<asp:Button runat="server" Text="Upload" ID="btnUpload" OnClick="btnUpload_Click" />

<asp:Image ID="imgProfile" runat="server" Width="150px" Height="150px" />
</td>
</tr>

<tr>
<td align="right">Email ID:</td>
<td align="left">
<asp:TextBox runat="server" ID="txtEmail" />
<asp:RequiredFieldValidator runat="server" ControlToValidate="txtEmail" ErrorMessage="*" ForeColor="Red" />
<asp:RegularExpressionValidator runat="server" ValidationExpression="\w+([-+.]\w+)*@\w+([-.]\w+)*\.\w+([-.]\w+)*" ControlToValidate="txtEmail"
ErrorMessage="Email address invalid" />
</td>
</tr>
<tr>
<td align="right">Password:</td>
<td align="left">
<asp:TextBox runat="server" ID="txtpassword" TextMode="Password"/>
<asp:RequiredFieldValidator runat="server" ControlToValidate="txtpassword" ErrorMessage="*" ForeColor="Red" />
</td>
</tr>
<tr>
<td align="right">Confirm Password:</td>
<td align="left">
<asp:TextBox runat="server" ID="txtConfirmPassword" TextMode="Password"/></td>
</tr>
<tr>
<td colspan="20">
<asp:CompareValidator ID="comparePasswords"
runat="server"
ControlToCompare="txtpassword"
ControlToValidate="txtConfirmPassword"
ErrorMessage="Passwords do not match up."
ForeColor="Red" />
</td>
</tr>
<tr>
<td colspan="2" align="center">
<br />
<asp:Button runat="server" ID="btnSubmit" Text="Submit" OnClick="btnSubmit_Click"
CssClass="btn btnCoral" />
</td>
</tr>
<tr>
<td colspan="2">
<asp:Label runat="server" ID="lblInfo" />
</td>
</tr>
</table>
</div>

</div>
</form>
</body>
</html>


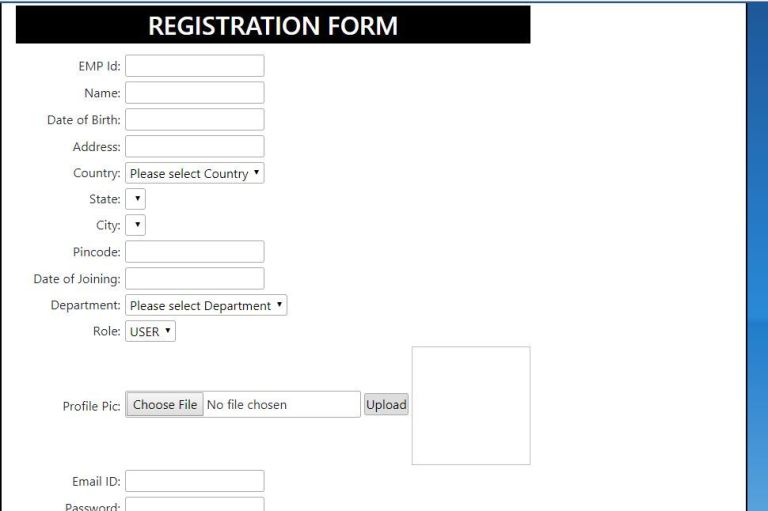
Ajax’s Data picker is used to set Date of Birth and Date of Joining information of the employee to complete the registration process.

Profile picture will be saved inside “ProfileImages” folder.


And below is my code for the registration page:

using System;
using System.Data.SqlClient;
using System.Data;
using System.Configuration;
using System.IO;
using System.Web.UI;

namespace RegistrationForms
{
public partial class Registration : System.Web.UI.Page
{
SqlConnection con;
SqlCommand cmd;
SqlDataAdapter adapter;
SqlDataReader reader;
DataSet ds;
DataTable dt;

protected void Page_Load(object sender, EventArgs e)
{
if (!IsPostBack)
{
LoadCountries();
LoadDepartment();
}
}

public void LoadDepartment()
{
try
{
con = new SqlConnection(ConfigurationManager.ConnectionStrings["connectionstring"].ConnectionString);
cmd = new SqlCommand("Select * from tblDepartments", con);
con.Open();
adapter = new SqlDataAdapter(cmd);
dt = new DataTable();
adapter.Fill(dt);

if (dt.Rows.Count > 0)
{
DataRow dr = dt.NewRow();
dr["DeptId"] = 0;
dr["Department"] = "Please select Department";
dt.Rows.InsertAt(dr, 0);

ddDepartment.DataSource = dt;
ddDepartment.DataTextField = "Department";
ddDepartment.DataValueField = "DeptId";
ddDepartment.DataBind();
}
adapter.Dispose();
cmd.Dispose();
con.Close();
}
catch (Exception ex)
{
lblInfo.Text = ex.Message.ToString();
}
}
public void LoadCountries()
{
try
{
con = new SqlConnection(ConfigurationManager.ConnectionStrings["connectionstring"].ConnectionString);
cmd = new SqlCommand("Select * from tblCountries", con);
con.Open();
adapter = new SqlDataAdapter(cmd);
dt = new DataTable();
adapter.Fill(dt);

if (dt.Rows.Count > 0)
{
DataRow dr = dt.NewRow();
dr["CountryId"] = 0;
dr["Country"] = "Please select Country";
dt.Rows.InsertAt(dr, 0);


ddCountry.DataSource = dt;
ddCountry.DataTextField = "Country";
ddCountry.DataValueField = "CountryId";
ddCountry.SelectedIndex = 0;
ddCountry.DataBind();
}
adapter.Dispose();
cmd.Dispose();
con.Close();
}
catch (Exception ex)
{
lblInfo.Text = ex.Message.ToString();
}

}
protected void btnSubmit_Click(object sender, EventArgs e)
{
try
{
if (Page.IsValid)
{

con = new SqlConnection(ConfigurationManager.ConnectionStrings["connectionString"].ConnectionString);
cmd = new SqlCommand();
cmd.CommandType = CommandType.StoredProcedure;
cmd.CommandText = "sp_AddUsers";
cmd.Connection = con;
cmd.Parameters.AddWithValue("@UserId", txtEmpId.Text.ToString());
cmd.Parameters.AddWithValue("@Name", txtName.Text.ToString());
cmd.Parameters.AddWithValue("@DOB", txtDOB.Text.ToString());
cmd.Parameters.AddWithValue("@Address", txtAddress.Text.ToString());
cmd.Parameters.AddWithValue("@City", ddCity.SelectedValue.ToString());
cmd.Parameters.AddWithValue("@State", ddState.SelectedValue.ToString());
cmd.Parameters.AddWithValue("@Country", ddCountry.SelectedValue.ToString());
cmd.Parameters.AddWithValue("@Pincode", txtPincode.Text.ToString());
cmd.Parameters.AddWithValue("@Department", ddDepartment.SelectedValue.ToString());
cmd.Parameters.AddWithValue("@UserRole", ddRole.SelectedItem.Text.ToString());
cmd.Parameters.AddWithValue("@Passcode", txtpassword.Text.ToString());
cmd.Parameters.AddWithValue("@DOJ", txtDOJ.Text.ToString());
cmd.Parameters.AddWithValue("@ProfilePic", imgProfile.ImageUrl.ToString());
cmd.Parameters.AddWithValue("@EmailId", txtEmail.Text.ToString());
con.Open();
cmd.ExecuteNonQuery();
cmd.Dispose();
con.Close();
ShowAlert("Success", "Saved Successfully");
ClearFeilds();
}
else
ShowAlert("Error", "Please enter all fields");
}
catch (Exception ex)
{

}
}

public void ShowAlert(String header, String message)
{
ScriptManager.RegisterStartupScript(this, GetType(), header, "alert('" + message + "');", true);
}

public void ClearFeilds()
{
txtAddress.Text = "";
txtConfirmPassword.Text = "";
txtDOB.Text = "";
txtDOJ.Text = "";
txtEmail.Text = "";
txtEmpId.Text = "";
txtName.Text = "";
txtpassword.Text = "";
txtPincode.Text = "";
LoadCountries();
}
protected void ddCountry_SelectedIndexChanged(object sender, EventArgs e)
{
LoadState();
}

public void LoadState()
{
try
{
con = new SqlConnection(ConfigurationManager.ConnectionStrings["connectionstring"].ConnectionString);
cmd = new SqlCommand("Select * from tblStates where CountryId=@id", con);
cmd.Parameters.AddWithValue("@id", ddCountry.SelectedValue.ToString());
con.Open();
adapter = new SqlDataAdapter(cmd);
dt = new DataTable();
adapter.Fill(dt);

if (dt.Rows.Count > 0)
{
DataRow dr = dt.NewRow();
dr["StateId"] = 0;
dr["State"] = "Please select State";
dr["CountryId"] = "0";
dt.Rows.InsertAt(dr, 0);
ddState.Items.Clear();
ddState.ClearSelection();
ddState.DataSource = dt;
ddState.DataTextField = "State";
ddState.DataValueField = "StateId";
ddState.DataBind();
ddState.SelectedValue = null;
ddState.SelectedIndex = 0;
ddCity.Items.Clear();
ddCity.SelectedValue = null;
}
adapter.Dispose();
cmd.Dispose();
con.Close();
}
catch (Exception ex)
{
}
}

protected void ddState_SelectedIndexChanged(object sender, EventArgs e)
{
try
{
con = new SqlConnection(ConfigurationManager.ConnectionStrings["connectionstring"].ConnectionString);
cmd = new SqlCommand("Select * from tblCities where Stateid=@id", con);
cmd.Parameters.AddWithValue("@id", ddState.SelectedValue.ToString());
con.Open();
adapter = new SqlDataAdapter(cmd);
dt = new DataTable();
adapter.Fill(dt);

if (dt.Rows.Count > 0)
{
DataRow dr = dt.NewRow();
dr["CityId"] = 0;
dr["City"] = "Please select City";
dr["StateId"] = "0";
dt.Rows.InsertAt(dr, 0);
ddCity.DataSource = null;
ddCity.DataSource = dt;
ddCity.DataTextField = "City";
ddCity.DataValueField = "CityId";
ddCity.DataBind();
ddCity.SelectedValue = null;
ddCity.SelectedIndex = 0;
}
adapter.Dispose();
cmd.Dispose();
con.Close();
}
catch (Exception ex)
{
}
}

protected void btnUpload_Click(object sender, EventArgs e)
{
try
{
if (fileUpload.HasFile)
{
string fileName = Path.GetFileName(fileUpload.PostedFile.FileName);
fileUpload.PostedFile.SaveAs(Server.MapPath("~/ProfileImages/") + fileName);
imgProfile.ImageUrl = "~/ProfileImages/" + fileName;
}
}
catch (Exception ex)
{
lblInfo.Text = "Image upload: " + ex.Message.ToString();
}
}
}
}

Below is the Database script (MS SQL Database):

--Create database [ESource]
USE [ESource]

CREATE TABLE [dbo].[tblStates](
[StateId] [int] IDENTITY(1,1) NOT NULL,
[State] [nvarchar](50) NOT NULL,
[CountryId] [int] NOT NULL
)

CREATE TABLE [dbo].[tblCities](
[CityId] [int] IDENTITY(1,1) NOT NULL,
[City] [nvarchar](50) NOT NULL,
[StateId] [int] NOT NULL
)

CREATE TABLE [dbo].[tblCountries](
[CountryId] [int] IDENTITY(1,1) NOT NULL,
[Country] [nvarchar](50) NOT NULL
)

CREATE TABLE [dbo].[tblDepartments](
[DeptId] [int] IDENTITY(1,1) NOT NULL,
[Department] [nvarchar](50) NOT NULL
)

CREATE TABLE [dbo].[tblUserDetails](
[EId] [int] IDENTITY(1,1) NOT NULL,
[EmailId] [nvarchar](50) NOT NULL,
[UserId] [nvarchar](50) NULL,
[Passcode] [nvarchar](50) NOT NULL,
[Name] [nvarchar](50) NOT NULL,
[DOB] [datetime] NOT NULL,
[Address] [nvarchar](max) NOT NULL,
[City] [nvarchar](50) NOT NULL,
[Pincode] [int] NOT NULL,
[State] [nvarchar](50) NOT NULL,
[Country] [nvarchar](50) NOT NULL,
[Department] [nvarchar](50) NOT NULL,
[DOJ] [datetime] NOT NULL,
[ProfilePic] [nvarchar](max) NOT NULL,
[UserRole] [nvarchar](50)
)

CREATE procedure [dbo].[sp_AddUsers]
(
@UserId nvarchar(50),
@Passcode nvarchar(50),
@Name nvarchar(50),
@DOB datetime,
@Address nvarchar(max),
@City int,
@Pincode nvarchar(50),
@State int,
@Country int,
@Department int,
@DOJ datetime,
@ProfilePic nvarchar(max),
@UserRole nvarchar(50),
@EmailId nvarchar(50)
)
as begin
Insert into tblUserDetails
(UserId,Passcode,Name,DOB,Address,City,Pincode,State,Country,Department,DOJ,ProfilePic,UserRole,EmailId)
values
(@UserId,@Passcode,@Name,@DOB,@Address,@City,@Pincode,@State,@Country,@Department,@DOJ,@ProfilePic,@UserRole,@EmailId);
end
GO


European SQL Hosting - Amsterdam :: SQL Injection? How to Prevent It?

clock June 19, 2013 08:10 by author Scott

This article talk about what SQL injection is, how can that effect the security of our websites and what steps should be taken to create an ASP.NET application SQL injection proof. SQL injection is the attack in which the user of the website will input some SQL code as input which would result in creating a SQL statement that developers didn't intend to write. These SQL statements could result in unauthorized access, revealing secret user information and sometimes it could even wipe out the entire data lying on the server.


Getting to know SQL Injection

Let us take this discussion a little further by looking into the bad coding practices that will make the application prone to the SQL injection attacks. Let us create a simple table that contains username and password of the user for authentication.

Now I will create a small page that lets the user to enter his login credentials and get them validated against the Users table.

Note: Password should never be stored in plain text. This table contains password in plain text just for the sake of simplicity of this article.

The actual code that I will use to authenticate the user contains dynamic SQL that is being created by concatenating strings. This code will return true if the userid and password are found in the database otherwise false.  

public bool IsUserAuthenticated_Bad(string username, string password)
{
    DataTable result = null;
    try
    {
        using (SqlConnection con = new SqlConnection(ConfigurationManager.ConnectionStrings["SampleDbConnectionString1"].ConnectionString))
        {
            using (SqlCommand cmd = con.CreateCommand())
            {
                cmd.CommandType = CommandType.Text;
                cmd.CommandText = "select userID from Users where userID = '" + username + "' and password = '" + password + "'";               

                using (SqlDataAdapter da = new SqlDataAdapter(cmd))
                {
                    result = new DataTable();
                    da.Fill(result);


                    //check if any match is found
                    if (result.Rows.Count == 1)
                    {
                        // return true to indicate that userID and password are matched.
                        return true;
                    }
                }
            }
        }
    }
    catch (Exception ex)
    {
        //Pokemon exception handling
    }

    //user id not found, lets treat him as a guest       
    return false;
}

For all the normal users this code will work fine. I can even test it using userid as sampleuser and password as samplepwd and this will work fine. For any other data except this it should say that authentication failed(since this is the only record in the table). The query that will get generated to test this input will be:

select userID from Users where userID = 'sampleuser' and password = 'samplepwd'

Now let us try to inject some SQL into this page. Let me give hacker' or 1=1-- as username and anything in the password(even leave it empty). Now the resultant SQL for this will become:

select userID from Users where userID = 'hacker' or 1=1--' and password = ''

Now when we execute this query the 1=1 clause will always return true(and the password check is commented out. Now irrespective of whatever data user has entered this will SQL return a row making this function return true and in turn authenticating the user. So What I have done now is that I gained access to the website even when I didn't knew the valid user credentials.

How can I curb this problem is something we will look into details in some time. But before that let us also look at one more example of SQL injection just to get little more understanding.

In this second example we will assume that the malicious user somehow got hold of the database schema and then he is trying to manipulate the application to find some confidential information. Lets say we have a page that is supposed to show all the products that are assigned to a user in the organization.

Let us start by looking at the Product table.

Let us now look at the code that is retrieving this data:

public DataTable GetProductsAssigner_Bad(string userID)
{
    DataTable result = null;
    try
    {
        using (SqlConnection con = new SqlConnection(ConfigurationManager.ConnectionStrings["SampleDbConnectionString1"].ConnectionString))
        {
            using (SqlCommand cmd = con.CreateCommand())
            {
                cmd.CommandType = CommandType.Text;
                cmd.CommandText = "select * from Products where AssignedTo = '" + userID + "'";

                using (SqlDataAdapter da = new SqlDataAdapter(cmd))
                {
                    result = new DataTable();
                    da.Fill(result);
                }
            }
        }
    }
    catch (Exception ex)
    {
        //Pokemon exception handling
    }

    //user id not found, lets treat him as a guest       
    return result;
}

Now if I call this function with the proper data(as normal users would do) then this will show me the results. i.e. If I call this page for sampleuser the resulting query would be:

select * from Products where AssignedTo = 'sampleuser'

Now let me use this query string with this page: userID=' UNION SELECT 0 AS Expr1, password, userID FROM Users -- . Once this data is used with the current code this will show me all the username and passwords from the database. The reason will be quiet clear once we look into the resulting query of this input.

select * from Products where AssignedTo = '' UNION SELECT 0 AS Expr1, password, userID FROM Users --

Now we saw that how string concatenated dynamic SQL is prone to SQL injection. There are many other problems that could be created by injecting SQL. Imagine a scenario where the injected SQL is dropping tables or truncating all the tables. The problem in such cases would be catastrophic.

How to Prevent SQL Injection

ASP.NET provides us beautiful mechanism for prevention against the SQL injection. There are some thumb rules that should be followed in order to prevent injection attacks on our websites.

  • User input should never be trusted. It should always be validated
  • Dynamic SQL should never be created using string concatenations.
  • Always prefer using Stored Procedures. 
  • If dynamic SQL is needed it should be used with parametrized commands.
  • All sensitive and confidential information should be stored in encrypted.
  • The application should never use/access the DB with Administrator privileges. 

User input should never be trusted. It should always be validated

The basic thumb rule here is that the user input should never be trusted. First of all we should apply filters on all the input fields. If any field is supposed to take numbers then we should never accept alphabets in that. Secondly, All the inputs should be validated against a regular expression so that no SQL characters and SQL command keywords are passed to the database.

Both this filtration and validation should be done at client side using JavaScript. It would suffice for the normal user. Malicious users cans till bypass the client side validations. So to curb that all the validations should be done at server side too.

Dynamic SQL should never be created using string concatenations.

If we have dynamic SQL being created using string concatenations then we are always at the risk of getting some SQL that we are not supposed to use with the application. It is advisable to avoid the string concatenations altogether.

Always prefer using Stored Procedures.

Stored procedures are the best way of performing the DB operations. We can always be sure of that no bad SQL is being generated if we are using stored procedures. Let us create a Stored procedure for the database access required for our login page and see what is the right way of doing the database operation using stored procedure.

CREATE PROCEDURE dbo.CheckUser     
      (
      @userID varchar(20),
      @password varchar(16)
      )
AS
      select userID from Users where userID = @userID and password = @password
      RETURN

And now lets have a good version in our code using this stored procedure.

public bool IsUserAuthenticated_Good(string username, string password)
{
    DataTable result = null;
    try
    {
        using (SqlConnection con = new SqlConnection(ConfigurationManager.ConnectionStrings["SampleDbConnectionString1"].ConnectionString))
        {
            using (SqlCommand cmd = con.CreateCommand())
            {
                cmd.CommandType = CommandType.StoredProcedure;
                cmd.CommandText = "CheckUser";
                cmd.Parameters.Add(new SqlParameter("@userID", username));
                cmd.Parameters.Add(new SqlParameter("@password", password));

                using (SqlDataAdapter da = new SqlDataAdapter(cmd))
                {
                    result = new DataTable();
                    da.Fill(result);

                    //check if any match is found
                    if (result.Rows.Count == 1)
                    {
                        // return true to indicate that userID and password are matched.
                        return true;
                    }
                }
            }
        }
    }
    catch (Exception ex)
    {
        //Pokemon exception handling
    }

    //user id not found, lets treat him as a guest       
    return false;
}

If dynamic SQL is needed it should be used with parametrized commands.

If we still find our self needing the dynamic SQL in code then parametrized commands are the best way of performing such dynamic SQL business. This way we can always be sure of that no bad SQL is being generated. Let us create a parametrized command for the database access required for our Product page and see what is the right way of doing the database operation.

public DataTable GetProductsAssigner_Good(string userID)
{
    DataTable result = null;
    try
    {
        using (SqlConnection con = new SqlConnection(ConfigurationManager.ConnectionStrings["SampleDbConnectionString1"].ConnectionString))
        {
            using (SqlCommand cmd = con.CreateCommand())
            {
                cmd.CommandType = CommandType.Text;
                cmd.CommandText = "select * from Products where AssignedTo = @userID";
                cmd.Parameters.Add(new SqlParameter("@userID", userID));

                using (SqlDataAdapter da = new SqlDataAdapter(cmd))
                {
                    result = new DataTable();
                    da.Fill(result);
                }
            }
        }
    }
    catch (Exception ex)
    {
        //Pokemon exception handling
    }

    //user id not found, lets treat him as a guest       
    return result;
}

All sensitive and confidential information should be stored in encrypted.

All the sensitive information should be stored encrypted in the database. The benefit of having this is that even if somehow the user get hold of the data he will only be able to see the encrypted values which are not easy to use for someone who doesn't know the encryption technique used by the application.

The application should never use/access the DB with Administrator privileges.

This will make sure that even if the bad SQL is being passed to the Database by some injections, the database will not allow any catastrophic actions like dropping table.

Note: Refer the sample application attached to see the working examples SQL injection and how to curb them using parametrized commands and stored procedures.


European SQL 2012 Hosting - Amsterdam :: Database Backup With Compression in SQL Server 2012

clock May 17, 2013 08:20 by author Scott

In this article, we will see how to do Database Backup Compression in SQL Server 2012. To do that you can use SQL Server Management Studio and also you can use a Transact-SQL statement. So let's have a look at a practical example of how to do database backup with compression. The example is developed in SQL Server 2012 using the SQL Server Management Studio.

To visually create a Database Backup

Now Press F8 to open the Object Browser in SQL Server Management Studio and expend it.

Select database then right-click on the selected database then click on "Task" then click on "Back Up".

This will open the following window:

To specify the destination of the database, select the destination then click on the Add Button. We then see a new dialog box, click on the browse button to choose the location

Now next click on "Options" and the following screen appears:

Now select Compress Backup.

The above image contains three options to select:

  1. The first option, "Use the default server settings" tells the backup to use the server's default backup compression setting. By default, it is set to have backup compression off.
  2. The Second option "Compress Backup" turns backup compression on.
  3. The "Do not compress backup" option turns it off.

Now click again on the "General" option.

Now you will see that the database backup has completed successfully.


European SQL Hosting - Amsterdam :: How to Truncate Log File in SQL Server 2008/2008R2/2012

clock February 22, 2013 07:17 by author Scott

When we create a new database inside the SQL Server, it is typical that SQL Server creates two physical files in the Operating System: one with .MDF Extension, and another with .LDF Extension.
* .MDF is called as Primary Data File.
* .LDF is called as Transactional Log file.
 
Sometimes, it looks impossible to shrink the Truncated Log file. The following code always shrinks the Truncated Log File to minimum size possible.

USE DatabaseName

GO
ALTER DATABASE [DBName] SET RECOVERY SIMPLE WITH NO_WAIT

DBCC SHRINKFILE([DBName_log], 1)

ALTER DATABASE [DBName] SET RECOVERY FULL WITH NO_WAIT

GO


European SQL 2012 Hosting - Amsterdam :: How to Transfer Data Two SQL Server Databases

clock January 30, 2013 07:42 by author Scott

Sometimes we need to transfer database data and objects from one server to another. In this article I represent a tool which can transfer data and database objects like tables and stored procedure scripts to another SQL Server database. Practically I've transferred database objects from SQL Server 2005 to SQL Server 2012. Then I thought it could help other stuff which would face these kinds of problems!  

Background 

Once I had a requirement to transfer data between two online databases. I saw many tools on the internet for transferring data between two SQL Server databases, but I decided to develop this kind of a tool because I believed that if you write some code you learn something new... 

In this article we learn the following points: 

- How to connect to a SQL Server database. 
- How to generate a Table and SP script programmatically. 
- How to copy data between two tables using Bulk Copy.
- How to insert data in an Identity column manually.  

Using the code 

The name of this project is DataTransfer. I use Windows Forms Application in Visual Studio 2008 to developed this project. I separate three sections to design the UI. See the image below pointing out the five main functionalities:


1. Point-1 in section-1: this section is used to take the source server information. Source server means a SQL Server database that has some data and objects needed to transfer.

2. Point-2 in section -2: this section is used to take the destination server information. Destination server means a SQL Server database where we place transferable objects and data.

3. Point-3 in sections 1 and 2: used to set SQL Server connection authentication because most of the time when we connect a database, we use SQL Server Authentication or Windows Authentication.

When we move to transfer an object or some data the first time we build the source and destination server connection considering the above point.   

Connection string build code:

public void BuildConnectionString()
{
    if (chkSAuthentication.Checked)
    {
        strSrc = "Data Source=" + txtSServerName.Text + ";Initial Catalog=" +
          txtSDatabase.Text + ";User Id=" + txtSLogin.Text +
          ";Password=" + txtSPassword.Text;
    }
    else
    {
        strSrc = "Data Source=" + txtSServerName.Text +
          ";Initial Catalog=" + txtSDatabase.Text + ";Integrated Security=True";
    }

    if (chkDAuthentication.Checked)
    {
        strDst = "Data Source=" + txtDServerName.Text + ";Initial Catalog=" +
          txtDDatabase.Text + ";User Id=" + txtDLogin.Text +
          ";Password=" + txtDPassword.Text;
    }
    else
    {
        strDst = "Data Source=" + txtDServerName.Text +
          ";Initial Catalog=" + txtDDatabase.Text +
          ";Integrated Security=True";
    }
}


1. Point-4 in section-3: used to transfer behavior. There are two main options: one for Table object and another for Store Procedure object. When we select a table, the text box prepares to get transferable table name, and when we select a SP then the text box prepares to get the SP name.

2. Point-5 in section-3: used mainly when we try to transfer a Table object from a database to another database. When we transfer a Table then there are two transferable options: a table script and table data. This application creates a table script from a source database and executes this script to create a table in a destination database. 

To create a table script we use a T-SQL statement. When we execute this T-SQL statement it returns a datatable with some rows. Those rows have a total table script with Identity, and a Primary key script.

Table script generate code: 

public string GetTableScript(string TableName, string ConnectionString)
{
    string Script = "";

    string Sql = "declare @table varchar(100)" + Environment.NewLine +
    "set @table = '" + TableName + "' " + Environment.NewLine +
        //"-- set table name here" +
    "declare @sql table(s varchar(1000), id int identity)" + Environment.NewLine +
    " " + Environment.NewLine +
        //"-- create statement" +
    "insert into  @sql(s) values ('create table [' + @table + '] (')" + Environment.NewLine +
    " " + Environment.NewLine +
        //"-- column list" +
    "insert into @sql(s)" + Environment.NewLine +
    "select " + Environment.NewLine +
    "    '  ['+column_name+'] ' + " + Environment.NewLine +
    "    data_type + coalesce('('+cast(character_maximum_length as varchar)+')','') +
    ' ' +" + Environment.NewLine +
    "    case when exists ( " + Environment.NewLine +
    "        select id from syscolumns" + Environment.NewLine +
    "        where object_name(id)=@table" + Environment.NewLine +
    "        and name=column_name" + Environment.NewLine +
    "        and columnproperty(id,name,'IsIdentity') = 1 " + Environment.NewLine +
    "    ) then" + Environment.NewLine +
    "        'IDENTITY(' + " + Environment.NewLine +
    "        cast(ident_seed(@table) as varchar) + ',' + " + Environment.NewLine +
    "        cast(ident_incr(@table) as varchar) + ')'" + Environment.NewLine +
    "    else ''" + Environment.NewLine +
    "   end + ' ' +" + Environment.NewLine +
    "    ( case when IS_NULLABLE = 'No' then 'NOT ' else '' end ) + 'NULL ' + " + Environment.NewLine +
    "    coalesce('DEFAULT '+COLUMN_DEFAULT,'') + ','" + Environment.NewLine +
    " " + Environment.NewLine +
    " from information_schema.columns where table_name = @table" + Environment.NewLine +
    " order by ordinal_position" + Environment.NewLine +
    " " + Environment.NewLine +
        //"-- primary key" +
    "declare @pkname varchar(100)" + Environment.NewLine +
    "select @pkname = constraint_name from information_schema.table_constraints" + Environment.NewLine +
    "where table_name = @table and constraint_type='PRIMARY KEY'" + Environment.NewLine +
    " " + Environment.NewLine +
    "if ( @pkname is not null ) begin" + Environment.NewLine +
    "    insert into @sql(s) values('  PRIMARY KEY (')" + Environment.NewLine +
    "    insert into @sql(s)" + Environment.NewLine +
    "        select '   ['+COLUMN_NAME+'],' from information_schema.key_column_usage" +
Environment.NewLine +
    "        where constraint_name = @pkname" + Environment.NewLine +
    "        order by ordinal_position" + Environment.NewLine +
        //"    -- remove trailing comma" +
    "    update @sql set s=left(s,len(s)-1) where id=@@identity" + Environment.NewLine +
    "    insert into @sql(s) values ('  )')" + Environment.NewLine +
    "end" + Environment.NewLine +
    "else begin" + Environment.NewLine +
        //"    -- remove trailing comma" +
    "    update @sql set s=left(s,len(s)-1) where id=@@identity" + Environment.NewLine +
    "end" + Environment.NewLine +
    " " + Environment.NewLine +
    "-- closing bracket" + Environment.NewLine +
    "insert into @sql(s) values( ')' )" + Environment.NewLine +
    " " + Environment.NewLine +
        //"-- result!" +
    "select s from @sql order by id";
    DataTable dt = GetTableData(Sql, ConnectionString);
    foreach (DataRow row in dt.Rows)
    {
        Script += row[0].ToString() + Environment.NewLine;
    }

    return Script;
}

To create a SP script we use a SQL Server database built-in Sp name "sp_helptext", it has a parameter to get the SP name.

SP script generate code:

public string GetSPScript(string SPName, string ConnectionString)
{
    string Script = "";

    string Sql = "sp_helptext '" + SPName + "'";

    DataTable dt = GetTableData(Sql, ConnectionString);
    foreach (DataRow row in dt.Rows)
    {
        Script += row[0].ToString() + Environment.NewLine;
    }

    return Script;
}

When we get both scripts from the source database then simply execute the destination database for transferring both objects to another database.

Now we transfer data between two servers. In this project we use two options to transfer data: Bulk copy method, or generate an insert statements according to source table and data then execute those statements in the destination server. 

Bulk data copy code:

void TransferData()
{
    try
    {
        DataTable dataTable = new Utility().GetTableData("Select * From " + txtTableName.Text, strSrc);

        SqlBulkCopy bulkCopy = new SqlBulkCopy(strDst, SqlBulkCopyOptions.TableLock)
        {
            DestinationTableName = txtTableName.Text,
            BatchSize = 100000,
            BulkCopyTimeout = 360
        };
        bulkCopy.WriteToServer(dataTable);

        MessageBox.Show("Data Transfer Succesfull.");
    }
    catch (Exception ex)
    {
        MessageBox.Show(ex.Message);
    }
}

Copy data using Insert statements code:  

void TransferDataWithTableScript()
{
    try
    {       

        DataTable dataTable = new Utility().GetTableData("Select * From " + txtTableName.Text, strSrc);

        if (!string.IsNullOrEmpty(new Utility().GetIdentityColumn(txtTableName.Text, strSrc)))
        {
            string InsertSQL = "";
            InsertSQL += "SET IDENTITY_INSERT [" + txtTableName.Text + "] ON " + Environment.NewLine;

            string ColumnSQL = "";
            foreach (DataColumn column in dataTable.Columns)
            {
                ColumnSQL += column.ColumnName + ",";
            }
            ColumnSQL = ColumnSQL.Substring(0, ColumnSQL.Length - 1);

            foreach (DataRow row in dataTable.Rows)
            {
                string ColumnValueL = "";
                foreach (DataColumn column in dataTable.Columns)
                {
                    ColumnValueL += "'" + row[column.ColumnName].ToString().Replace("''", "'") + "',";
                }
                ColumnValueL = ColumnValueL.Substring(0, ColumnValueL.Length - 1);

                InsertSQL += "Insert Into " + txtTableName.Text +
                  " (" + ColumnSQL + ") Values(" +
                  ColumnValueL + ")" + Environment.NewLine;
            }

            InsertSQL += "SET IDENTITY_INSERT [" + txtTableName.Text + "] OFF " + Environment.NewLine;

            new Utility().ExecuteQuery(InsertSQL, strDst);
        }       

        MessageBox.Show("Data Transfer Succesfull.");
    }
    catch (Exception ex)
    {
        MessageBox.Show(ex.Message);
    }
}

We need to use second data copy option because when a table has an Identity column and we try to copy data from another table, the new table generates a new ID for the identity column and not use the existing identity column data. For this situation we use this option to copy data. Also we use an extra statement to insert an identity column value before we execute an insert statement in the destination server, and after we execute the insert statement, we need to execute another statement. 

Identity column code:  

SET IDENTITY_INSERT [" + txtTableName.Text + "] ON // before execute insert statement
SET IDENTITY_INSERT [" + txtTableName.Text + "] OFF // after execute insert statement


European SQL 2012 Hosting - Amsterdam :: Data Alerting in SQL Server 2012

clock September 18, 2012 08:43 by author Scott

You can create a data alert to email notification in SQL Server 2012 reporting services. This data alert sends e-mail notification when only when specific conditions in the data are true at a schedule time. This Date Alerting feature is available only when reporting services runs in sharepoint integration mode. It works only with reports that are designed using Report Designer or Report Builder. You can not create alert for Power View reports.

Data Alerts Designer

You can create one or more data alerts for any report provided report must return the data at the time you create the data alert.


Steps to create a Data Alert

Open the report that you want to add the data alert, Select new Data Alert from the actions menu in reports toolbar


Note
: You must have a permission in sharepoint to create an alert.

Using Data Alert designer you can define rules for one or more data regions in the report that control reporting services send an alert. When you save the alerting definitions, reporting services saves it in the alerting database and schedules a corresponding SQL Server Agent Job.


You can create one or more rules that compares a field value to value that you enter, Data Alert designer combines multiple rules for the same data feed by using logical AND operator.


In schedule section of the Data Alert designer , you can configure the daily, weekly intervals at which to run the SQL Server Agent job for the data alert.


Final, you must specify email address as a recipient for the data alert. Reporting services alert service manages the process of refreshing data feed and applying the rules in the data alert definition. Alerting service adds an alerting instance to the alerting database.


The email for successful data alert shows the user name of the person who created the alert and description of the data from the alert and rows from the data feed that generated the data alert. The Sample alert shown as below


If an error occurs during the alert processing then it sends an alert message to recipient describing the error message.


Data Alert Manager

Data Alert Manager lists all data alerts that you created for the report as shown below. To open the Data Alert Manager , Open the document library which has the report then click the down arrow and select Manage Data Alerts.


European SQL Hosting - Amsterdam :: Import SQL Server Data to an Access Database

clock August 28, 2012 07:14 by author Scott

SQL Server data can be transferred to a Microsoft Access database via importing or linking. Importing essentially creates a copy of the SQL Server data in the Access database. Once the data is imported, changes made in either the SQL Server database or the Access database are not reflected in one another. In other words, think of it as a one-way street. Linking, on the other hand, provides a direct connection between the two entities that will reflect any changes made to the data in either entity.

Importing comes in handy when have data stationed in your SQL Server database that you want to transfer to your Access database permanently. This specific tutorial will explain how to import SQL Server Data to an Access database. An upcoming tutorial detailing the linking process will be posted in the future.


How to Get Your Data Ready Before Import


Before you begin preparing for the import process, you will obviously need to have the proper information in place to connect to your SQL Server database. If you are not the database administrator, contact them and secure the relevant login information first.


Once you have the necessary information, connect to the SQL Server database containing the data you are planning to import to Access.


You will have the option to import several objects (tables or views) at the same time. As is usually the case when importing data from different programs, errors can occur if the formatting is not correct before the import begins. To ensure that your database’s source data gets imported without problems, follow the guidelines in this checklist:


1. Your data must be limited to a maximum of 255 columns, as that is all that Access will support.


2. Your source data cannot exceed 2GB in size. Access limits database size to 2GB, and you will also have to concede some storage for system objects as well. If your SQL Server source data is very large due to having multiple tables, you will probably encounter an error when trying to import them via an .accdb file. Should this apply to you, linking your SQL Server data to Access will provide a solution to your woes. You will be shown how to link the data in an upcoming article in this series.


3. It will be necessary to manually create relationships between new and existing tables due to the fact that Access does not create them automatically once the data is imported. You can create the table relationships by selecting the File tab, clicking Info, and selecting Relationships.


Now that you have looked over your SQL Server source data and checked that it meets the prerequisites, go to the Access database that will be the destination for the data. Before you can import anything to the Access database, you will need the appropriate permissions to do so.


You can either add data to an existing database, or add it to a fresh, blank database. To add data to a blank database, select File, click New, and select the Blank Database option. If you are adding data to an existing database, check over the tables to see that there are no errors.


How to Import Your Data


With your data prepared, it’s now time to finally import it. Open up your Access destination database, and click on the External Data tab. Go to Import & Link, and select the ODBC Database option. Select the Import the source data into a new table in the current database option. Click OK.


You must now select your data source, or .dsn file. If you see your .dsn file, click on it and select OK. If you need to create a new .dsn file, clicking New will bring up the Create New Data Source wizard, which is detailed in the next paragraph of this tutorial. If you already selected your data source, skip the next two paragraphs.


In the Create New Data Source wizard, select SQL Server from the driver list. Click Next. Enter a name for the .dsn file. You’ll need write permissions for the folder where you are saving the .dsn file. Click Next, followed by Finish.


You should now see the Create a New Data Source to SQL Server window. You have the option of entering a description of the data source in the Description box. Enter one in, or leave it blank. Enter the name of the SQL Server you want to connect to in the corresponding box, and click Next. Choose whether to use Windows NT authentication or SQL Server authentication, and click Next. Check the box next to the Change the default database to option if you plan on connecting to a specific database. Click Next, followed by Finish. Check over the summary, and select Test Data Source. If your test results are fine, click OK twice. Click OK once again until the Select Data Source window is closed.


In the Import Objects window, go to the Tables. Here is where you click on the tables or views to import. Click OK to begin importing the data.


It is recommended that you save the steps you just performed as an import specification. This will save you time as you repeat the process in the future. In the Get External Data – ODBC Database window, look for and add a check in the box next to the Save Import Steps option. Enter a name for the import specification. You can optionally enter a description in the appropriate box as well. If you have Microsoft Outlook 2010 installed and want to execute the data import during specific times, check the box next to the Create Outlook Task option. Otherwise, you can run the import at your own discretion without the help of Outlook. Click Save Import to save the specification. You will now have the import specification at your fingers the next time you want to import data between SQL Server and Access.


About HostForLIFE.eu

HostForLIFE.eu is European Windows Hosting Provider which focuses on Windows Platform only. We deliver on-demand hosting solutions including Shared hosting, Reseller Hosting, Cloud Hosting, Dedicated Servers, and IT as a Service for companies of all sizes.

We have offered the latest Windows 2016 Hosting, ASP.NET Core 2.2.1 Hosting, ASP.NET MVC 6 Hosting and SQL 2017 Hosting.


Tag cloud

Sign in