European Windows 2012 Hosting BLOG

BLOG about Windows 2012 Hosting and SQL 2012 Hosting - Dedicated to European Windows Hosting Customer

Press Release :: European HostForLIFE.eu Proudly Launches ASP.NET MVC 5 Hosting - Russia

clock August 28, 2013 10:29 by author Administrator

European Windows and ASP.NET hosting specialist, HostForLIFE.eu, has announced the availability of new hosting plans that are optimized for the latest update of the Microsoft ASP.NET Model View Controller (MVC) technology. The MVC web application framework facilitates the development of dynamic, data-driven websites.

The latest update to Microsoft’s popular MVC (Model-View-Controller) technology,  ASP.NET MVC 5 adds sophisticated features like single page applications, mobile optimization, adaptive rendering, and more. Here are some new features of ASP.NET MVC 5:

- ASP.NET Identity
- Bootstrap in the MVC template
- Authentication Filters
- Filter overrides

HostForLIFE.eu is Microsoft’s number one Recommended Windows and ASP.NET Spotlight Hosting Partner in Europe for its support of Microsoft technologies that include WebMatrix, WebDeploy, Visual Studio 2012, ASP.NET 4.5, ASP.NET MVC 4.0, Silverlight 5, and Visual Studio Lightswitch.

HostForLIFE.eu hosts its servers in top class data centers that is located in Amsterdam to guarantee 99.9% network uptime. All data center feature redundancies in network connectivity, power, HVAC, security, and fire suppression.

In addition to shared web hosting, shared cloud hosting, and cloud server hosting, HostForLIFE.eu offers reseller hosting packages and specialized hosting for Microsoft SharePoint 2010 and 2013. All hosting plans from HostForLIFE.eu include 24×7 support and 30 days money back guarantee.

For more information about this new product, please visit http://www.HostForLIFE.eu

About HostForLIFE.eu:

HostForLIFE.eu is Microsoft No #1 Recommended Windows and ASP.NET Hosting in European Continent. HostForLIFE.eu service is ranked the highest top #1 spot in several European countries, such as: Germany, Italy, Netherlands, France, Belgium, United Kingdom, Sweden, Finland, Switzerland and many top European countries.

HostForLIFE.eu number one goal is constant uptime. HostForLIFE.eu data center uses cutting edge technology, processes, and equipment. HostForLIFE.eu has one of the best up time reputations in the industry.

HostForLIFE.eu second goal is providing excellent customer service. HostForLIFE.eu technical management structure is headed by professionals who have been in the industry since it's inception. HostForLIFE.eu has customers from around the globe, spread across every continent. HostForLIFE.eu serve the hosting needs of the business and professional, government and nonprofit, entertainment and personal use market segments.


European SQL 2012 Hosting - Germany :: EXECUTE Statement Using WITH RESULT SETS in SQL 2012

clock August 16, 2013 07:06 by author Scott

Microsoft SQL Server 2012 extends the EXECUTE statement to introduce WITH RESULT SETS option which can be used to change the Column Name and Data Types of the result set returned by the execution of stored procedure.


Example Using WITH RESULT SETS Feature of SQL Server 2012

Let us go through an example which illustrates WITH RESULT SETS Feature of SQL Server 2012.

Use AdventureWorks2008R2
GO

IF
EXISTS (

SELECT
* FROM sys.objects    
WHERE object_id = OBJECT_ID(N'[dbo].[WithResultSets_SQLServer2012]')   
AND type in (N'P', N'PC'))
DROP
PROCEDURE [dbo].[WithResultSets_SQLServer2012]
GO

CREATE PROCEDURE WithResultSets_SQLServer2012
AS
   
BEGIN      
SELECT                 
 TOP 5                 
                                                 PP.FirstName + ' ' + PP.LastName AS Name            
,PA.City               
,PA.PostalCode         
FROM  Person.Address PA            
INNER JOIN                   
Person.BusinessEntityAddress PBEA                          
ON PA.AddressID = PBEA.AddressID               
INNER JOIN                         
Person.Person PP                         
ON PBEA.BusinessEntityID = PP.BusinessEntityID       
ORDER BY PP.FirstName
      END

GO

Once the stored procedure is created successfully. The next step will be to execute the above stored procedure using WITH RESULT SET Feature of SQL Server 2012.

/* Execute Stored Procedure which uses WITH RESULT SETS  Feature of SQL Server 2012*/
EXEC WithResultSets_SQLServer2012GO
/*
 Example - Using WITH RESULT SETS Feature of SQL Server 2012
*/

EXEC
WithResultSets_SQLServer2012
WITH
RESULT SETS
(

 
(
  [Employe Name]  NVARCHAR(100),
  [Employee City]       NVARCHAR(20),
  [Employee Postal Code]      NVARCHAR(30)
 )
)

GO

In the above image you could see that once you execute WithResultSets_SQLServer2012 stored procedure using WITH RESULT SET feature of SQL Server 2012 you can change the Column Name and Data Type as per your need without actually altering the exisiting stored procedure. In the second result set (above image) you could see that the Column Names are changed from Name to Employee Name, City to Employee City and PostalCode to Employee Postal Code. Similary, the data type was changes from VARCHAR to NVARCHAR.

Conclusion

The WITH RESULT SET Feature of SQL Server 2012 is a great enhancement to the EXECUTE Statement. This feature will be widely used by Business Intelligence Developers to execute a stored procedure with in an SQL Server Integration Services (SSIS) Package to return the result set with required Columns and modified data types.


European Windows 2012 Hosting - Amsterdam :: Creating Storage Pool Windows Server 2012

clock August 15, 2013 07:58 by author Scott

Storage Spaces, the Windows Server 2012 storage subsystem, is a storage virtualization platform that allows fast and easy provisioning of storage pools, and the virtual hard disks that they host.

This article provides an in depth look at how to create a storage pool on Windows Server 2012, using both the PowerShell Cmdlets and the Storage Manager GUI tools.

Before you can create a storage pool on your Windows Server 2012 computer, you need to add some storage to it. This can be either SAS or SATA drives, installed either internally or externally, such as a JBOD or a SAN array.

Here are the steps to create a storage pool from the Management GUI

1. Open Server Manager, then select “File and Storage Services.”

2. Select “Storage Pools” from the left side menu.

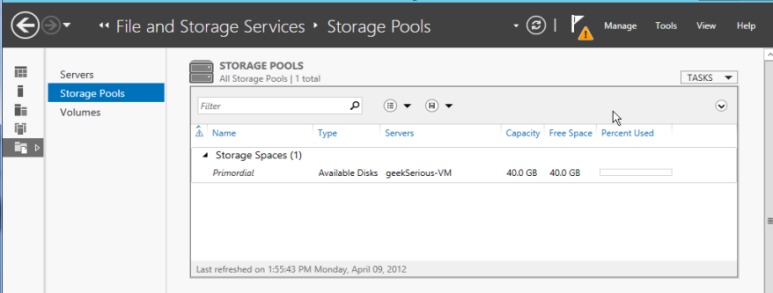
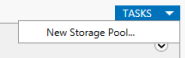
Then select “New Storage Pool” from the Tasks actions list.

3. Click Next on the “Before you begin” dialog.

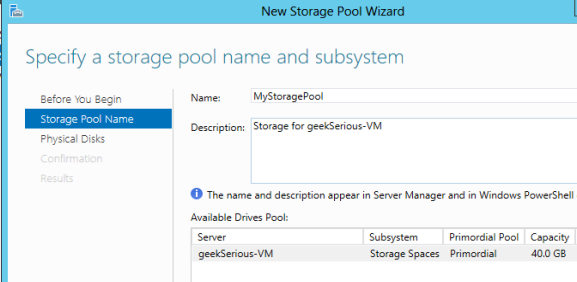
4. Name your storage pool.

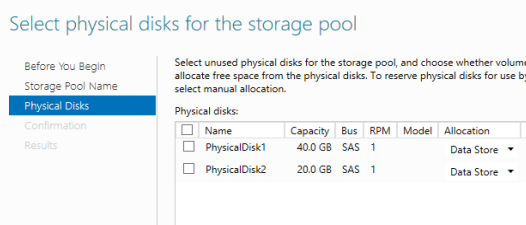
5. Select physical drives to add to the storage pool.

6. Click “Create” on the confirmation dialog box. If you want to create a Virtual Disk immediately, there is a checkbox to bring up the New Virtual Disk wizard on the results screen. Click “Close” to complete the storage pool.

Now, the next step we need to create a storage pool with powershell

As seen in the management GUI, there is not much information that is required to create a storage pool.

The three things that are required are:

1. The storage pool name
2. Which disks to use to create the pool
3. The storage subsystem (Storage Spaces)

The cmdlet we use to create the storage pool is New-StoragePool. While the only three things that are required are name, disks, and subsystem, New-StoragePool also provides some other more advanced features.

The name of the storage pool will be passed through the “FriendlyName” parameter.

The disks to create the storage pool on will be passed into the New-StoragePool in the “PhysicalDisks” parameter. Which disks are available is found by using the Get-PhysicalDisk cmdlet, and can be made even easier using the “-IsPooled” parameter (which will either provide all of the disks that are already pooled, or if set to false will return all of the disks not already in a pool. The Get-PhysicalDisk cmdlet can be run as part of the –PhysicalDisk parameter, or can be run previously and the results stored in a variable. If creating a script that will be reused, it’s advisable to use a variable, so that it is easier to read and understand.

“#Inline, as typed in at the console (incomplete – it would still need the storage subsystem)

New-StoragePool –PhysicalDisk (Get-PhysicalDisk –IsPooled $false) –FriendlyName “Pool1”

#Easier to read and understand in a saved script

$disks = Get-PhysicalDisk –IsPooled $false

New-StoragePool –PhysicalDisk $disks –FriendlyName “Pool1”

The storage subsystem in this case is looking for the “Storage Spaces” instance of storage subsystem. It is returned in the Get-StorageSubsystem cmdlet. In the New-StoragePool cmdlet, it is passed in as either the unique ID, the name, or the friendly name of the subsystem. For simplicity, it is helpful that New-StoragePool accepts the storage subsystem to create the storage pool on through the pipeline.

#This uses the $env:computername environment variable to provide the Storage Spaces subsystem.
#If only one subsystem is installed on the system

$Disks = Get-PhysicalDisk –IsPooled $false

Get-StorageSubsystem –FriendlyName “Storage Spaces on$env:computername” | `

New-StoragePool –Friendlyname “Pool1” –PhysicalDisk $Disks

That is everything that is needed to create a basic storage pool. However, these optional parameters for New-StoragePool may provide some benefit.

ResiliencySettingsNameDefault – specify the default resiliency on new Storage Spaces created on the storage pool.
ProvisioningTypeDefault – specify the default provisioning type for new Storage Spaces created on the storage pool.
IsEnclosureAware – Used if the enclosure containing the disks supports SCSI Enclosure Services. SCSI Enclosure Services provides extra information such as slot location, and LEDs on the enclosure.

To take advantage of Storage Spaces, the storage virtualization technology in Windows Server 2012, you first need to add storage to your server. Once the storage has been added, it needs to be grouped together in storage pools. The storage pools are used to store the virtual hard drives on them.

Create Storage Pools with the Management GUI and PowerShell

Storage pools can be created either through the management GUI or through PowerShell. The management GUI is easier if you are not familiar with the commands used to create storage pools. However, once familiar with the commands, PowerShell becomes easier and faster to create storage pools.

To use the management GUI for creating storage pools, you access "Storage and File Services" from Server Manager. From there, you can access the storage pools, and can take actions on them such as create new storage pools, delete storage pools, or rename them. There are fewer options available for creating storage pools from the management GUI. For example, you cannot specify the default VHD provisioning type on the storage pool when it’s created with the management GUI.

To use PowerShell for creating the storage pools, you need to use three cmdlets:

- First, you need to get the storage subsystem using the get-storagesubsystem cmdlet.
- Second, you need to find the disks you will use to create the storage pool using the get-physicaldisk cmdlet.
- Finally, you will use the storage subsystem and the physical disks together as parameters in the new-storagepool cmdlet.

You can use more options for creating the storage pools by using PowerShell, and you can also save the script to use on multiple systems if needed.

Now that you've added the storage pools to your Windows Server 2012, you'll be ready to add storage spaces onto them and you'll officially be using storage virtualization!


European Windows 2012 Hosting - Amsterdam :: Clustered Shared Volumes (2.0) in Windows Server 2012

clock August 5, 2013 12:09 by author Scott

Clustered Shared Volumes was first introduced in Windows Server 2008 R2, and was almost as popular as sliced bread by the time. A great enhancement, and it was solely meant for Hyper-V virtual machines.

Instead of using a dedicated LUN for each VM (so that you could migrate them between cluster nodes without taking down the other VMs on the same LUN) as in Windows Server 2008, you had now the possibility to store multiple VMs on the same LUN by converting it to CSV.

CSV is a distributed file access solution that let multiple nodes in a cluster to access the same file system simultaneously.

This means that many VMs can share the same volume, while you can failover, live migrate and move VMs without affecting the other virtual machines. This leads to better utilization of your storage since you don’t have to place VMs on separate disks, and the CSV’s are not depending in disk letters so you can scale this configuration out, if you’d like.

What’s the latest and greatest related to CSV 2.0:

- Windows Server 2012 has brought some changes to the architecture, so there’s now a new NTFS compatible file system, which is called CSVFS. This means that applications running on a CSV are able to discover this, and leverage this. But still, the underlying file system is NTFS.

- BitLocker Support is added to the list, which means you can secure your CSVs on a remote location. The Cluster Name Object is used as the identity to decryption and you should include this in every cluster deployment you are doing, because the performance penalty are less than 1%.

- Direct I/O for data access which gives enhancements for virtual machine creation and copy operations.

- Support for other roles than Virtual Machines. There’s an entirely new story around SMB in Windows Server 2012, and CSV is also affected by this. You can now put a SMB file share on top of your CSVs, which makes it easier to scale out your cluster storage, to share a single CSV among several clusters, where they will access their shares instead of volumes. Just a reminder: You can run Hyper-V virtual machines from a SMB file share in Windows Server 2012. This requires that both the server and the client is using SMB 3.0.

- The marriage to Active Directory has come to an end. External authentication dependencies, which you would run into if you started your cluster without an available AD is now removed. This gives us an easier setup of clusters, with less trouble and dependencies.

- File backup by supporting requestors that’s running Windows Server 2008 R2 or 2012. You can use application consistent and crash consistent VSS snapshots.

- SMB support with multichannel and direct. CSV traffic can now stream across multiple networks in the clusters and utilize the performance in your NICs that supports RDMA.

- Integration with storage spaces (new in Windows Server 2012) so that you can leverage your cheap disks (just a bunch of disks, JBOD) in a cluster environment

- Maintenance by scanning and repairing volumes with no downtime

Although there’s several enhancement for VM mobility in 2012, where you can move VMs without shared storage, there are still significant benefits by clustering your Hyper-V hosts.


About HostForLIFE.eu

HostForLIFE.eu is European Windows Hosting Provider which focuses on Windows Platform only. We deliver on-demand hosting solutions including Shared hosting, Reseller Hosting, Cloud Hosting, Dedicated Servers, and IT as a Service for companies of all sizes.

We have offered the latest Windows 2016 Hosting, ASP.NET Core 2.2.1 Hosting, ASP.NET MVC 6 Hosting and SQL 2017 Hosting.


Tag cloud

Sign in