European Windows 2012 Hosting BLOG

BLOG about Windows 2012 Hosting and SQL 2012 Hosting - Dedicated to European Windows Hosting Customer

European nopCommerce Hosting - UK :: How to Recover Your Administrator Password in nopCommerce?

clock November 27, 2014 10:21 by author Scott

In this tutorial, we will talk about how to recover administrator password in nopcommerce. Once you have installed nopCommerce, you suddenly deleted administrator account by mistake. So, how do you recover the administrator account?

Don’t be panic. Please just follow this steps below:

1. Login to the database in SQL Server (using tool like SSMS etc)
2. Open the database and run this sql query:

UPDATE Customer
  SETDeleted = 0
  WHERE Id = 1

The things you need to note:

a. Id is the account id from the "Customer" table of your admin account. Usually id=1 for default admin account. If you create any extra admin account and trying to recover the account, then you

will need to check the "Customer" table to get the correct id for the specific account (or record).

b. All the account records if deleted, never gets permanently deleted from the database. Only the value of column "Delete" change from "False" to "True" if you delete any account. In  the sql script, we are simply changing the value back from "True" to "False".

3. How to recover the account if you do not have the "id"?

Well, as long as you remember the username or email address, you can change your sql script accordingly like this:

WHERE Username = 'MyUsername'

Or

WHERE Email = '[email protected]'

Hope this helps!


SQL Reporting Service (SSRS) 2012 Hosting - HostForLIFE.eu :: How to Configure Folder Permissions in SSRS ?

clock November 25, 2014 10:49 by author Peter

The very first thing that we need to do is create a new SSRS 2012 Role that may be used across multiple users/groups which gave minimum permissions towards the SSRS folder structure, however permitted all of these to make, edit, and delete their own reports. In an effort to produce the new Role we linked to Reporting Services by using the Microsoft SQL Management Studio.

Now, expand Security and then right click on Roles and click New Role

Next Enter a name and description to the Role, assign the View Reports, Handle Reports, and Consume Reports permissions, and click OK. We named our Role “Users”.

Then Browse within your SSRS Report Manager website (http://yoursqlsite/Reports)  and click on Folder Settings.

Click on New Role Assignment and type inside the user or group name you would like the Role assigned to, click the check box next to the Browser Role then click OK.

In our case we've 2 folders made, TestFolder1 and TestFolder2. We'll assign the Test1 user to TestFolder1 and also the Test2 user to TestFolder2 after which lock it down wherever they can't view each others’ folders and can't delete their root folder (TestFolderX). Hover your mouse around TestFolder1 then click the down arrow and click Security.

Click Edit Item Security, click OK upon the inherited security alert, and eliminate any users which you don't need to discover or get access to the folder. Click Edit next towards the user which you would like to have create/edit/delete report capabilities and add the new Role you produced in stage 3. The user ought to have Browser and also the new Role permissions.

Do the same thing for each folder, limiting the permissions to only the users who need use of the folders.
Login as perhaps one of the users and verify which they simply notice their assigned folders and therefore are unable to delete their parent folder.

Once Reports are produced you are also able to limit the permissions upon the Reports themselves in an effort to avoid all of these from edited or deleted.


SQL Server 2012 Hosting UK - HostForLIFE.eu :: Moving a Table to Another Schema

clock November 20, 2014 05:35 by author Peter

From SQL Server 2005, all tables are grouped into schemas. Even though making a table in case the schema name isn't specified it's developed inside the default schema from the user making it. You are able to use ALTER SCHEMA command to move tables in among schemas. For instance, in case I develop a table using below script it is going to be developed below my default schema that is dbo:
USE [hostsql]
GO
CREATE TABLE Employee
(
       ID     INT,
       Name VARCHAR(20)
)
GO
SELECT name, [schema] = SCHEMA_NAME(schema_id)
FROM   sys.tables
WHERE  name = 'Employee'
GO

Result Set:
name            schema
Employee      dbo
(1 row(s) affected)

As you are able to notice coming from the output the table is currently in dbo schema. Currently to move this table to another schema utilizing ALTER SCHEMA command, first we have to create the schema in case it doesn't exist by now. When that many of us can move table to new schema.
USE [SqlAndMe]
GO CREATE SCHEMA Staff
GO 
ALTER SCHEMA Staff
TRANSFER dbo.Employee
GO 
SELECT name, [schema] = SCHEMA_NAME(schema_id)
FROM   sys.tables
WHERE  name = 'Employee'
GO


Result Set:
name            schema
Employee      Staff 
(1 row(s) affected)

As you can see from the result, the table of Employee is now moved to Staff schema.


SQL Reporting Service (SSRS) 2012 Hosting UK - HostForLIFE.eu :: Remove HTML From a String (T-SQL) on SSRS

clock November 18, 2014 07:55 by author Peter

I have been focusing on SQL Reporting Service (SSRS) 2012 using a supply database that had terribly fascinating worth inside the field. It looked such as HTML upon the website :

It is very annoying for business users to discover some thing similar to this on SSRS report :
SELECT TheName = 'Put your <span style="color: #ff0000; font-weight: bold; text-decoration: underline">name </span>in the box:'

This was a " name " column simply beneath the ID in database and there wasn't some other columns along with no HTML. I'm not so positive in case somebody took a incorrect approach making this field using HTML or that was an intension of the developer creating his life easier on the online interface, however I've determined to get yourself a quick answer to eliminate it and to provide the report when I can.
CREATE FUNCTION fn_RemoveHTMLFromText (@inputString nvarchar(max))
RETURNS nvarchar(MAX)
AS
BEGIN

  /*Variables to store source fielde temporarily and to remove tags one by one*/
  DECLARE @replaceHTML nvarchar(2000), @counter int, @outputString nvarchar(max)
  set @counter = 0
  SET @outputString = @inputString

  /*This was extra case which I've added later to remove no-break space*/
  SET @outputString = REPLACE(@outputString, '&nbsp;', '')

  /*This loop searches for tags beginning with "<" and ending with ">" */
  WHILE (CHARINDEX('<', @outputString,1)>0 AND CHARINDEX('>', @outputString,1)>0)
  BEGIN
    SET @counter = @counter + 1

    /*
    Some math here... looking for tags and taking substring storing result into temporarily variable, for example "</span>"
   */
   SELECT @replaceHTML = SUBSTRING(@outputString, CHARINDEX('<', @outputString,1), CHARINDEX('>',   @outputString,1)-CHARINDEX('<', @outputString,1)+1)

   /* Replace the tag that we stored in previous step */
   SET @outputString = REPLACE(@outputString, @replaceHTML, '')

   /* Let's clear our variable just in case... */
   SET @replaceHTML = ''

   /* Let's set up maximum number of tags just for fun breaking the loop after 15 tags */
  if @counter >15
      RETURN(@outputString);
  END
  RETURN(@outputString);
END

And now, let use the fuction:
SELECT TheName = dbo.fn_RemoveHTMLFromText ('Put your <span style="color: #ff0000; font-weight: bold; text-decoration: underline">name </span>in the box:')

And finally, this is what I wanna see:

This is simply easy resolution that has been applied upon the field along with not so many HTML tags, other then may be simply changed into more serious HTML cleaner.


France European SQL 2008 R2 Hosting - HostForLIFE.eu :: How to Change SMTP servers on Database Mail with SQL Server??

clock November 13, 2014 08:43 by author Peter

The database I inheritable when I started my current job sends out a lot of mails. It does therefore using database Mail with SQL Server, and it's a lot of mail accounts and mail profiles outlined. I do know that many of these profiles are used, i think that some aren't, and that I haven't any plan concerning the rest – in the future I'll notice the time to clean up, however to this point there have always been a lot of pressing matters to attend to.

But nowadays the mail administrator told me that thanks to a modification in design, SQL Server had to start using a completely different SMTP server for sending mails. Quite easy task if you've got just a single profile. Just a couple of clicks within the database Mail Configuration Wizard, and done. But continuation those self same mouse-clicks for each profile within the list wasn't my plan of a morning well spent, therefore I made a decision that I’d got to script this. (This ought to be easy – we've just a single SMTP server, therefore I may hit each single mail account and did not get to trouble with exceptions).

Usually, scripts for such a task are terribly easy. You just type a felicitous search string in your favorite Search Engine, check the primary 2 or 3 hits, and you’ll have a script. Sometimes even over one. Carefully inspect the script,copy the script, paste into SSMS, build adjustments for your own scenario, do a new review simply to take care. Bottom line, I did not notice a pre-made script for this task, therefore I put in the effort to put in writing one, so determined to share it with you.

Note that the script below was tested on SQL Server 2008R2 only. also note that it'll update all mail accounts to use the new SMTP server. If you've got a a lot of complicated setup with multiple servers and just some got to change, you may got to add the correct filtering criteria to the wherever clause.

DECLARE @NewServer sysname = 'NotTelling.mail', -- New SMTP server
        @OldServer sysname = 'MySecret.mail',   -- Old SMTP server
        @account_id int;
DECLARE Cursor_MailAccounts CURSOR LOCAL FORWARD_ONLY STATIC READ_ONLY
FOR SELECT account_id
    FROM   msdb.dbo.sysmail_server
    WHERE  servername = @OldServer;             -- Add extra logic here
OPEN Cursor_MailAccounts;

FETCH NEXT
FROM  Cursor_MailAccounts
INTO  @account_id;

WHILE @@FETCH_STATUS = 0
BEGIN;
    EXECUTE msdb.dbo.sysmail_update_account_sp
                @account_id = @account_id,
                @mailserver_name = @NewServer;
   
    FETCH NEXT
    FROM  Cursor_MailAccounts
    INTO  @account_id;
END;

CLOSE Cursor_MailAccounts;
DEALLOCATE Cursor_MailAccounts;

I hope it will works for you!


European Crystal Report 2013 Hosting - HostForLIFE.eu :: How to Display Records from Database using Crystal Report Viewer?

clock November 11, 2014 06:12 by author Peter

In  this tutorial, I will tell you how to display records from your database using Crystal Report 2013 Hosting. Crystal Report 2013 is an integrated development environment you'll be able to use to form applications and libraries with many alternative frameworks and languages. it's a rich feature set together with an intelligent editor, built in compiler (and related tools) and context sensitive facilitate. SAP Crystal Reports 2013 (Crystal Reports) is intended to figure along with your database to assist you analyze and interpret vital data. Crystal Reports makes it straightforward to form simple reports, and, it conjointly has the great tools you would like to provide advanced or specialized reports.

Crystal Reports will facilitate a company build sensible business selections. It will provide you with a warning to areas of a business's operations that aren't performing on all cylinders, or means areas that are a model for excellence. Reports will permit staff to target the business info instead of the production of data. Application and net developers will save time and meet their users wants by integrating the report process power of Crystal Reports into their info applications.

And here is code for Default.aspx file
<%@ Page Language="C#" AutoEventWireup="true" CodeBehind="Default.aspx.cs" Inherits="ReportViewer._Default" %>
<%@ Register assembly="CrystalDecisions.Web, Version=10.5.3700.0, Culture=neutral, PublicKeyToken=692fbea5521e1304" namespace="CrystalDecisions.Web" tagprefix="CR" %>
<!DOCTYPE html PUBLIC "-//W3C//DTD XHTML 1.0 Transitional//EN" "http://www.w3.org/TR/xhtml1/DTD/xhtml1-transitional.dtd">
<html xmlns="http://www.w3.org/1999/xhtml" >
<head runat="server">   
<title>Untitled Page</title>
</head><
body>
    <form id="form1" runat="server">
    <div>
    <CR:CrystalReportViewer ID="CrystalReportViewer1" runat="server"
        AutoDataBind="true" />
    </div>
    </form>
</body>
</html>

And now, here is the Default.aspx.cs code:
using System;
using System.Collections;
using System.Configuration;
using System.Data;
using System.Linq;
using System.Web;
using System.Web.Security;
using System.Web.UI;
using System.Web.UI.HtmlControls;
using System.Web.UI.WebControls;
using System.Web.UI.WebControls.WebParts;
using System.Xml.Linq;
using System.Data.SqlClient;
using CrystalDecisions.CrystalReports.Engine;

namespace ReportViewer{
    public partial class _Default : System.Web.UI.Page
    {
        string connStr =
ConfigurationManager.ConnectionStrings["ConnectionString"].ConnectionString;
        SqlDataAdapter sqlda = new SqlDataAdapter();
        SqlCommand com = new SqlCommand();
        DataTable dt;
        DataSet1 ds=new DataSet1();
        ReportDocument rptDoc=new ReportDocument(); 
        protected void Page_Load(object sender, EventArgs e)
        {
            bindReport(); 
        }
        private void bindReport()
        {            
            SqlConnection conn = new SqlConnection(connStr);
            dt = new DataTable();
            dt.TableName = "Crystal Report Example";
            com.Connection = conn;
            com.CommandText = "SELECT * FROM product";
            sqlda = new SqlDataAdapter(com);
            sqlda.Fill(dt);
            ds.Tables[0].Merge(dt);
            rptDoc.Load(Server.MapPath("CrystalReport1.rpt"));
            rptDoc.SetDataSource(ds);
            CrystalReportViewer1.ReportSource = rptDoc; 
        }
    }


HostForLIFE.eu Windows Hosting Proudly Launches New Data Center in Paris (France)

clock November 10, 2014 10:53 by author Peter

HostForLIFE.eu, a leading Windows web hosting provider with innovative technology solutions and a dedicated professional services team proudly announces New Data Center in Paris (France) for all costumers. HostForLIFE’s new data center in Paris will address strong demand from customers for excellent data center services in Europe, as data consumption and hosting services experience continued growth in the global IT markets.

The new facility will provide customers and our end users with HostForLIFE.eu services that meet in-country data residency requirements. It will also complement the existing HostForLIFE.eu. The Paris (France) data center will offer the full range of HostForLIFE.eu web hosting infrastructure services, including bare metal servers, virtual servers, storage and networking.

HostForLIFE.eu expansion into Paris gives us a stronger European market presence as well as added proximity and access to HostForLIFE.eu growing customer base in region. HostForLIFE.eu has been a leader in the dedicated Windows & ASP.NET Hosting industry for a number of years now and we are looking forward to bringing our level of service and reliability to the Windows market at an affordable price.

The new data center will allow customers to replicate or integrate data between Paris data centers with high transfer speeds and unmetered bandwidth (at no charge) between facilities. Paris itself, is a major center of business with a third of the world’s largest companies headquartered there, but it also boasts a large community of emerging technology startups, incubators, and entrepreneurs.

Our network is built from best-in-class networking infrastructure, hardware, and software with exceptional bandwidth and connectivity for the highest speed and reliability. Every upstream network port is multiple 10G and every rack is terminated with two 10G connections to the public Internet and two 10G connections to our private network. Every location is hardened against physical intrusion, and server room access is limited to certified employees.

All of HostForLIFE.eu controls (inside and outside the data center) are vetted by third-party auditors, and we provide detailed reports for our customers own security certifications. The most sensitive financial, healthcare, and government workloads require the unparalleled protection HostForLIFE.eu provides.

Paris data centres meet the highest levels of building security, including constant security by trained security staff 24x7, electronic access management, proximity access control systems and CCTV. HostForLIFE.eu is monitored 24/7 by 441 cameras onsite. All customers are offered a 24/7 support function and access to our IT equipment at any time 24/7 by 365 days a year.

For more information about new data center in Paris, please visit http://hostforlife.eu/Paris-Hosting-Data-Center

About HostForLIFE.eu
HostForLIFE.eu is an European Windows Hosting Provider which focuses on the Windows Platform only. HostForLIFE.eu deliver on-demand hosting solutions including Shared hosting, Reseller Hosting, Cloud Hosting, Dedicated Servers, and IT as a Service for companies of all sizes.

HostForLIFE.eu is awarded Top No#1 SPOTLIGHT Recommended Hosting Partner by Microsoft (see http://www.asp.net/hosting/hostingprovider/details/953). Our service is ranked the highest top #1 spot in several European countries, such as: Germany, Italy, Netherlands, France, Belgium, United Kingdom, Sweden, Finland, Switzerland and other European countries. Besides this award, we have also won several awards from reputable organizations in the hosting industry and the detail can be found on our official website.


Europe ASP.NET Hosting - HostForLIFE.eu :: Adding a GridView Column of Checkboxes (C#)

clock November 6, 2014 07:41 by author Frank

In this tutorial we will see how to add a column of checkboxes and how to determine what checkboxes were checked on postback. In particular, we ll build an example that closely mimics the web-based email client user interface. Our example will include a paged GridView listing the products in the Products database table with a checkbox in each row (see Figure 1). A Delete Selected Products button, when clicked, will delete those products selected.

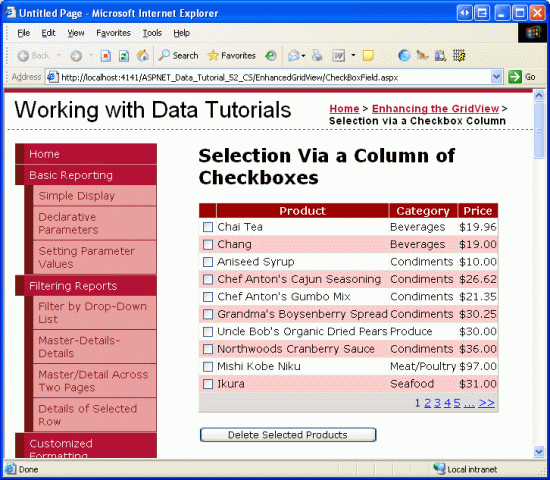
Figure 1: Each Product Row Includes a Checkbox

Step 1: Adding a Paged GridView that Lists Product Information

Before we worry about adding a column of checkboxes, let s first focus on listing the products in a GridView that supports paging. Start by opening the CheckBoxField.aspx page in the EnhancedGridView folder and drag a GridView from the Toolbox onto the Designer, setting its ID to Products. Next, choose to bind the GridView to a new ObjectDataSource named ProductsDataSource. Configure the ObjectDataSource to use the ProductsBLL class, calling the GetProducts() method to return the data. Since this GridView will be read-only, set the drop-down lists in the UPDATE, INSERT, and DELETE tabs to (None) .

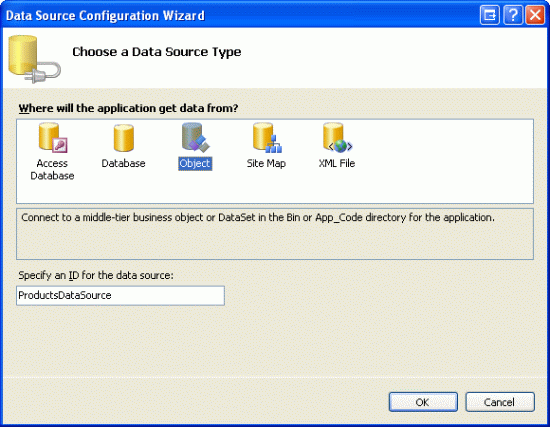
Figure 2: Create a New ObjectDataSource Named ProductsDataSource

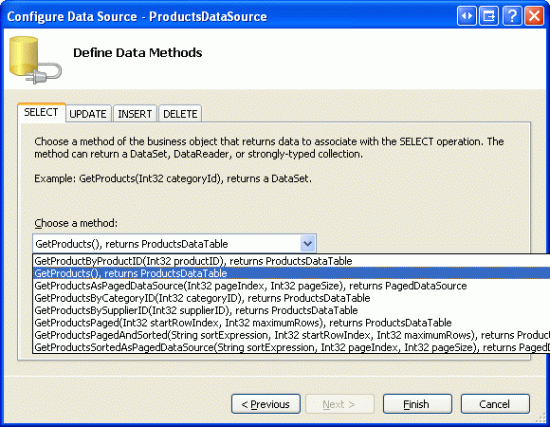
Figure 3: Configure the ObjectDataSource to Retrieve Data Using the GetProducts() Method

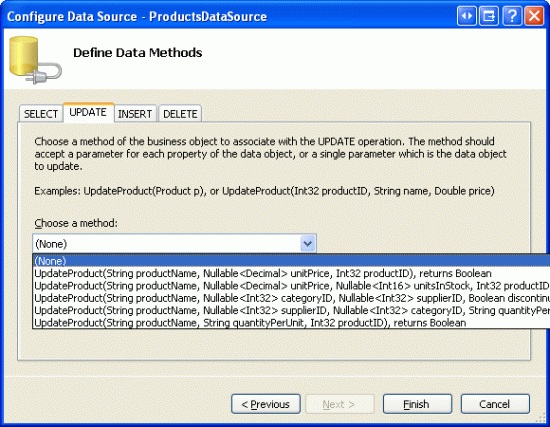
Figure 4: Set the Drop-Down Lists in the UPDATE, INSERT, and DELETE Tabs to (None)

After completing the Configure Data Source wizard, Visual Studio will automatically create BoundColumns and a CheckBoxColumn for the product-related data fields. Like we did in the previous tutorial, remove all but the ProductName, CategoryName, and UnitPrice BoundFields, and change the HeaderText properties to Product , Category , and Price . Configure the UnitPrice BoundField so that its value is formatted as a currency. Also configure the GridView to support paging by checking the Enable Paging checkbox from the smart tag.

Let s also add the user interface for deleting the selected products. Add a Button Web control beneath the GridView, setting its ID to DeleteSelectedProducts and its Text property to Delete Selected Products . Rather than actually deleting products from the database, for this example we ll just display a message stating the products that would have been deleted. To accommodate this, add a Label Web control beneath the Button. Set its ID to DeleteResults, clear out its Text property, and set its Visible and EnableViewState properties to false.

After making these changes, the GridView, ObjectDataSource, Button, and Label s declarative markup should similar to the following:

<p>
    <asp:GridView ID="Products" runat="server" AutoGenerateColumns="False"
        DataKeyNames="ProductID" DataSourceID="ProductsDataSource"
        AllowPaging="True" EnableViewState="False">
        <Columns>
            <asp:BoundField DataField="ProductName" HeaderText="Product"
                SortExpression="ProductName" />
            <asp:BoundField DataField="CategoryName" HeaderText="Category"
                ReadOnly="True" SortExpression="CategoryName" />
            <asp:BoundField DataField="UnitPrice" DataFormatString="{0:c}"
                HeaderText="Price" HtmlEncode="False"
                SortExpression="UnitPrice" />
        </Columns>
    </asp:GridView>
    <asp:ObjectDataSource ID="ProductsDataSource" runat="server"
        OldValuesParameterFormatString="original_{0}"
        SelectMethod="GetProducts" TypeName="ProductsBLL">            
    </asp:ObjectDataSource>
</p>
<p>
    <asp:Button ID="DeleteSelectedProducts" runat="server"
        Text="Delete Selected Products" />
</p>
<p>
    <asp:Label ID="DeleteResults" runat="server" EnableViewState="False"
        Visible="False"></asp:Label>
</p>

Take a moment to view the page in a browser (see Figure 5). At this point you should see the name, category, and price of the first ten products.

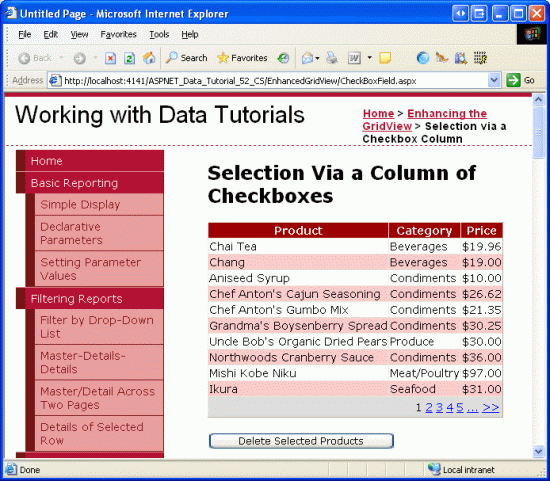
Figure 5: The Name, Category, and Price of the First Ten Products are Listed

Step 2: Adding a Column of Checkboxes

Since ASP.NET 2.0 includes a CheckBoxField, one might think that it could be used to add a column of checkboxes to a GridView. Unfortunately, that is not the case, as the CheckBoxField is designed to work with a Boolean data field. That is, in order to use the CheckBoxField we must specify the underlying data field whose value is consulted to determine whether the rendered checkbox is checked. We cannot use the CheckBoxField to just include a column of unchecked checkboxes.

Instead, we must add a TemplateField and add a CheckBox Web control to its ItemTemplate. Go ahead and add a TemplateField to the Products GridView and make it the first (far-left) field. From the GridView s smart tag, click on the Edit Templates link and then drag a CheckBox Web control from the Toolbox into the ItemTemplate. Set this CheckBox s ID property to ProductSelector.

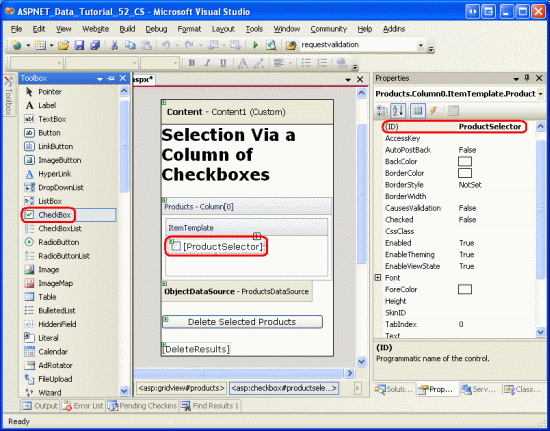
Figure 6: Add a CheckBox Web Control Named ProductSelector to the TemplateField s ItemTemplate

With the TemplateField and CheckBox Web control added, each row now includes a checkbox. Figure 7 shows this page, when viewed through a browser, after the TemplateField and CheckBox have been added.

Figure 7: Each Product Row Now Includes a Checkbox

Step 3: Determining What Checkboxes Were Checked On Postback

At this point we have a column of checkboxes but no way to determine what checkboxes were checked on postback. When the Delete Selected Products button is clicked, though, we need to know what checkboxes were checked in order to delete those products.The GridView s Rows property provides access to the data rows in the GridView. We can iterate through these rows, programmatically access the CheckBox control, and then consult its Checked property to determine whether the CheckBox has been selected.

Create an event handler for the DeleteSelectedProducts Button Web control s Click event and add the following code:

protected void DeleteSelectedProducts_Click(object sender, EventArgs e)
{
    bool atLeastOneRowDeleted = false;
    // Iterate through the Products.Rows property
    foreach (GridViewRow row in Products.Rows)
    {
        // Access the CheckBox
        CheckBox cb = (CheckBox)row.FindControl("ProductSelector");
        if (cb != null && cb.Checked)
        {
            // Delete row! (Well, not really...)
            atLeastOneRowDeleted = true;
            // First, get the ProductID for the selected row
            int productID =
                Convert.ToInt32(Products.DataKeys[row.RowIndex].Value);
            // "Delete" the row
            DeleteResults.Text += string.Format(
                "This would have deleted ProductID {0}<br />", productID);
        }
    }
    // Show the Label if at least one row was deleted...
    DeleteResults.Visible = atLeastOneRowDeleted;
}

The Rows property returns a collection of GridViewRow instances that makeup the GridView s data rows. The foreach loop here enumerates this collection. For each GridViewRow object, the row s CheckBox is programmatically accessed using row.FindControl("controlID"). If the CheckBox is checked, the row s corresponding ProductID value is retrieved from the DataKeys collection. In this exercise, we simply display an informative message in the DeleteResults Label, although in a working application we d instead make a call to the ProductsBLL class s DeleteProduct(productID) method.

With the addition of this event handler, clicking the Delete Selected Products button now displays the ProductIDs of the selected products.

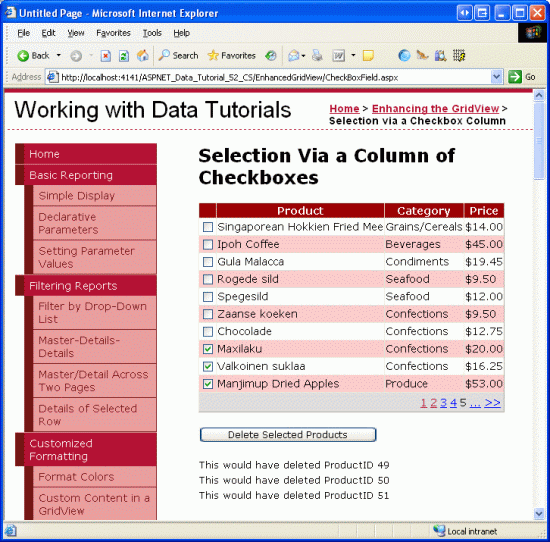
Figure 8: When the Delete Selected Products Button is Clicked the Selected Products ProductIDs are Listed

Step 4: Adding Check All and Uncheck All Buttons

If a user wants to delete all products on the current page, they must check each of the ten checkboxes. We can help expedite this process by adding a Check All button that, when clicked, selects all of the checkboxes in the grid. An Uncheck All button would be equally helpful.

Add two Button Web controls to the page, placing them above the GridView. Set the first one s ID to CheckAll and its Text property to Check All ; set the second one s ID to UncheckAll and its Text property to Uncheck All .


<asp:Button ID="CheckAll" runat="server" Text="Check All" />

<asp:Button ID="UncheckAll" runat="server" Text="Uncheck All" />

Next, create a method in the code-behind class named ToggleCheckState(checkState) that, when invoked, enumerates the Products GridView s Rows collection and sets each CheckBox s Checked property to the value of the passed in checkState parameter.

private void ToggleCheckState(bool checkState)
{
    // Iterate through the Products.Rows property
    foreach (GridViewRow row in Products.Rows)
    {
        // Access the CheckBox
        CheckBox cb = (CheckBox)row.FindControl("ProductSelector");
        if (cb != null)
            cb.Checked = checkState;
    }
}

Next, create Click event handlers for the CheckAll and UncheckAll buttons. In CheckAll s event handler, simply call ToggleCheckState(true); in UncheckAll, call ToggleCheckState(false).

protected void CheckAll_Click(object sender, EventArgs e)
{
    ToggleCheckState(true);
}
protected void UncheckAll_Click(object sender, EventArgs e)
{
    ToggleCheckState(false);
}

With this code, clicking the Check All button causes a postback and checks all of the checkboxes in the GridView. Likewise, clicking Uncheck All unselects all checkboxes. Figure 9 shows the screen after the Check All button has been checked.

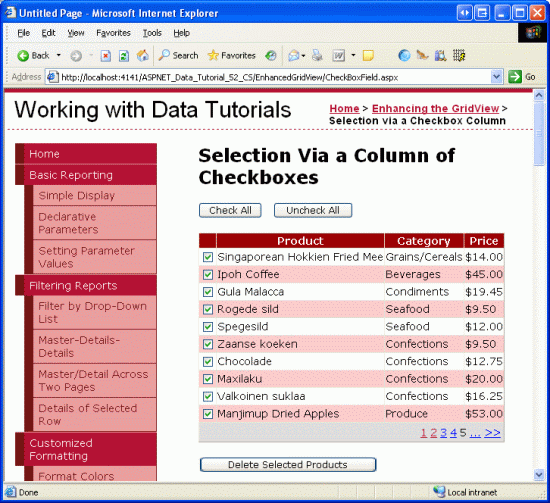
Figure 9: Clicking the Check All Button Selects All Checkboxes

Note: When displaying a column of checkboxes, one approach for selecting or unselecting all of the checkboxes is through a checkbox in the header row. Moreover, the current Check All / Uncheck All implementation requires a postback. The checkboxes can be checked or unchecked, however, entirely through client-side script, thereby providing a snappier user experience.


SQL 2014 Hosting Italy - HostForLIFE.eu :: How to Kill all sessions using database in MSSQL 2014

clock November 4, 2014 07:56 by author Peter

At this moment, we are going to discussed about: How to Kill all sessions in MSSQL using database. Before an existing database are often restored, there ought to be connections using the database in question. If the database is presently in use the RESTORE command fails with error on below:
Msg 3101, Level 16, State 1, Line 2
Exclusive access could not be obtained because the database is in use.
Msg 3013, Level 16, State 1, Line 2
RESTORE DATABASE is terminating abnormally.

To avoid that error, we'd like to kill all sessions using the database in MSSQL. All sessions using the database are often queries using system hold on procedure sp_who2 or using sys.dm_exec_sessions DMV:
SELECT   session_id
FROM     sys.dm_exec_sessions
WHERE    DB_NAME(database_id) = 'SqlAndMe'

You need to terminate every of the sessions came back one by one by using KILL command. If there are sizable amount of sessions to kill, otherwise you got to try this on a routine basis it gets boring to do it this manner. you'll be able to *automate* this using below script, that takes database name as input, and kills all sessions connecting to that.
USE [master]
GO 
DECLARE @dbName SYSNAME
DECLARE @sqlCmd VARCHAR(MAX) 
SET @sqlCmd = ''
SET @dbName = 'SqlAndMe' -- Change database NAME
 SELECT   @sqlCmd = @sqlCmd + 'KILL ' + CAST(session_id AS VARCHAR) +
         CHAR(13)
FROM     sys.dm_exec_sessions
WHERE    DB_NAME(database_id) = @dbName 
PRINT @sqlCmd
--Uncomment line below to kill
--EXEC (@sqlCmd)

Hope this tutorial works for you!


About HostForLIFE.eu

HostForLIFE.eu is European Windows Hosting Provider which focuses on Windows Platform only. We deliver on-demand hosting solutions including Shared hosting, Reseller Hosting, Cloud Hosting, Dedicated Servers, and IT as a Service for companies of all sizes.

We have offered the latest Windows 2016 Hosting, ASP.NET Core 2.2.1 Hosting, ASP.NET MVC 6 Hosting and SQL 2017 Hosting.


Tag cloud

Sign in