Storage Spaces, the Windows Server 2012 storage subsystem, is a storage virtualization platform that allows fast and easy provisioning of storage pools, and the virtual hard disks that they host.
This article provides an in depth look at how to create a storage pool on Windows Server 2012, using both the PowerShell Cmdlets and the Storage Manager GUI tools.
Before you can create a storage pool on your Windows Server 2012 computer, you need to add some storage to it. This can be either SAS or SATA drives, installed either internally or externally, such as a JBOD or a SAN array.
Here are the steps to create a storage pool from the Management GUI
1. Open Server Manager, then select “File and Storage Services.”
2. Select “Storage Pools” from the left side menu.
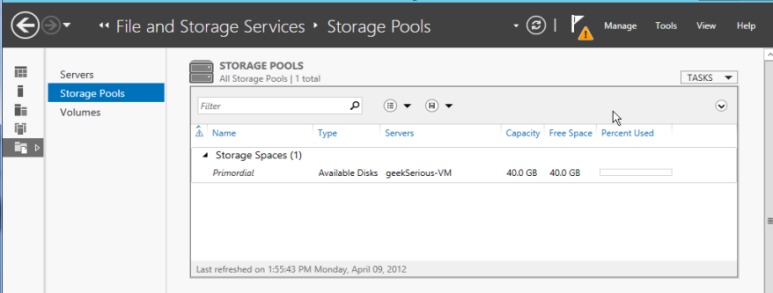
Then select “New Storage Pool” from the Tasks actions list.

3. Click Next on the “Before you begin” dialog.
4. Name your storage pool.
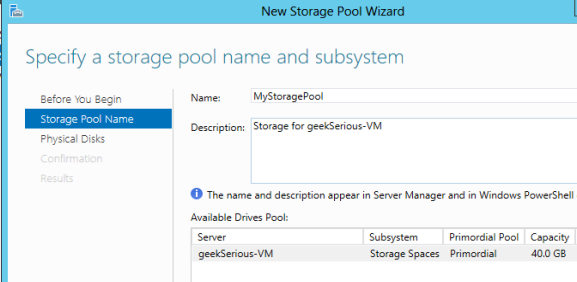
5. Select physical drives to add to the storage pool.
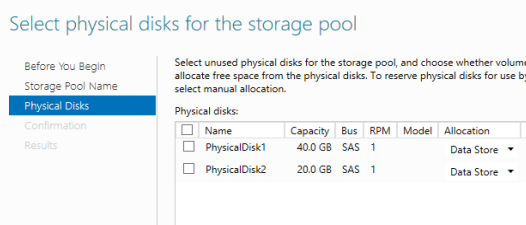
6. Click “Create” on the confirmation dialog box. If you want to create a Virtual Disk immediately, there is a checkbox to bring up the New Virtual Disk wizard on the results screen. Click “Close” to complete the storage pool.
Now, the next step we need to create a storage pool with powershell
As seen in the management GUI, there is not much information that is required to create a storage pool.
The three things that are required are:
1. The storage pool name
2. Which disks to use to create the pool
3. The storage subsystem (Storage Spaces)
The cmdlet we use to create the storage pool is New-StoragePool. While the only three things that are required are name, disks, and subsystem, New-StoragePool also provides some other more advanced features.
The name of the storage pool will be passed through the “FriendlyName” parameter.
The disks to create the storage pool on will be passed into the New-StoragePool in the “PhysicalDisks” parameter. Which disks are available is found by using the Get-PhysicalDisk cmdlet, and can be made even easier using the “-IsPooled” parameter (which will either provide all of the disks that are already pooled, or if set to false will return all of the disks not already in a pool. The Get-PhysicalDisk cmdlet can be run as part of the –PhysicalDisk parameter, or can be run previously and the results stored in a variable. If creating a script that will be reused, it’s advisable to use a variable, so that it is easier to read and understand.
“#Inline, as typed in at the console (incomplete – it would still need the storage subsystem)
New-StoragePool –PhysicalDisk (Get-PhysicalDisk –IsPooled $false) –FriendlyName “Pool1”
#Easier to read and understand in a saved script
$disks = Get-PhysicalDisk –IsPooled $false
New-StoragePool –PhysicalDisk $disks –FriendlyName “Pool1”
The storage subsystem in this case is looking for the “Storage Spaces” instance of storage subsystem. It is returned in the Get-StorageSubsystem cmdlet. In the New-StoragePool cmdlet, it is passed in as either the unique ID, the name, or the friendly name of the subsystem. For simplicity, it is helpful that New-StoragePool accepts the storage subsystem to create the storage pool on through the pipeline.
#This uses the $env:computername environment variable to provide the Storage Spaces subsystem.
#If only one subsystem is installed on the system
$Disks = Get-PhysicalDisk –IsPooled $false
Get-StorageSubsystem –FriendlyName “Storage Spaces on$env:computername” | `
New-StoragePool –Friendlyname “Pool1” –PhysicalDisk $Disks
That is everything that is needed to create a basic storage pool. However, these optional parameters for New-StoragePool may provide some benefit.
ResiliencySettingsNameDefault – specify the default resiliency on new Storage Spaces created on the storage pool.
ProvisioningTypeDefault – specify the default provisioning type for new Storage Spaces created on the storage pool.
IsEnclosureAware – Used if the enclosure containing the disks supports SCSI Enclosure Services. SCSI Enclosure Services provides extra information such as slot location, and LEDs on the enclosure.
To take advantage of Storage Spaces, the storage virtualization technology in Windows Server 2012, you first need to add storage to your server. Once the storage has been added, it needs to be grouped together in storage pools. The storage pools are used to store the virtual hard drives on them.
Create Storage Pools with the Management GUI and PowerShell
Storage pools can be created either through the management GUI or through PowerShell. The management GUI is easier if you are not familiar with the commands used to create storage pools. However, once familiar with the commands, PowerShell becomes easier and faster to create storage pools.
To use the management GUI for creating storage pools, you access "Storage and File Services" from Server Manager. From there, you can access the storage pools, and can take actions on them such as create new storage pools, delete storage pools, or rename them. There are fewer options available for creating storage pools from the management GUI. For example, you cannot specify the default VHD provisioning type on the storage pool when it’s created with the management GUI.
To use PowerShell for creating the storage pools, you need to use three cmdlets:
- First, you need to get the storage subsystem using the get-storagesubsystem cmdlet.
- Second, you need to find the disks you will use to create the storage pool using the get-physicaldisk cmdlet.
- Finally, you will use the storage subsystem and the physical disks together as parameters in the new-storagepool cmdlet.
You can use more options for creating the storage pools by using PowerShell, and you can also save the script to use on multiple systems if needed.
Now that you've added the storage pools to your Windows Server 2012, you'll be ready to add storage spaces onto them and you'll officially be using storage virtualization!