European Windows 2012 Hosting BLOG

BLOG about Windows 2012 Hosting and SQL 2012 Hosting - Dedicated to European Windows Hosting Customer

European SQL 2016 Hosting - HostForLIFE.eu :: Warehousing JSON formatted data in SQL Server 2016

clock March 8, 2017 10:34 by author Scott

In this article, I continue to review the exciting features available in SQL Server 2016. One such feature is the long awaited T-SQL support for JSON formatted data. In this article we take a look at how JSON support will impact data warehouse solutions.

Background

Since the advent of EXtensible Markup Language (XML) many modern web applications have focused on providing data that is both human-readable and machine-readable. From a relational database perspective, SQL Server kept up with these modern web applications by providing support for XML data in a form of an XML data type and several functions that could be used to parse, query and manipulate XML formatted data.

As a result of being supported in SQL Server, data warehouse solutions based off SQL Server were then able to source XML-based OLTP data into a data mart. To illustrate this point, let’s take a look at the XML representation of our fictitious Fruit Sales data shown in figure below.

To process this data in data warehouse, we would first have to convert it into relational format of rows and columns using T-SQL XML built-in functions such as the nodes() function. 

The results of the above script are shown in figure below in a recognisable format for data warehouse.

Soon after XML became a dominant language for data interchange for many modern web applications, JavaScript Object Notation (JSON) was introduced as a lightweight data-interchange format that is more convenient for web applications to process than XML. Likewise most relational database vendors released newer versions of their database systems that included the support for JSON formatted data. Unfortunately, Microsoft SQL Server was not one of those vendors and up until SQL Server 2014, JSON data was not supported. Obviously this lack of support for JSON, created challenges for data warehouse environments that are based off SQL Server.

Although there were workarounds (i.e. using Json.Net) to addressing the lack of JSON support in SQL Server, there was always sense that these workarounds were inadequate, time-wasting, and were forcing data warehouse development teams to pick up a new skill (i.e. learn .Net). Fortunately, the release of SQL Server 2016 has ensured that development teams can throw away their JSON workarounds as JSON is supported in SQL Server 2016.

Parsing JSON Data into Data Warehouse

Similarly to XML support in SQL Server, SQL Server supports of JSON can be classified into two ways:

  • Converting Relational dataset into JSON format
  • Converting JSON dataset into relational format

However, for the purposes of this discussion we are focusing primarily on the second part – which is converting a JSON formatted data (retrieved from OLTP sources) into a relational format of rows and columns. To illustrate our discussion points we once again make use of the fictitious fruit sales dataset. This time around the fictitious dataset has been converted into a JSON format as shown below.

ISJSON function

As part of supporting JSON formatted data in other relational databases such as MySQL and PostgreSQL 9.2, there is a separate JSON data type that has been introduced by these vendors. Amongst other things, JSON data type conducts validation checks to ensure that values being stored are indeed of valid JSON format.

Unfortunately, SQL Server 2016 (and ORACLE 12c) do not have a special data type for storing JSON data instead a variable character (varchar/nvarchar) data type is used. Therefore, a recommended practice to dealing with JSON data in SQL Server 2016 is to firstly ensure that you are indeed dealing with a valid JSON data. The simplest way to do so is to use the ISJSON function. This is a built-in T-SQL function that returns 1 for a valid JSON dataset and 0 for invalids.

Image below shows us the implementation of ISJSON function whereby we validate our fictitious sample dataset.

OPENJSON function

Now that we have confirmed that we are working with a valid JSON dataset, the next step is to convert the data into a table format. Again, we have a built-in T-SQL function to do this in a form of OPENJSON. OPENJSON works similar to OPENXML in that it takes in an object and convert its data into rows and columns.

Figure below shows a complete T-SQL script for converting JSON object into rows and columns.

Once we execute the above script, we get relational output shown below.

Now that we have our relational dataset, we can process this data into data warehouse.

JSON_VALUE function

Prior to concluding our discussion of JSON in SQL Server 2016, it is worth mentioning that in addition to OPENJSON, you have other functions such as JSON_VALUE that could be used to query JSON data. However this function returns a scalar value which means that unlike the multiple rows and columns returned using OPENJSON, JSON_VALUE returns a single value as shown below.

If you the JSON object that you are querying doesn’t have multiple elements, than you don’t have to specify the row index (i.e. [0]) as shown below.

Conclusion

The long wait is finally over and with the release of SQL Server 2016, JSON is now supported. Similarly to XML, T-SQL support the conversion of JSON object to relational format as well the conversion of relational tables to a JSON object. This support is implemented via built-in T-SQL functions such as OPENJSON and JSON_VALUE. In spite of all the excitement with the support of JSON is SQL Server 2016, we still don’t have a JSON data type. The ISJSON function can then be used to validate JSON text.


SQL Server 2016 Hosting - HostForLIFE.eu :: Isolation Level In SQL Transaction

clock February 28, 2017 08:37 by author Peter

Isolation is one of the properties of SQL Transaction. Isolating / separating transactions from each other to maintain Data Integrity in Database is called Isolation.Before going to implementation part of isolation, we will understand why isolation is required in database ?

Why Is Isolation Level Required ?
While developing large enterprise/public networking kind of applications where a huge number of users access same Database, same Table and at the same Time, Data concurrency situation may occur. We will discuss this situation into 4 parts:

  • Loss of Data
  • Dirty Read
  • Phantom Read
  • Inconsistency Analysis

Loss of Data
Let's take an example - Suppose, there are 2 users accessing the same table, at the same moment, to update the same row. Each transaction is unaware of the other transaction. User A updates the row and then User B updates the same row. What happened here is the last transaction made my User B overwrites the updated record of User A and User A lost his/her data in the table.

Dirty Read
This is otherwise known as Uncommitted Dependency. Let's take another example - Suppose, User A and User B are accessing a table row at the same time. User A wants to read and User B wants to update the row. In the friction of time difference, transactions are executed. So, when User B not yet updated the row (during the update process), User A reads that row and got the old record which may not be correct for his/her operation. This situation is known as Dirty Read.

Phantom Read
This is also known as Phantom Problem. Let's again take another example - Suppose User A is granted to insert a row but the same time User B inserted that row. Now, when User A tries to insert, he/she can't. Then, he/she will get angry and say- "Hey you committed that this is available for me to insert, but you cheated on me and granted someone else to do so !" . You may/might get this problem while the reservation of Train/Movie ticket.

Inconsistency Analysis
This is also known as Non-Repeatable Problem. Let's take the same example of User A and User B. Suppose, User A executes a transaction having three queries - a stored procedure or transaction or individual query with a batch. 1st query is to read a table row, the 2nd query is to update that, and the 3rd query is to read that again. By doing this, User A wants to generate the report. As we know User B is not a gentleman he always spoils the intention of User A, he accessed the table row in between the two Read queries of User A and did some operation like Delete ! Now, User A has already modified the data and when he wants to read it again, he is surprised ! He got inconsistency in data.

In the above-mentioned points, we understood that - as User A is a weak person, User B always plays with User A and forcefully does it's job by dominating him. But as a Database Administrator or Developer, we need to help the User A. Now, we have a weapon called "Isolation Level" by using which we can cooperate User A to maintain its integrity.

Isolation Levels
SQL Server provides 5 Isolation levels to implement with SQL Transaction to maintain data concurrency in the database.

Isolation level is nothing but locking the row while performing some task, so that other transaction can not access or will wait for the current transaction to finish its job.

Let's write a transaction without Isolation level.
BEGIN TRANSACTION MyTransaction 
BEGIN TRY 
UPDATE Account SET Debit=100 WHERE Name='John Cena' 
UPDATE ContactInformation SET Mobile='1234567890' WHERE Name='The Rock' 
COMMIT TRANSACTION MyTransaction 
PRINT 'TRANSACTION SUCCESS' 
END TRY 
BEGIN CATCH 
ROLLBACK TRANSACTION MyTransaction 
PRINT 'TRANSACTION FAILED' 
END CATCH  


In the above code snippet, we have not implemented Isolation Level. Therefore, there are chances of data concurrency. Now, we will go through all the five Isolation levels and find the solution for our situation.

Read Uncommitted

When this level is set, the transaction can read uncommitted data resulting in the Dirty Read problem. With this isolation level, we allow a transaction to read the data which is being updated by other transaction and not yet committed. Suppose User A is trying to read a row which is being updated by User B. Here, we are allowing User A to read the un-updated/uncommitted data i.e old data.

Example
SET TRANSACTION ISOLATION LEVEL  
READ UNCOMMITTED 
BEGIN TRANSACTION MyTransaction 
BEGIN TRY 
UPDATE Account SET Debit=100 WHERE Name='John Cena' 
UPDATE ContactInformation SET Mobile='1234567890' WHERE Name='The Rock' 
COMMIT TRANSACTION MyTransaction 
PRINT 'TRANSACTION SUCCESS' 
END TRY 
BEGIN CATCH 
ROLLBACK TRANSACTION MyTransaction 
PRINT 'TRANSACTION FAILED' 
END CATCH 
Read Committed

This prevents Dirty Read. When this level is set, the transaction can not read the data that is being modified by the current transaction. This will force user to wait for the current transaction to finish up its job. Suppose User A is trying to read a row which is being updated by User B. Here, we are asking User A to wait for the User B to finish its update task, and giving the updated/correct data to User A. But the problem with this level is - it can't resolve Phantom Read or Inconsistency Analysis i.e it asks User A to wait for Read but not for update or insert.

Example
SET TRANSACTION ISOLATION LEVEL  
READ COMMITTED 
BEGIN TRANSACTION MyTransaction 
BEGIN TRY 
UPDATE Account SET Debit=100 WHERE Name='John Cena' 
UPDATE ContactInformation SET Mobile='1234567890' WHERE Name='The Rock' 
COMMIT TRANSACTION MyTransaction 
PRINT 'TRANSACTION SUCCESS' 
END TRY 
BEGIN CATCH 
ROLLBACK TRANSACTION MyTransaction 
PRINT 'TRANSACTION FAILED' 
END CATCH 
Repeatable Read

This level does every work that Read Committed does. but it has one additional benefit. User A will wait for the transaction being executed by User B to execute it's Update query as well, like Read Query. But Insert query doesn't wait, this also creates Phantom Read problem.

Example
SET TRANSACTION ISOLATION LEVEL  
REPEATABLE READ
Snapshot

This level takes a snapshot of current data. Every transaction works on its own copy of data. When User A tries to update or insert or read anything, we ask him to re-verify the table row once again from the starting time of its execution, so that he can work on fresh data. with this level. We are not giving full faith to User A that he is going to work on fresh data but giving high-level changes of data integrity.

Example
SET TRANSACTION ISOLATION LEVEL  
SNAPSHOT 
Serializable

This is the maximum level of Isolation level provided by SQL Server transaction. We can prevent Phantom Read problem by implementing this level of isolation. It asks User A to wait for the current transaction for any kind of operation he wants to perform.

Example
SET TRANSACTION ISOLATION LEVEL  
SERIALIZABLE

Isolation level also has a problem called "Dead Lock"- "Both the transactions lock the object and waits for each other to finish up the job". Dead Lock is very dangerous because it decreases the concurrency and availability of database and the database object. We will discuss Dead-Lock in the later part of this topic.

Hope, I covered the necessary points that can help many of us to implement Isolation level in the project with the identification of real situations. Believe me friends, it is a good practice to implement Transaction with "Isolation Level" in every type of projects.

HostForLIFE.eu SQL Server 2016 Hosting
HostForLIFE.eu is European Windows Hosting Provider which focuses on Windows Platform only. We deliver on-demand hosting solutions including Shared hosting, Reseller Hosting, Cloud Hosting, Dedicated Servers, and IT as a Service for companies of all sizes.


SQL Server 2016 Hosting - HostForLIFE.eu :: FORMATMESSAGE

clock February 21, 2017 08:25 by author Peter

In this post, I will show you how to using bigint with FORMATMESSAGE. SQL Server 2016 added the FORMATMESSAGE function.  According to Books On Line, FORMATMESSAGE constructs a message from an existing message in sys.messages or from a provided string. The functionality of FORMATMESSAGE resembles that of the RAISERROR statement. However, RAISERROR prints the message immediately, while FORMATMESSAGE returns the formatted message for further processing.

So let's take a look at this new function, run the following
SELECT FORMATMESSAGE('Signed int %i, %i', 50, -50)
SELECT FORMATMESSAGE('Unsigned int %u, %u', 50, -50);


Here is the output if you run that

--------------------------------------------
Signed int 50, -50
Unsigned int 50, 4294967246

Here is what the type specifications that you can use are

Type specification         Represents
d or i                          Signed integer
o                                Unsigned octal
s                                String
u                               Unsigned integer
x or X                         Unsigned hexadecimal

We used i to denote a signed integer, we also used u to denote a unsigned integer

Let's look at another example, this time we are using a variable. The variable will be an integer and we  are using i as the type specification

DECLARE @Val int = 1
SELECT FORMATMESSAGE('The value you supplied %i is incorrect!', @Val);


Here is the output
---------------------------------------
The value you supplied 1 is incorrect!

That worked without a problem. Now let's use a variable of the bigint data type, we are using the same type specification as before

DECLARE @Val bigint = 1
SELECT FORMATMESSAGE('The value you supplied %i is incorrect!', @Val);

Here is the output
---------------------------------------------------------------------------
Error: 50000, Severity: -1, State: 1. (Params:).


The error is printed in terse mode because there was error during formatting.
Tracing, ETW, notifications etc are skipped.

As you can see that did not work, so what can we do?
One thing we can do is converting the value to a varchar and then use s as the type specification
DECLARE @Val bigint = 1
SELECT FORMATMESSAGE('The value you supplied %s is incorrect!',
   CONVERT(VARCHAR(100),@Val));

You will again get this as output
---------------------------------------

So converting to varchar worked, but what if we want to use a bigint data type without converting to a varchar?

Another way is to use I64d as the type specification
DECLARE @Val bigint = 1<br />
SELECT FORMATMESSAGE('The value you supplied %I64d is incorrect!', @Val);


You will get this
---------------------------------------

The value you supplied 1 is incorrect!
So there you have it, if you want to use bigint with FORMATMESSGAE use I64d as the type specification, or convert to varchar and use s as the type specification.

HostForLIFE.eu SQL Server 2016 Hosting
HostForLIFE.eu is European Windows Hosting Provider which focuses on Windows Platform only. We deliver on-demand hosting solutions including Shared hosting, Reseller Hosting, Cloud Hosting, Dedicated Servers, and IT as a Service for companies of all sizes.


SQL Server 2016 Hosting - HostForLIFE.eu :: How to Auto Increment ID Column Using nvarchar DataType In SQL Server?

clock February 14, 2017 07:53 by author Peter

This article is about Auto Increment ID Column using nvarchar datatype in SQL Server 2016 . SQL server provides identity property to get auto-increment record values where the datatype used is “int”. This article explains a way to use nvarchar datatype column to get auto-increment record values.
e.g. S00001, E00001, INV00001. (Here there are prefix like S, E, INV used to denote the record ids.)

This article provides a solution to use alphanumeric record ids incremented automatically.

Solution
Create an Employee table as below,

Here “ID” column is for storing record id as similar to Serial No of any entry made. “EmployeeNo” column is used to store the alphanumeric auto increment id. “Name” stores the name of the Employee. Create a Windows Form with a TextBox and a Button control


The above figure shows the use of a textbox to enter name in the ”employee” table where the id is auto-incremented.
Code
    Import the NameSpace

Create 2 methods OpenConnection() and CloseConnection() to handle the SQL Server Connection object.
        private void OpenConnection(SqlConnection con) { 
            con.ConnectionString = "Data Source=.; Initial Catalog=demodb; Integrated Security=True"; 
            if (con.State == ConnectionState.Closed) { 
                con.Open(); 
            } 
        } 
        private void CloseConnection(SqlConnection con) { 
            con.Close(); 
        } 


On the Insert button click the id is auto-incremented and the relevant data is inserted in the employee table. (id, employeeno and name)
        SqlConnection con = new SqlConnection(); 
        OpenConnection(con); 
        string id = AutoIncrementID(); 
        int idLimit = 7; 
        string eno = "E" + ZeroAppend("0000000" + id, idLimit); 
        string query = "insert into employee values ('" + id + "', '" + eno + "', '" + txtName.Text + "')"; 
        SqlCommand cmd = new SqlCommand(query, con); 
        int i = cmd.ExecuteNonQuery(); 
        if (i > 0) { 
            MessageBox.Show("Data Added", "Add", MessageBoxButtons.OK, MessageBoxIcon.Information); 
        } 
        CloseConnection(con); 

Here a method AutoIncrementID() is used to do the task of auto-incrementing based on the last entry inserted in the table.
        private string AutoIncrementID() { 
            SqlConnection con = new SqlConnection(); 
            OpenConnection(con); 
            SqlCommand cmd = new SqlCommand("SELECT ISNULL(MAX(ID),0) + 1 from employee", con); 
            SqlDataReader dr = cmd.ExecuteReader(); 
            string id = null; 
            if (dr.Read()) { 
                id = dr[0].ToString(); 
            } 
            CloseConnection(con); 
            return id; 
        } 
        //The function ZeroAppend is used to append “0” after the prefix to the code. 
        public static string ZeroAppend(string data, int idLimit) { 
            return data.Substring(data.Length - idLimit); 
        } 

Output,

HostForLIFE.eu SQL Server 2016 Hosting
HostForLIFE.eu is European Windows Hosting Provider which focuses on Windows Platform only. We deliver on-demand hosting solutions including Shared hosting, Reseller Hosting, Cloud Hosting, Dedicated Servers, and IT as a Service for companies of all sizes.


SQL Server 2016 Hosting - HostForLIFE.eu :: How to Implement Inner Join When Query Contains Outer Join?

clock February 7, 2017 08:50 by author Peter

This is something interesting; i.e., how to enforce the compiler to use the inner join instead of the outer join. Let's take an example. We have two tables State_Tab and City_Tab. An SQL JOIN clause is used to combine rows from two or more tables, based on a common field between them. The most common type of join is: SQL INNER JOIN (simple join). An SQL INNER JOIN returns all rows from multiple tables where the join condition is met.

State_Tab

City_Tab

Now, we write two queries, using outer join, and compare the execution plan of both the queries.

Query 1

Query 2


We can see that both the queries use the left outer join but the second query implements the inner join, instead of outer join, because for "On condition", we define the 1=1, which will be always true, so the query optimizer converts the left outer join to cross join due to the "Where condition". This cross join will convert into the inner join.


SQL Server 2016 Hosting - HostForLIFE.eu :: How to Get The Header Information Of A Table in SQL Server?

clock January 10, 2017 10:14 by author Peter

Now, I will show you how to Get The Header Information Of A Table in SQL Server. If someone asks the question, "How do I get the header information of the table in SQL Server?" the first solution that arises in our mind will be "use any condition that never matches," like 1=0 or 2=0. However, in this case, we only get the header information of the table, and no result will return.

It is true that using the above solution, we will not get any data and the result will be the header information of our table.

But this is not the best solution because in this case, SQL Server reads all rows and compares the conditions each time. That increases the turnaround time and resource complexity.

For this, SQL Server provides the "SET FMTONLY ON" keyword. "SET FMTONLY ON" returns only metadata to the client. It can be used to test the format of the response without actually running the query. This method returns header information without performing any read operation.

HostForLIFE.eu SQL Server 2016 Hosting
HostForLIFE.eu is European Windows Hosting Provider which focuses on Windows Platform only. We deliver on-demand hosting solutions including Shared hosting, Reseller Hosting, Cloud Hosting, Dedicated Servers, and IT as a Service for companies of all sizes.


SQL Server 2016 Hosting - HostForLIFE.eu :: Clearing Down A Database Full Of Constraints In SQL Server

clock January 3, 2017 08:32 by author Peter

Have you ever been in a situation where you've got to clear down some data within a database that's chock filled with constraints but don't desire to wipe out your precious relationships, indices and all that other jazz?

I found myself in a similar situation earlier this week, and required a clear-down script that might wipe out all of the data within a whole database, without being bothered by any existing constraints. Here it is.
    USE @YourTable;  
    EXEC sp_MSForEachTable "ALTER TABLE ? NOCHECK CONSTRAINT ALL"  
    EXEC sp_MSForEachTable "DELETE FROM ?"  
    EXEC sp_MSForEachTable "ALTER TABLE ? WITH CHECK CHECK CONSTRAINT ALL"  
    GO  

The script itself takes advantage of an undocumented stored procedure within SQL Server called sp_MSForEachTable that will actually iterate through all of the tables within a given database.

Now that we know we are going to be looping through each of the tables within the specified database, let's see what is going to happen to each of the tables.


ALTER TABLE ? NOCHECK CONSTRAINT ALL
This will disable any constraint checking that is present on the table (so, operations like deleting a primary key or a related object won't trigger any errors).

DELETE FROM ?
This will delete every record within the table.

ALTER TABLE ? WITH CHECK CHECK CONSTRAINT ALL
This re-enables the constraint checking, bringing your table back to its original state, sans data.

It is very important that you properly scope this query to the table that you are targeting to avoid any crazy data loss. While I don't think that you could just leave that out and execute on master, I wouldn't want to even risk testing that out (although feel free to try it out and let me know if it nukes everything).

HostForLIFE.eu SQL Server 2016 Hosting
HostForLIFE.eu is European Windows Hosting Provider which focuses on Windows Platform only. We deliver on-demand hosting solutions including Shared hosting, Reseller Hosting, Cloud Hosting, Dedicated Servers, and IT as a Service for companies of all sizes.


European SQL 2016 Hosting - HostForLIFE.eu :: Using SQL Server 2016 Query Store to Force Query Execution

clock December 5, 2016 10:44 by author Scott

Many a time we come across a scenario where suddenly in production without any release or changes some query which was working perfectly alright till yesterday is taking too long to execute or consuming lot of resources or timing out.

Most of the times such issue are related to execution plan change (commonly referred as Plan Regression). Till yesterday the query was running fine as it was running with good cached execution plan and today a bad plan is generated and cached. Because of this bad cached plan the query which was executing perfectly alright suddenly starts misbehaving.

To identify and fix such performance problems due to the execution plan change the Query Store feature introduced in Sql Server 2016 will be very handy.

Query Store basically captures and stores the history of query execution plans and its performance data. And provides the facility to force the old execution plan if the new execution plan generated was not performing well.

What’s Interesting with SQL Query Store

The SQL Server Query Store consists of two main store parts; the Plan Store, where the execution plans information stored, and the Runtime State Store, where the execution statistics will be stored. The query execution statistics and plans are stored first in memory, and flushed to the disk after a specific interval of time. In this way, the Query Store information will not be lost when the SQL Server service is restarted, as the data is hardened to the disk. The default flush to disk configurable database option DATA_FLUSH_INTERNAL_SECONDS value is 15 minutes, this means that, the executed queries information will be written to the disk from the Query Store every 15 minutes. The smaller flush interval, the more frequent write-to-disk operations, the worst SQL performance. The Query Store data will be flushed automatically to the disk to release the memory for other processes if there is a memory pressure. For proper memory and space usage for the Query Store, the execution information is aggregated in the memory first over fixed interval of time, and then flushed to the disk in aggregated form. The max_plans_per_query option can be used to control the number of plans that will be stored for review.

SQL Server Query Store provides you with an easy way to troubleshoot query performance, where you can identify the top CPU, Memory and IO consuming queries, with full execution history for these queries in addition to find which and when the query performance regressed and fix it directly by forcing the best plan, preventing the SQL Server Query Optimizer from using the less efficient new plan. It also can be used to draw a general image about the workload of your environment, with the query text, execution plans, the number of executions and SQL Server resources utilization, which can help you in evaluating how much resources required by your SQL Server database.

When the query is executed for its first time, the query execution plan with full query properties and statistics will be stored in the Query Store internal tables. If you run the query again and the SQL Server Query Optimizer decides to recompile the query and create a new execution plan, this plan will be added to the Query Store, in addition to the old one, with the plan and query execution statistics. Query Store allows you to track the queries execution plans and performance changes, and enforce the plan that the query behaves better when you execute the query with it. When a query is compiled, the SQL Server Query Optimizer will take the latest plan in the plan cache if it is still useful, unless a PLAN HINT is used, or another plan is forced by the Query Store. In this case, the Query Optimizer will recompile the query and use that new plan. No change is required from the application side to perform that, as this is performed transparently from the users.

To start using the new Query Store feature, you need to enable it at the database level, then it will start capturing the queries execution statistics and plans automatically. The below ALTER DATABASE statement is used to enable the Query Store feature on the SQLShackDemo database , which is disabled by default, and specify the operation mode for that feature:

USE [master]
GO
ALTER DATABASE [SQLShackDemo] SET QUERY_STORE = ON
GO
ALTER DATABASE [SQLShackDemo] SET QUERY_STORE (OPERATION_MODE = READ_WRITE)
GO

You can also use the SQL Server Management Studio to enable the Query Store, from the Database Properties window below, where you can find the new Query Store tab introduced when you use the SQL Server 2016 version:

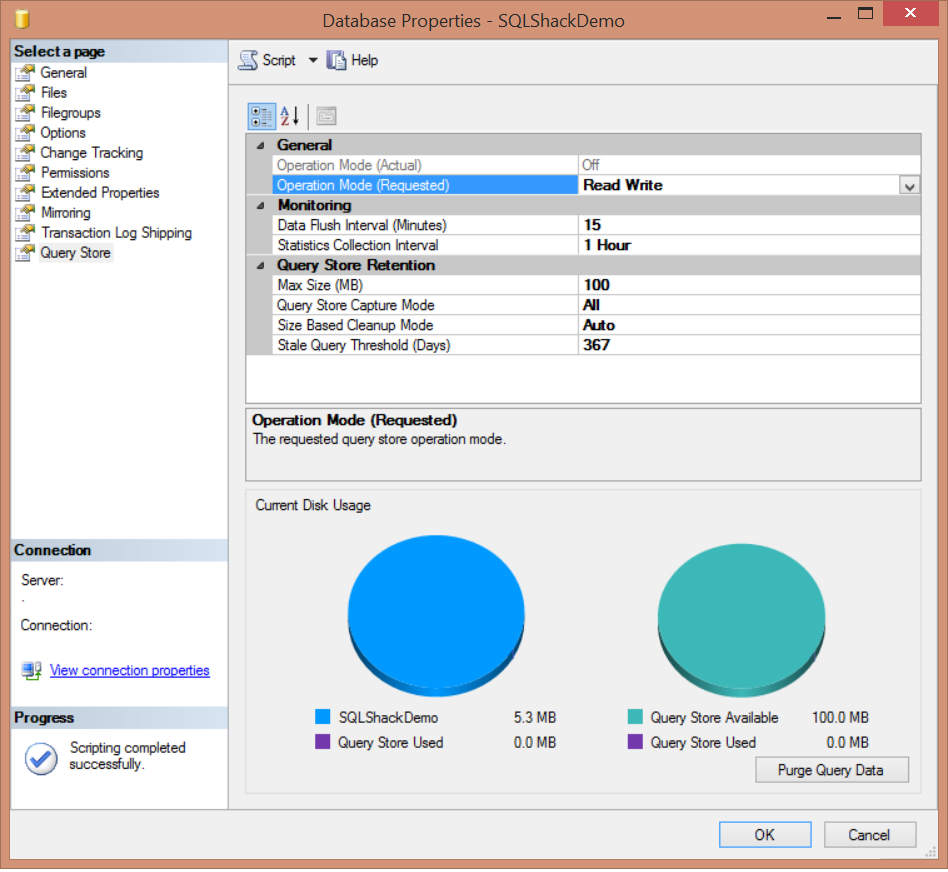
As you can see from the previous image, SQL Server Query Store can be run in two operation modes; Read-Onlymode, where you can only use the persisted statistics to analyze the queries , without capturing any new data. This occurrs when the Query Store reaches its maximum allocation space. In Read-Write mode, the Query Store will capture the execution statistics for the current workload and store it, to be used for analyzing the queries execution performance. The DATA_FLUSH_INTERVAL_SECONDS option determines how frequent the Query Store data stored in the memory will be asynchronously transferred to the disk. By default, SQL Server will write the in-memory Query Store statistics to the disk every 15 minutes, or 900 seconds. You can also flush the Query Store data manually from the memory to the disk by executing the below query:

USE SQLShackDemo
GO
EXEC sys.sp_query_store_flush_db

The maximum size of data that can be stored in the Query Store can be controlled by the MAX_STORAGE_SIZE_MB option. As mentioned previously, exceeding that limit will change the Query Store operation mode to Read-Only mode automatically. By default, the Query Store can keep up to 100 MB of query statistical data before transferring to the Read-Only operation mode. You can make sure that the Query Store will activate the cleanup process if the execution data exceeds the MAX_STORAGE_SIZE_MB value by setting the SIZE_BASED_CLEANUP_MODE to AUTO, which is the default value, or turn it OFF to stop the automatic cleanup process.

The QUERY_CAPTURE_MODE option specifies if the Query Store will capture ALL queries, or ignore the queries that are not running frequently or running on a very small time with AUTO capture mode or stop capturing any new query using the NONE capture mode. The number of days to keep the Query Store data is specified by the STALE_QUERY_THRESHOLD_DAYS parameter.

As mentioned previously in this article, query execution statistics data is aggregated in memory and later flushed to Query Store internal tables to optimize the space usage. The aggregation process is performed over a fixed time interval that is controlled by the INTERVAL_LENGTH_MINUTES parameter, which is 60 minutes by default.

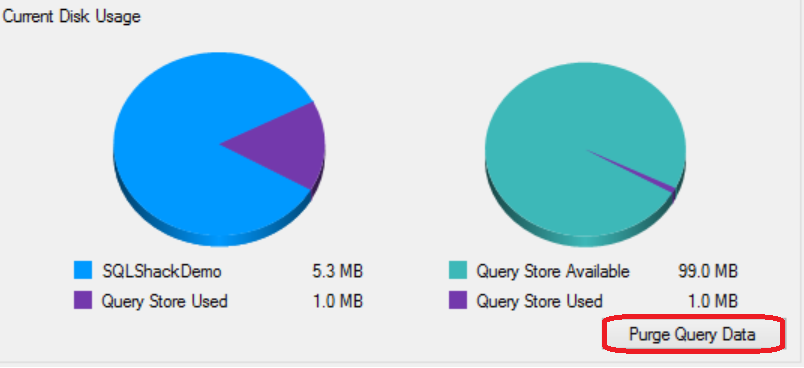
You can also find other useful information in the Query Store page under the Database Properties window, such as the Query Store disk usage in the current database and disk space used by the Query Store internal tables. This page allows you to delete or purge the Query Store data by clicking on the Purge Query Data at the right bottom part of the window:

Or use the below ALTER statement to purge the content of the Query Store:

ALTER DATABASE [SQLShackDemo] SET QUERY_STORE CLEAR

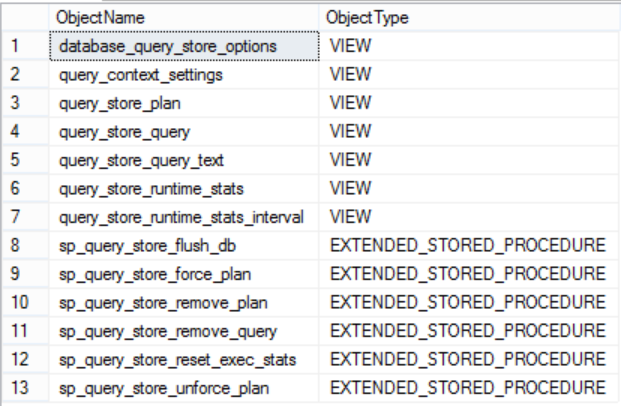
SQL Server introduced 6 new system stored procedures and 7 new system views to check the Query Store feature information and deal with it. These system objects can be listed by querying the sys.all_objects system table as below:

USE master
GO
SELECT Name as ObjectName , type_desc as ObjectType
FROM sys.all_objects
WHERE name LIKE '%query_store%'
or name= 'query_context_settings'

The result will be like:

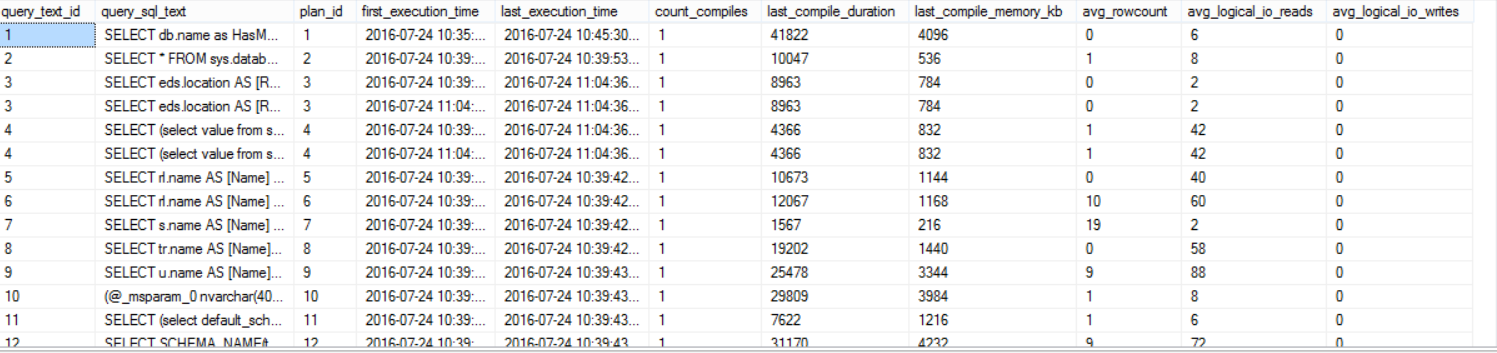
The sys.query_store_plan, sys.query_store_query, and sys.query_store_query_text system tables can be used to get the current query plans in the Query Store. To show you up-to-date statistics, the data stored in the disk and the current data in the memory will be merged together to provide toy with full image as follows:

SELECT QST.query_text_id,
QST.query_sql_text,
QSP.plan_id,
QSRS.first_execution_time,
QSQ.last_execution_time,
QSQ.count_compiles,
QSQ.last_compile_duration,
QSQ.last_compile_memory_kb,
QSRS.avg_rowcount,
QSRS.avg_logical_io_reads,
QSRS.avg_logical_io_writes
FROM sys.query_store_plan AS QSP  
JOIN sys.query_store_query AS QSQ  
    ON QSP.query_id = QSQ.query_id  
JOIN sys.query_store_query_text AS QST  
    ON QSQ.query_text_id = QST.query_text_id
JOIN sys.query_store_runtime_stats  QSRS
   ON QSP.plan_id =QSRS.plan_id

The result will be like:

The SQL Server Query Store has no direct impact on SQL Server performance, but you need to take into consideration the disk space required to store the aggregated query execution data, where the data will be stored in the Primary database filegroup and consume the configurable MAX_STORAGE_SIZE_MB disk amount as described previously. Also the Query Store capture the execution data asynchronously as it writes the data to the memory first and flush it later to the disk. Query Store avoids consuming the CPU and Memory resources in the way it uses to capture the new plans and the executions statistics.

Once the Query Store is enabled on your database, you can query the sys.database_query_store_options system object to check the Query Store settings you configured as follows:

USE SQLShackDemo
GO
SELECT  actual_state_desc,
                                flush_interval_seconds,  
                                interval_length_minutes,
                                max_storage_size_mb,
                                stale_query_threshold_days,
                                max_plans_per_query,
                                query_capture_mode_desc,
                                size_based_cleanup_mode_desc    
FROM sys.database_query_store_options;  

The result in our case will be like:

Refresh your database node from the Object Explorer to ensure that the new Query Store node that is added in SQL Server 2016, is enabled as below:

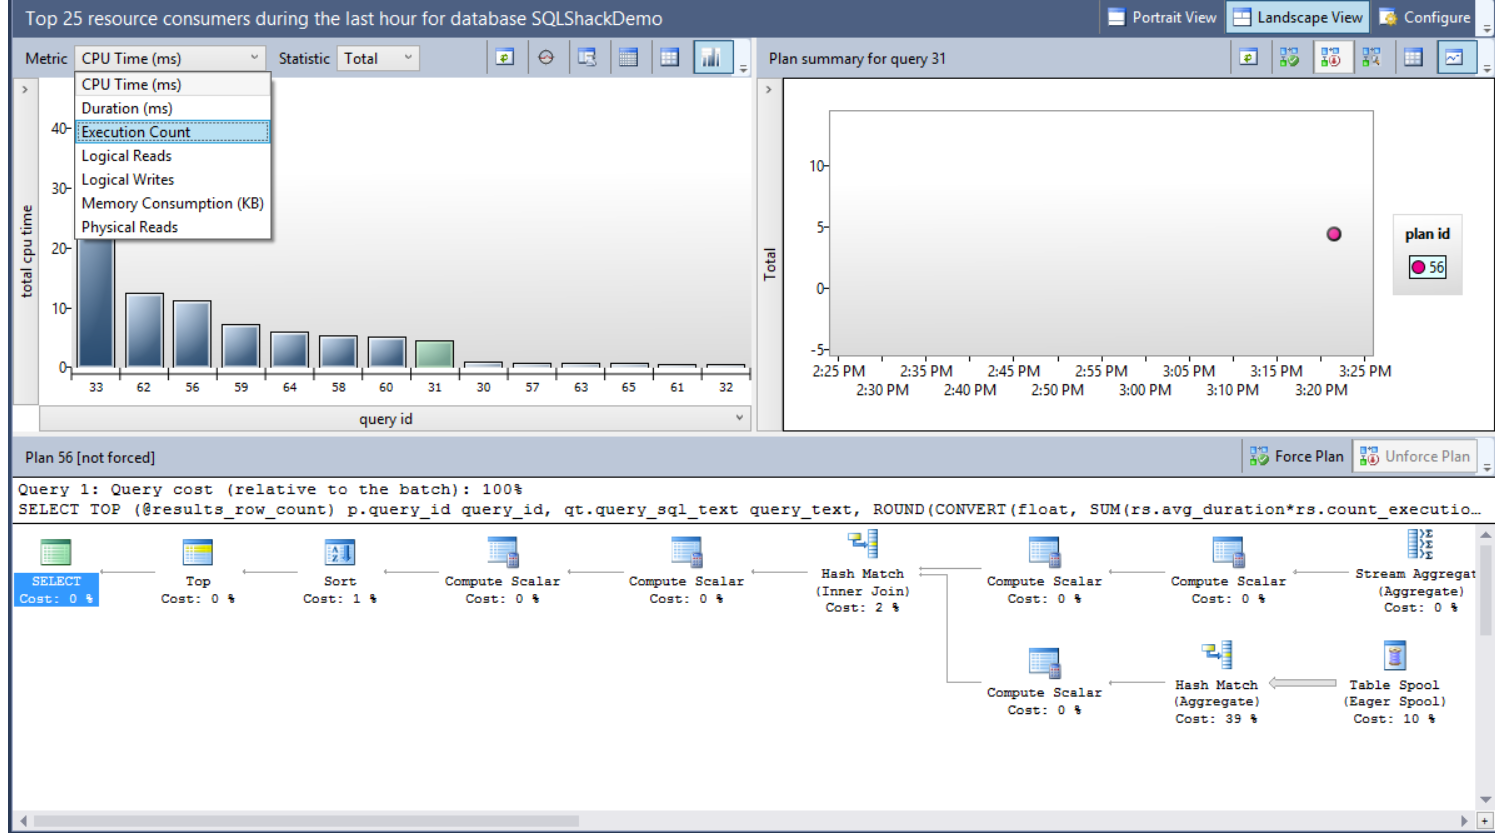
Four nodes will be displayed, from where you can check and track the changes in the queries execution statistics and performance. Choose the Regressed Queries node that will show you the queries execution plans with all related statistics:

From the previous window, you can use the Metric drop-down list to choose the criteria that will be used to compare the execution plans performance, with the Statistic drop-down list to select the aggregation function used in the comparison. You can also view the graphical plan for the queries, the query text and the available plans for the query to force the best plan if requested.

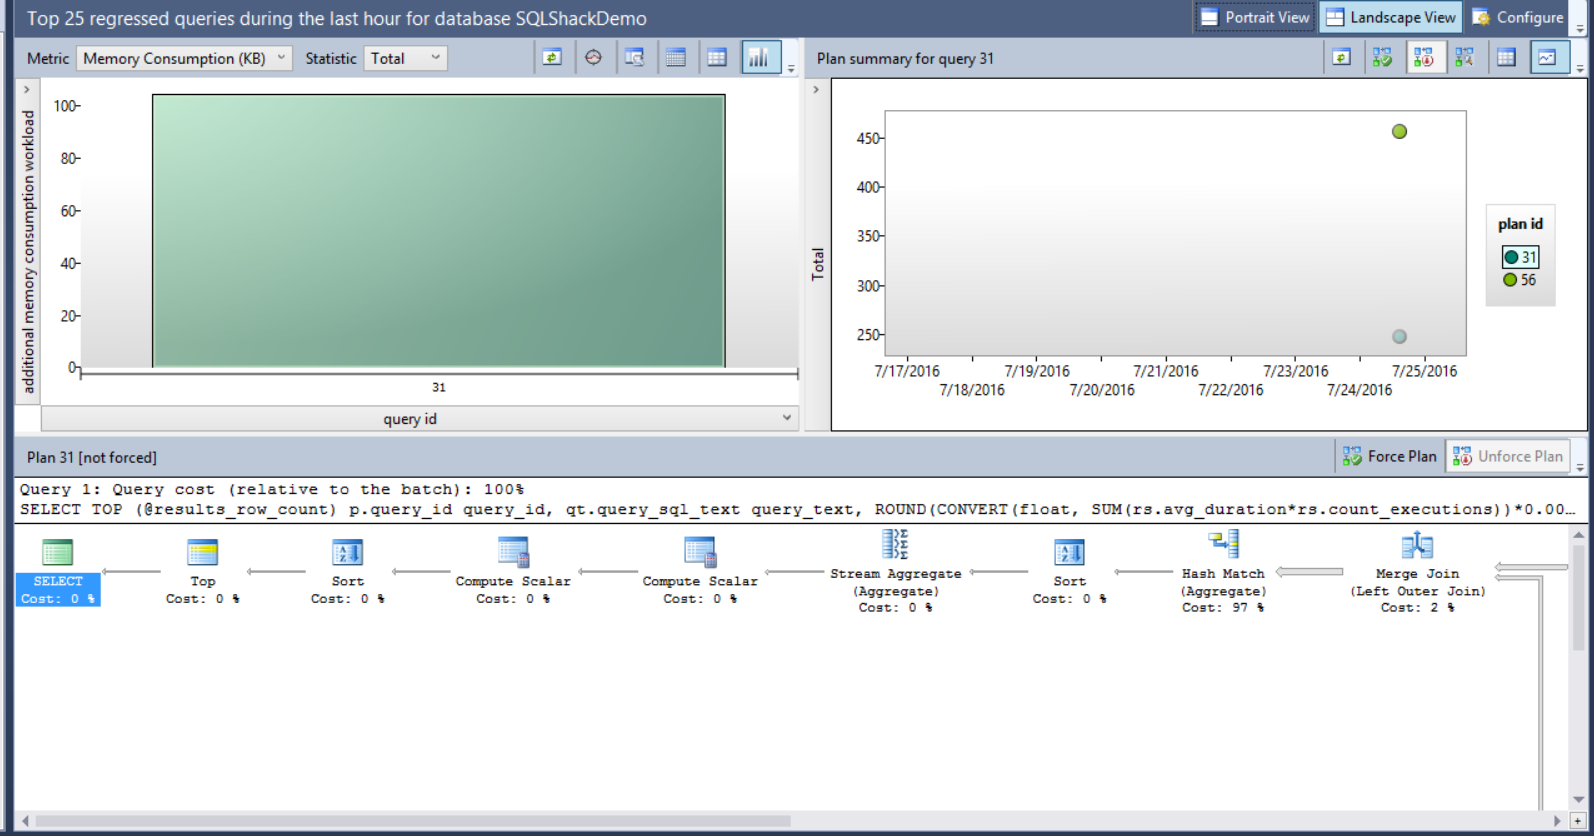
Assume that we faced a memory consumption performance issue recently with one of our queries, and we arrange to force the Query Optimizer to use the old plan. Using the Query Store feature, select the Memory Consumption (KB) metric, the query and the plan as in the below window:

<image>

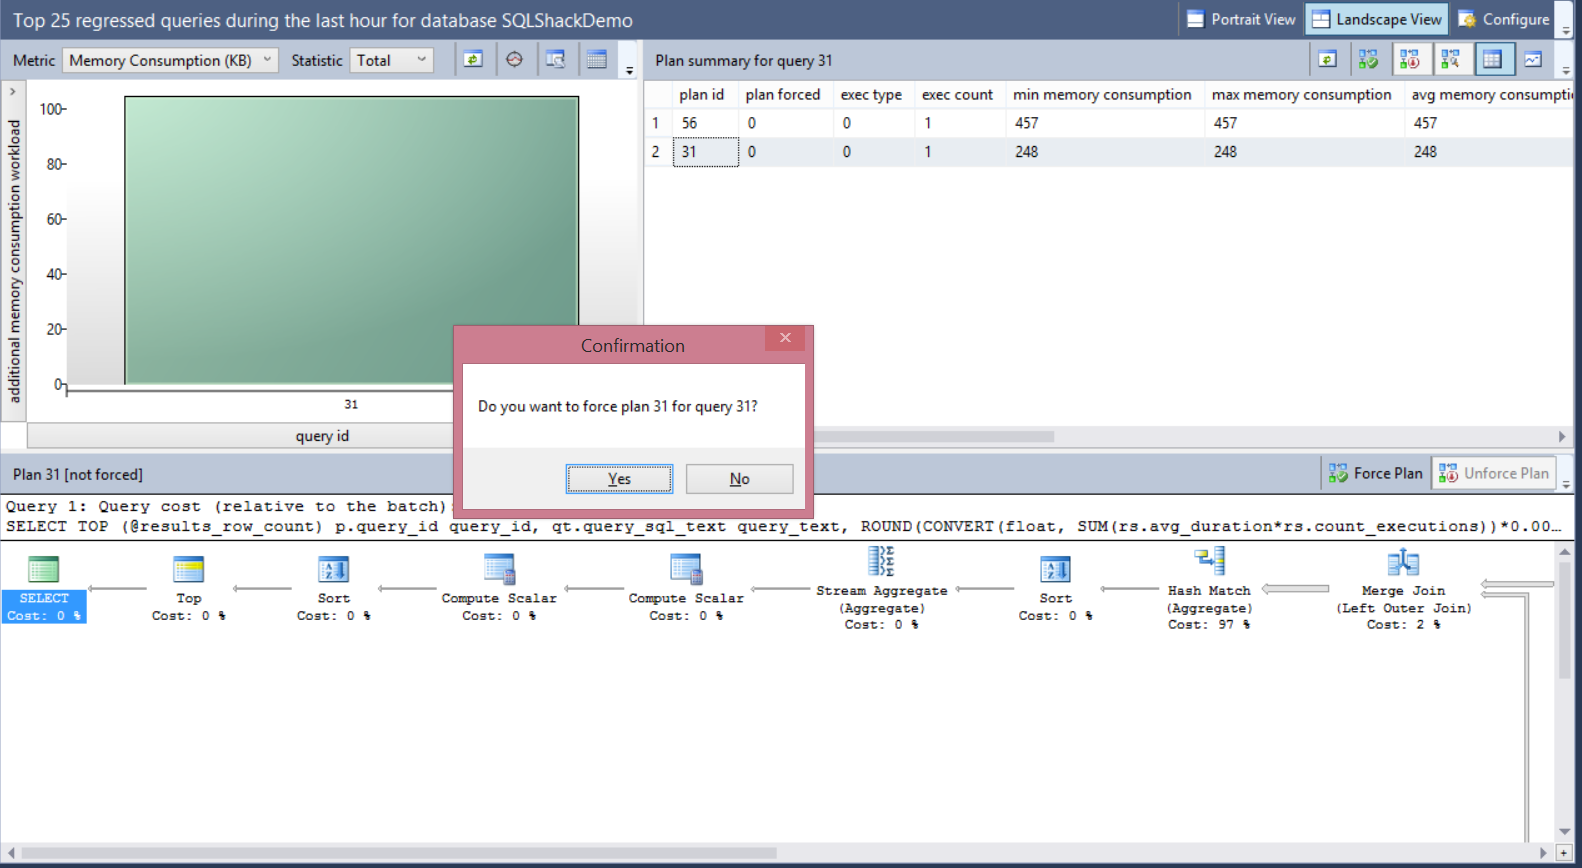
It is clear that the memory consumption for plan 56 is double the memory consumption of plan 31, so we will force the plan 31 for that query. The size of the bubbles shown in the right chart of the window depends on the total number of executions for each plan. The plans data can be displayed in grid form or as bubbles depends in the view you choose. Choose plan 31 in the previous window and click on Force Plan button.

A message will be displayed to confirm that you need to force the selected plan for that query as follows:

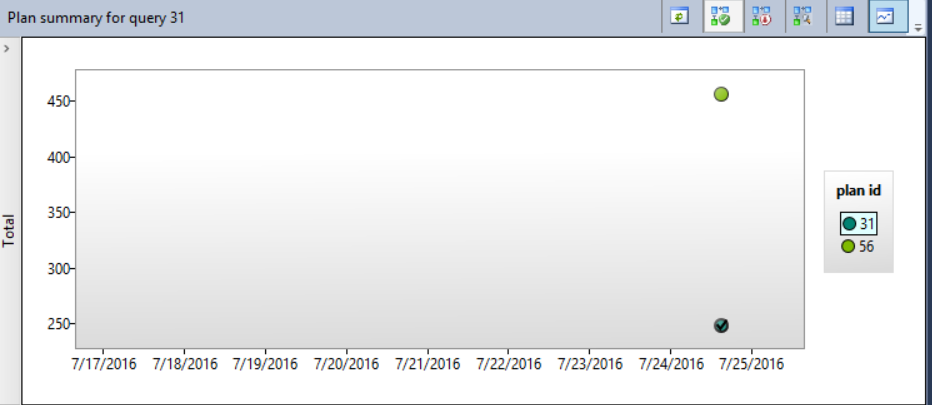
This action will force the SQL Server Query Optimizer to recompile that query in the next run using the forced plan. The selected plan will be shown with tick inside it, indicating that this plan is forced now for that query as below:

You can also use the sp_query_store_force_plan SP to enforce a specific plan for the query as follows:

EXEC sp_query_store_force_plan @query_id = 31, @plan_id = 31;

Conclusion:

The SQL Server Query Store is a nice feature introduced in SQL Server 2016, which certainly merits your time and attention, although it will take few minutes from you to configure and learn. This feature is a simple way that can be used to track performance changes and troubleshoot any degradation in the queries performance by comparing the execution plans for the same query and force the best one by overriding the one saved in the plan cache and used by the Query Optimizer. The SQL Server Query Store has no major impact on SQL Server performance due to the way that is used in capturing and saving the queries execution statistics and plans to be viewed later.


SQL Server 2016 Hosting - HostForLIFE.eu :: LAG and LEAD Functions in SQL Server

clock November 24, 2016 07:33 by author Peter

In this post, I will tell you about the LAG and LEAD functions in SQL Server. These two functions are analytical functions in SQL Server. In actual scenarios we need to analyze the data, for example, comparing previous sales data.

The Lag and Lead functions support the window partitioning and ordering clauses in SQL Server. The Lag and Lead functions do not support the window frame clause.

LAG
The Lag function gives the previous column values based on ordering.

LEAD
The Lead function gives the next column values based on ordering.

Demo
    CREATE TABLE DBO.SALES 
    ( 
    PROD_ID INT , 
    SALES_YEAR INT, 
    SALES_AMOUNT INT  
    ) 

    INSERT INTO DBO.SALES(PROD_ID,SALES_YEAR,SALES_AMOUNT) VALUES(1,2009,10000) 
    INSERT INTO DBO.SALES(PROD_ID,SALES_YEAR,SALES_AMOUNT) VALUES(1,2010,9000) 
    INSERT INTO DBO.SALES(PROD_ID,SALES_YEAR,SALES_AMOUNT) VALUES(1,2011,8000) 
    INSERT INTO DBO.SALES(PROD_ID,SALES_YEAR,SALES_AMOUNT) VALUES(1,2012,7000) 
    INSERT INTO DBO.SALES(PROD_ID,SALES_YEAR,SALES_AMOUNT) VALUES(1,2013,14000) 
    INSERT INTO DBO.SALES(PROD_ID,SALES_YEAR,SALES_AMOUNT) VALUES(1,2014,18000) 
    INSERT INTO DBO.SALES(PROD_ID,SALES_YEAR,SALES_AMOUNT) VALUES(1,2015,15000) 
    INSERT INTO DBO.SALES(PROD_ID,SALES_YEAR,SALES_AMOUNT) VALUES(2,2013,12000) 
    INSERT INTO DBO.SALES(PROD_ID,SALES_YEAR,SALES_AMOUNT) VALUES(2,2014,8000) 
    INSERT INTO DBO.SALES(PROD_ID,SALES_YEAR,SALES_AMOUNT) VALUES(2,2015,16000) 
    INSERT INTO DBO.SALES(PROD_ID,SALES_YEAR,SALES_AMOUNT) VALUES(3,2012,7000) 
    INSERT INTO DBO.SALES(PROD_ID,SALES_YEAR,SALES_AMOUNT) VALUES(3,2013,8000) 
    INSERT INTO DBO.SALES(PROD_ID,SALES_YEAR,SALES_AMOUNT) VALUES(3,2014,9700) 
    INSERT INTO DBO.SALES(PROD_ID,SALES_YEAR,SALES_AMOUNT) VALUES(3,2015,12500) 

    SELECT * FROM DBO.SALES

The following example shows the Previous Year Sales Amount.
SELECT *, LAG(SALES_AMOUNT) OVER(ORDER BY PROD_ID ,SALES_YEAR) [Prevoius Year Sales] FROM DBO.SALES

The following example shows the Next Year Sales Amount.
    SELECT * , 
    LEAD(SALES_AMOUNT) OVER(ORDER BY PROD_ID ,SALES_YEAR) [Next Year Sales]  
    FROM DBO.SALES 

The following example shows the Previous Year Next Year Sales Amount using the partition by clause.
    SELECT *, 
     
       LAG(SALES_AMOUNT) OVER(PARTITION BY PROD_ID ORDER BY PROD_ID ,SALES_YEAR) [PREVOIUS YEAR SALES] , 
       LEAD(SALES_AMOUNT) OVER(PARTITION BY PROD_ID ORDER BY PROD_ID ,SALES_YEAR) [NEXT YEAR SALES]  
    FROM DBO.SALES     

The following example shows an offset other than 1.

The offset is by default 1. If we want an offset other than 1 then we need to provide 2 argument values in the Lag and Lead functions.
    SELECT * , 
       LAG(SALES_AMOUNT,2)  OVER(ORDER BY PROD_ID ,SALES_YEAR) [PREVOIUS YEAR SALES] , 
       LEAD(SALES_AMOUNT,2)  OVER( ORDER BY PROD_ID ,SALES_YEAR) [NEXT YEAR SALES]  
    FROM DBO.SALES 

The following example shows replacing the null with various values:

    SELECT * , 
       LAG(SALES_AMOUNT,2,0)  OVER(ORDER BY PROD_ID ,SALES_YEAR) [PREVOIUS YEAR SALES] , 
       LEAD(SALES_AMOUNT,2,0)  OVER( ORDER BY PROD_ID ,SALES_YEAR) [NEXT YEAR SALES]  
    FROM DBO.SALES 


HostForLIFE.eu SQL Server 2016 Hosting
HostForLIFE.eu is European Windows Hosting Provider which focuses on Windows Platform only. We deliver on-demand hosting solutions including Shared hosting, Reseller Hosting, Cloud Hosting, Dedicated Servers, and IT as a Service for companies of all sizes.


European SQL 2016 Hosting - HostForLIFE.eu :: Json in SQL Server 2016

clock November 17, 2016 10:17 by author Scott

In this article, we will focus on Json support in SQL Server 2016. We will take a look how Json will impact data warehouse solutions

Since the advent of EXtensible Markup Language (XML) many modern web applications have focused on providing data that is both human-readable and machine-readable. From a relational database perspective, SQL Server kept up with these modern web applications by providing support for XML data in a form of an XML data type and several functions that could be used to parse, query and manipulate XML formatted data.

As a result of being supported in SQL Server, data warehouse solutions based off SQL Server were then able to source XML-based OLTP data into a data mart. To illustrate this point, let’s take a look at the XML representation of our fictitious Fruit Sales data shown in figure below.

To process this data in data warehouse, we would first have to convert it into relational format of rows and columns using T-SQL XML built-in functions such as the nodes() function. 

The results of the above script are shown below in a recognisable format for data warehouse.

Soon after XML became a dominant language for data interchange for many modern web applications, JavaScript Object Notation (JSON) was introduced as a lightweight data-interchange format that is more convenient for web applications to process than XML. Likewise most relational database vendors released newer versions of their database systems that included the support for JSON formatted data. Unfortunately, Microsoft SQL Server was not one of those vendors and up until SQL Server 2014, JSON data was not supported. Obviously this lack of support for JSON, created challenges for data warehouse environments that are based off SQL Server.

Although there were workarounds (i.e. using Json.Net) to addressing the lack of JSON support in SQL Server, there was always sense that these workarounds were inadequate, time-wasting, and were forcing data warehouse development teams to pick up a new skill (i.e. learn .Net). Fortunately, the release of SQL Server 2016 has ensured that development teams can throw away their JSON workarounds as JSON is supported in SQL Server 2016.

Parsing JSON Data into Data Warehouse

Similarly to XML support in SQL Server, SQL Server supports of JSON can be classified into two ways:

1. Converting Relational dataset into JSON format
2. Converting JSON dataset into relational format

However, for the purposes of this discussion we are focusing primarily on the second part – which is converting a JSON formatted data (retrieved from OLTP sources) into a relational format of rows and columns. To illustrate our discussion points we once again make use of the fictitious fruit sales dataset. This time around the fictitious dataset has been converted into a JSON format as shown in below.

ISJSON function

As part of supporting JSON formatted data in other relational databases such as MySQL and PostgreSQL 9.2, there is a separate JSON data type that has been introduced by these vendors. Amongst other things, JSON data type conducts validation checks to ensure that values being stored are indeed of valid JSON format.

Unfortunately, SQL Server 2016 (and ORACLE 12c) do not have a special data type for storing JSON data instead a variable character (varchar/nvarchar) data type is used. Therefore, a recommended practice to dealing with JSON data in SQL Server 2016 is to firstly ensure that you are indeed dealing with a valid JSON data. The simplest way to do so is to use the ISJSON function. This is a built-in T-SQL function that returns 1 for a valid JSON dataset and 0 for invalids.

OPENJSON function

Now that we have confirmed that we are working with a valid JSON dataset, the next step is to convert the data into a table format. Again, we have a built-in T-SQL function to do this in a form of OPENJSON. OPENJSON works similar to OPENXML in that it takes in an object and convert its data into rows and columns.

Below shows a complete T-SQL script for converting JSON object into rows and columns.

Once we execute the above script, we get relational output shown below

Now that we have our relational dataset, we can process this data into data warehouse.

JSON_VALUE function

Prior to concluding our discussion of JSON in SQL Server 2016, it is worth mentioning that in addition to OPENJSON, you have other functions such as JSON_VALUE that could be used to query JSON data. However this function returns a scalar value which means that unlike the multiple rows and columns returned using OPENJSON, JSON_VALUE returns a single value as shown in Figure below.

If you the JSON object that you are querying doesn’t have multiple elements, than you don’t have to specify the row index (i.e. [0]) 

Conclusion

The long wait is finally over and with the release of SQL Server 2016, JSON is now supported. Similarly to XML, T-SQL support the conversion of JSON object to relational format as well the conversion of relational tables to a JSON object. This support is implemented via built-in T-SQL functions such as OPENJSON and JSON_VALUE. In spite of all the excitement with the support of JSON is SQL Server 2016, we still don’t have a JSON data type. The ISJSON function can then be used to validate JSON text.


About HostForLIFE.eu

HostForLIFE.eu is European Windows Hosting Provider which focuses on Windows Platform only. We deliver on-demand hosting solutions including Shared hosting, Reseller Hosting, Cloud Hosting, Dedicated Servers, and IT as a Service for companies of all sizes.

We have offered the latest Windows 2016 Hosting, ASP.NET Core 2.2.1 Hosting, ASP.NET MVC 6 Hosting and SQL 2017 Hosting.


Tag cloud

Sign in