October 21, 2014 09:57 by
 Peter
Peter
Here are some tips and tricks you'll be able to use for Umbraco 7.2 CMS related developments. You'll be ready to use the following techniques to organise your Umbraco page URLs.
NiceUrl
This is the most common method for us to return a "Friendly URL" for a given node within the Umbraco content section. As explained in Umbraco, a 'Friendly url' is the complete encoded URL excluding the domain. however this relies on the settings you tack in UmbracoSettings.config file. If you set useDomainPrefixes=true in UmbracoSettings.config, NiceUrl returns the url as well as the domain.

NiceUrl with XSLT
Code for Return current page URL
<xsl:value-of select="umbraco.library:NiceUrl($currentPage/@id)" />
This code will return hyperlink to parent page
<a href="{umbraco.library:NiceUrl($currentPage/../@id)}">
<xsl:value-of select="$currentPage/../@nodeName" />
</a>
NiceUrl with Razor
Return current page URL
@umbraco.library.NiceUrl(Model.Id)Hyperlink to parent page;
<a href="@umbraco.library:NiceUrl(Model.Parent.Id)">
@Model.Parent.Name
</a>
Model is basically Razors equivalent of "$currentPage" in XSLT.
NiceUrl with C#
This will get the current page URL to a string
var currentNode = umbraco.presentation.nodeFactory.Node.GetCurrent();
string pageURL = umbraco.library.NiceUrl(currentNode.Id);
This will get the parent page URL to a string;
var currentNode = umbraco.presentation.nodeFactory.Node.GetCurrent();
string parentPageURL = umbraco.library.NiceUrl(currentNode.Parent.Id);
umbracoUrlAlias
As Umbraco explains, using the "umbracoUrlAlias" alias with a text-string property can change you to supply multiple URLs for a content node. For example if we were to enter "news,events/upcoming-events", this is able to resolve the following URLs to the same page
./news.aspx
/events/upcoming-events.aspx
Things to note: you must perpetually use umbracoUrlAlias field value in lowercase letters, not use a leading slash and not use a trailing ".aspx".

January 15, 2014 11:28 by
 Scott
Scott
HostForLIFE.eu, a leading Windows web hosting provider with innovative technology solutions and a dedicated professional services team, today announced the supports for Umbraco 7 Hosting plan due to high demand of Umbraco 7 CMS users in Europe. Umbraco 7 features the stable engine of Umbraco 6 powering hundreds of thousands of websites, but now enriched with a completely new, remarkably fast and simple user interface.

Umbraco is fast becoming the leading .NET based, license-free (open-source) content management system. It is an enterprise level CMS with a fantastic user-interface and an incredibly flexible framework which is both scalable and easy to use. Umbraco is used on more than 85,000 websites, including sites for large companies such as Microsoft and Toyota.
HostForLIFE.eu is a popular online Umbraco 7 hosting service provider catering to those people who face such issues. The company has managed to build a strong client base in a very short period of time. It is known for offering ultra-fast, fully-managed and secured services in the competitive market.
Umbraco has given a lot of thought to the user experience of their CMS. The interface uses a navigational flow and editing tools that anybody using Windows Explorer and Microsoft Word will immediately recognise. Your site structure sits in a tree view - just like Windows Explorer. Anybody with experience using Microsoft Word, can use Umbraco's simple rich text editing (RTE) interface.
"Umbraco 7 is easy to install within few clicks, special thanks to HostForLIFE.eu special designed user friendly web hosting control panel systems." - Ivan Carlos, one of the many HostForLIFE.eu satisfying clients.
Further information and the full range of features Umbraco 7 Hosting can be viewed here http://hostforlife.eu/European-Umbraco-7-Hosting.
What is uCommerce?
uCommerce is an e-commerce offering fully integrated with Umbraco for building online stores. With uCommerce and Umbraco you create unique and powerful e-commerce webshops fully customized to your client's requirements.

uCommerce is completely integrated with the Umbraco membership system. Configure whether you want customers created during checkout for login to review ordering history and more.
- Use the Umbraco membership to stay in touch with with past customers.
- Create profiles for your customers automatically when they buy
- Segment customers using groups
- View customer profiles in back office
- Store additional information about your customer on their profile such as sign ups for newsletters
- Search for customer profiles
- Maintain e-mail templates with rich text editing capabilities
- Control who can maintain your store
So, how to adding new tab under uCommerce Admin sections in Umbraco 6.0.0? Steps for adding new tab in uCommerce section :
1. Add new user control for custom tab view
To add new tab first create new user control in your website, go to website in visual studio add new user control where you want as per your defined directory structure. It is good to place new user control under /usercontrols folder in Umbraco website.
So the virtual path for newly created user control will be “../../../usercontrols/TestTab.ascx”.
Inherit newly created user control from Ucommerce.Presentation.Web.Controls.ViewEnabledControl<T>
The generic parameter T must be type of view which you want to load your user control to appear on. Most commonly used views and their types are discussed below.

So if you are inheriting your user control from any of these views you can register for following events.
event EventHandler<EntityCommandEventArgs<T>> Saving;
event EventHandler<EntityCommandEventArgs<T>> Saved;
event EventHandler<EntityCommandEventArgs<T>> Deleting;
event EventHandler<EntityCommandEventArgs<T>> Deleted;
2. Insert New Row For Tab in Database
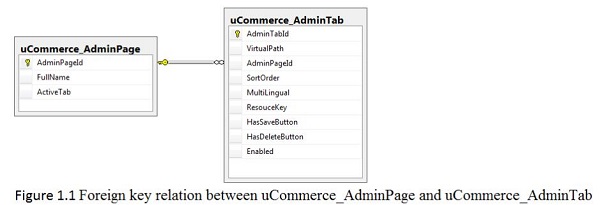
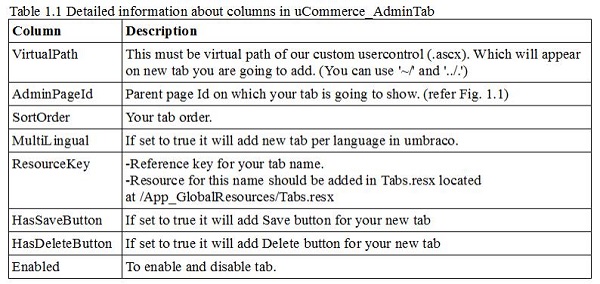
In uCommerce uCommerce_AdminTab refers to uCommerce_AdminPage for parent page container of your tab(usercontrol). So you have to add your usercontrol entry into uCommerce_AdminTab table and should give the AdminPageId from uCommerceAdminPage table to select on which view or page you going to add your new tab. See the visuals


As per the information in the above table you can insert an entry into uCommerce_AdminTab table for new tab. Build your solution and your new tab is ready under the view you have selected.
Hide/Show custom tab for particular section
As explained earlier your new tab will be visible for view you have selected, Consider an example where you want to do some functionality Completed Orders (uCommerce >> Orders >> Completed Orders) and if you have followed above steps your new tab will be visible for all remaining sections like New Orders, Requires Attention etc.To hide or show your tab for particular section only, implement ISection interface in your user control and set the Show property as per your requirement.
For ex:

So this will show your custom user control for Completed Orders only.

November 8, 2013 07:52 by
 Scott
Scott
In this tutorial, I will show you how to deploy Umbraco website on our shared hosting environment. Easy and faster.

First, you need to create blank SQL database.
1. Open Visual Web Developer Express 2010/VS 2010 Pro
2. Open Database Explorer (View -> Database Explorer) (in Visual Studio 2010 you will open “Server Explorer”).
3. The Database Explorer should show up on the right side of the IDE.
4. Right click Data Connections and select Add Connection.
5. Enter the server name in the first text box (type the name of your local SQL Server).
6. Type the name of the database in the database name field and click “OK.”
7. In Database Explorer you will see your local database. Right click on it and choose Publish to Provider.
Then:
To generate the script that will create the backup of your database follow the steps listed below.
1. Click “Next” on the welcome screen of Publishing Wizard.
2. Ensure that your database is selected, check Script all objects in the selected database and click “Next.”
3. Choose the Script to file option and type the name of the script you will be generating. Click “Next.”
4. Leave the default Publishing Options and click “Next.”
5. Click “Finish.”
The final steps are:
1. Open your database in SQL Server Management Studio 2008.
2. Click File/Open/File and navigate to the SQL script you just created from your SQL Server.
3. Input your database login and password from Control Panel
4. Once the script is opened, navigate to the very top of the page and type:
- USE [database name] (without the brackets)
- GO
5. Click the “Execute” button.
It creates all tables exactly the same as you have in your local DB.
Happy coding!