European Windows 2012 Hosting BLOG

BLOG about Windows 2012 Hosting and SQL 2012 Hosting - Dedicated to European Windows Hosting Customer

European ASP.NET 4.5 Hosting - HostForLIFE.eu :: New Features Visual Studio LightSwitch 2013

clock November 27, 2013 06:46 by author Scott

We believe that some of you’re looking for this new features on LightSwitch 2013. We also support the latest Visual Studio LightSwitch 2013. You can take a look our hosting plan. In today post I will show what’s new on Visual Studio LightSwitch 2013.

Targeting .NET 4.5

A LightSwitch solution is composed of a server-side project based on ASP.NET and client projects based on either Silverlight (desktop), the new HTML client, or both. Until Visual Studio 2012 Update 3 (the latest update available when this article was written), the server project targeted .NET Framework 4.0. In Visual Studio 2013, the server project targets .NET Framework 4.5, enabling developers to take advantage of all the benefits of the latest version of ASP.NET and the .NET platform.

New Structure and Solution Explorer Enhancements

There are many important changes in how LightSwitch projects are created and structured in Visual Studio 2013. The first important change is that every screen and every table is now represented by a file with the .lsml extension. These files are based on the XML markup language, and they make it easier to give projects a better organization.

Please take a look this image below:

Every .lsml file has a code-behind file. For instance, a screen in the Silverlight client can have a Visual Basic or C# code-behind file, whereas in the HTML client .lsml files have JavaScript code-behind files. On the server side, table definition files with the .lsml extension always have VB or C# code-behind files, depending on which programming language you chose when creating the project.

The new project structure also affects Solution Explorer in other areas. Visual Studio 2013 no longer offers Logical view and File view; you simply have the usual classic view of any kind of project you can open in Visual Studio. This change makes the LightSwitch development environment even simpler and provides a more logical approach. You can compare the new view to an extended File view. You also can take advantage of all the best tools offered by Solution Explorer since Visual Studio 2012 (a blog post on MSDN explains the details), such as search, scoping, and duplicate views.

Improved Team Development

Another important improvement thanks to the new project structure affects team development. If you've had a chance to work with Team Foundation Server and source control over a LightSwitch application, you know how painful merging changes can be. In previous versions of LightSwitch, not all elements in the solution were managed by the source control engine. Now that everything is basically a file, every element is added to source control, allowing Team Foundation Server to manage the application changes correctly, thereby enabling team members to be more productive and efficient.

Easier Navigation

Switching between designers and visual elements is a frequent task. To make this common task easier, LightSwitch now offers the following options:

  • Navigation buttons are available on the left end of the standard toolbar. With these buttons, you can easily go back and forward to elements you worked with previously.
  • The Related Items drop-down list, available at the upper-right corner of any designer allows for easy navigation to screens, entities, and queries that have a relationship with the item you're currently viewing.

Enhanced Views with Multiple Designers

One of the biggest limitations in previous editions of the IDE in LightSwitch was the inability to open multiple designers concurrently. This feature was requested frequently, as you often need to copy-and-paste items from one screen or table to another.

HTML Client: JavaScript IntelliSense and DOM Explorer Improvements

At a higher level, Visual Studio 2013 has added several improvements to the JavaScript code editor and the DOM Explorer window. Because such improvements are part of Visual Studio, the LightSwitch development experience can take advantage of them as well. The code editor for JavaScript has been dramatically improved; for instance, all the occurrences of an identifier are now highlighted, and a navigation bar at the upper-right corner makes it easier to browse methods and declarations, as shown in image below.

Another great new improvement in the coding experience is the new auto brace complete. With this feature, Visual Studio 2013 automatically adds closing quotes, parentheses, brackets, and braces for you as you type code.

The DOM Explorer window allows for inspecting the Document Object Model (DOM) of an HTML page while it's being shown—a particularly handy feature at debugging time. In Visual Studio 2013, DOM Explorer highlights in yellow the parts of the HTML page that are being rendered; such highlights are very useful for understand the rendering progress. DOM Explorer also now supports direct editing, meaning that you can add new HTML attributes to the code while inspecting the page. The right side of the window provides additional tools for inspecting styles and layout properties, including events

The JavaScript interactive console now supports IntelliSense, which makes testing code a faster and sharper task.

Intrinsic Database Management with Linked Database Projects

When you create tables in a LightSwitch application, a SQL Server database (the intrinsic database) is created for you. Then you can publish the database along with the application via the deployment wizard or with SQL scripts. Visual Studio 2013 brings an interesting new opportunity: You can link the intrinsic database to a SQL Server database project. This feature opens an incredible number of scenarios, such as writing custom scripts or adding stored procedures into the intrinsic database.

Looking forward to try this new feature? Please check http://www.hostforlife.eu. We have offered the latest Visual Studio 2013 hosting on our hosting environment.


European Ms. Visual Studio LightSwitch Hosting - France :: Tips How to Build App in LightSwitch Application

clock September 10, 2013 08:20 by author Administrator

LightSwitch is a Rapid Development environment that will allow technical and somewhat-technical people the ability to create light weight Line of Business applications. While many developers don’t think LightSwitch will be useful for creating apps, we think it can be very beneficial to use in the right circumstances.

Microsoft® Visual Studio® LightSwitch™ is a new streamlined development environment for designing data-centric business applications and helps you to build data-centric applications quickly, through visual means. LightSwitch business applications are multi-tiered, featuring a client application and a combination of LINQ, WCF RIA Services and the Entity Framework to implement the application services tier.
Benefits of using LightSwitch?
There are many benefits of using LightSwitch as shown in the below list

  • You can create an application with just few clicks and no code or coding only in the data models or substantial code within all parts of the application.
  • Based on permission, LightSwitch support distinct audiences end-users (View & Edit Data), administrative (maintain certain master data) and Super-users (granted access to most or all of the data and functionality).
  • Support built-in Business Types include like (Email, PhoneNumber, money,..etc), and partners can create new Business Types.
  • Enable Debug mode, and allows the screen to be edited interactively while the application is running.
  • Enable adding custom business rules to any field in the screen.
  • ou can create custom controls and embed sophisticated behaviors there.
  • LightSwitch produces desktop applications or pulls down and executed implicitly by navigating to a URL.
  • Enables you to deploy your LightSwitch on Cloud and Azure as simple as running a wizard.

Start building the App
Now let’s start building our application, I am going to list every thing in details starting from opening Visual studio 2012 until running the application. we will go throw the following steps.

Step 1 : Creating the Application

Creating new LightSwitch application is very simple, if you’re familiar with any old version of Visual Studio as follows:

Open VS 2012 –> New project –> Select LightSwitch from project Template list –> Select LightSwitch application (c#), and finally we will write the project name LighSwitchsubscriptionApp –> press Ok

Step 2 : Creating & Defining Data tables and relationships

The start point to LightSwitch application is creating Data Table and you can do this task through four ways:

  • Click the Create new table link in the start up project page “Start with data” which called [you project name] Designer
  • Go to Visual Studio menu bar Select Project –> Add table
  • Right click Project Name in solution explorer then select Add table
  • Connect to an exist data source published on (Database, Sharepoint, OData Services, WCF RIA Service) as mentioned in step 2 and 3, but select Add data source instead of Add Table option, and create Subscriber table as shown in below figure
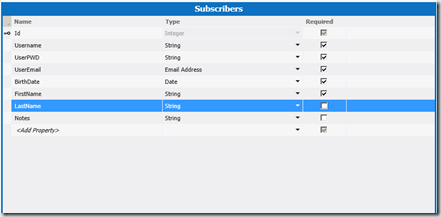
The above picture, it contains Useremail field with Data type Email, this is one of the new features of LightSwitch , that you can create new field with new Business Types like (Email, Money, Phone, web address).

- In addition, you can add New filed of static choice list by selecting choicelist link from right side properties of any string field, for example, we will create choicelist for Gender(male, female).
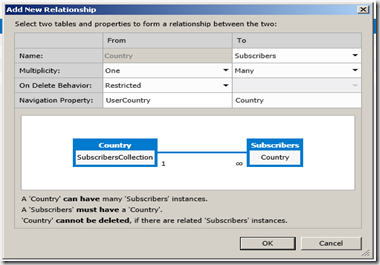
- Usually any registration module needs dropdown list of country field, but using LightSwitch makes the difference for you, we are not going to create new control and write code to bind this control from database, we are going to create new table of countries and link it to our Subscriber table and link these two tables, by following the below steps:

  • Create new table called Country with one columns(contryDesc).
  • Then click Relationshin, button in the toolbar.
  • Finally build the relation between the subscriber and country tables as shown below.
Step 3 : Building Screens & Running the Application

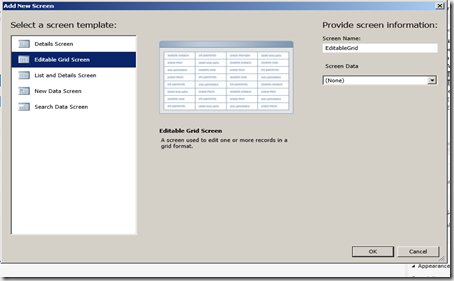
Now, we are getting ready to Build the screens corresponding to Entities, simply you click the Screen button from the toolbar on the subscriber & Countries Table Design forms, this will open Add ‘New screen’ Dialog then select the highlighted option showing in figure below, and finally press Ok button.
- Repeat same process above for country entity.
- Finally, we can run the application by pressing f5 key, we will see screen as shown in figure below:
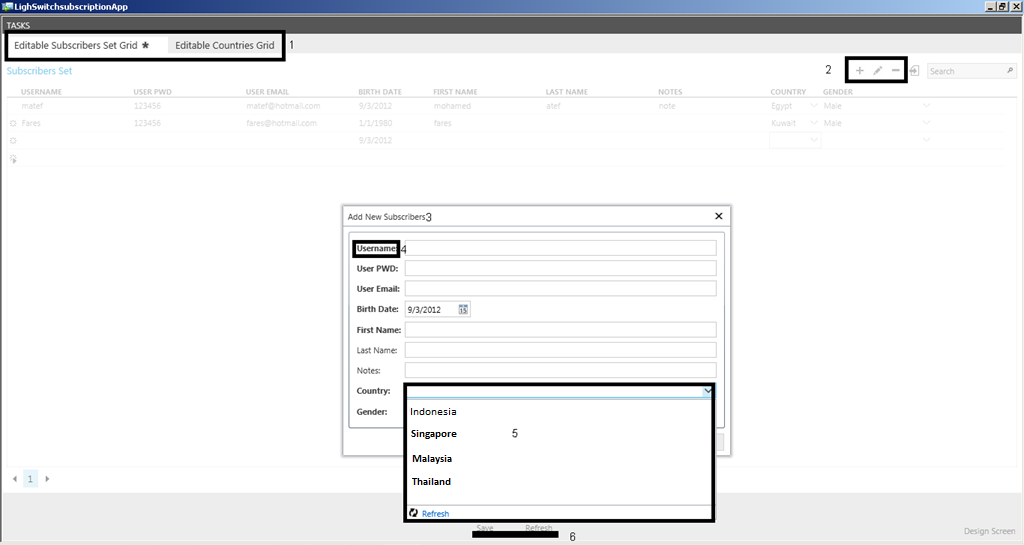
- Now, let’s go a head and review above screen as listed below:

Box 1 ,represent two tabs for all entity screens we have created .
Box 2 ,represent all actions available for this gridview Add, Delete, Edit, Search .
Box 3, represent the Dialog screen that opens when you select Add button.
Box 4, Showing Required fields marked as Bold.
Box 5, Showing Country list that I have entered in country entity.
Box 6, includes main actions for this screen ( Save , Refresh).

- There is another very important feature here, as you can see on right bottom of the screen link [Design Screen], this link allows you to edit the screen Design on the execution mode, if and only if, you have run the application in Debug mode.
- Eventually, we did not finish all features of LightSwitch, but we have other features that I will list them soon in other posts, I was just trying to show the power of using Lightswitch without writing any line of code.


About HostForLIFE.eu

HostForLIFE.eu is European Windows Hosting Provider which focuses on Windows Platform only. We deliver on-demand hosting solutions including Shared hosting, Reseller Hosting, Cloud Hosting, Dedicated Servers, and IT as a Service for companies of all sizes.

We have offered the latest Windows 2016 Hosting, ASP.NET Core 2.2.1 Hosting, ASP.NET MVC 6 Hosting and SQL 2017 Hosting.


Tag cloud

Sign in