European Windows 2012 Hosting BLOG

BLOG about Windows 2012 Hosting and SQL 2012 Hosting - Dedicated to European Windows Hosting Customer

HostForLIFE.eu Proudly Launches Scalable Enterprise Email Hosting - Italy

clock December 17, 2013 09:34 by author Administrator


HostForLIFE.eu, a leading Windows web hosting provider with innovative technology solutions and a dedicated professional services team proudly announces Enterprise Email Hosting for all costumer. HostForLIFE.eu aim to help you grow your bottom line whether it is driving direct sales from emails, driving website traffic or delivering outstanding service.

Enterprise Email is a great tool for communicating to existing customers, or individuals who know your organization well enough and have interest in opting-in to receive your e-mail. Your promotions, sales and offers get their attention, meet a need, and encourage them to do more business with you.  What e-mail marketing typically doesn’t do very effectively is attract the attention of new customers.

Robert Junior and Sophia Levine from HostForLIFE.eu say:
"Once a business has secured a domain name, we setup an email hosting account for them and they can choose any email account they wish.  Most popular email accounts for small business are sales, info and accounts, although it can be virtually anything once you own your own domain name." Robert says.

"I would expect that once more small business owners had the flexibility to mange their own email hosting, they would save money on their monthly internet costs because there are always cheaper deals being promoted. Of course email hosting does not replace your internet service, but it enables you to switch to a cheaper plan and not loose contact with your customers."  Sophia says.

"Our clients have found that they are able to save money on their internet services because once they no longer rely to manage their email, they can shop around for a better deal, save some money and take their Email Hosting with them.  Having your own domain name and email hosting also improves your business image far more that an ISP account or hotmail email address." Robert says.

"What many small business owners often struggle with is continuing to pay high internet service costs to keep their allocated ISP email address if they use their ISP email for their business.  What people do not realise is that if they were to purchase their own .com or etc domain name they have a unique email address like '[email protected]'.  It means they can move to a cheaper ISP if they find a better deal and not risk losing contact with their business contacts." Sophia Says.

HostForLIFE.eu provides a full suite of self-service marketing solutions with the following features: Total Bulk Email up to 10.000 emails/month with total maibox is 5, users receive 2 GB mailbox quota, a platform fully support Blackberry, SPF/DKIM/TXT, WebMail Access, and POP/SMTP/IMAP.

Are you sending direct mails to your customers just once a month or every three days? Simply choose the plan that suits you the most. All price plans are based on actual use of the system - from 10,000 e-mails sent out in a month starting at €8.00!

Further information and the full range of features Enterprise Email Hosting can be viewed here http://www.hostforlife.eu.


Visual Studio UK Hosting - HostForLIFE.eu :: Tutorial New API For Refreshing Data in LightSwitch in Visual Studio 2013

clock December 17, 2013 07:47 by author Administrator

New API For Refreshing Data in LightSwitch in Visual Studio 2013

You can get Visual Studio 2013 here: http://www.microsoft.com/visualstudio/eng/2013-downloads.

The Sample Project

When we open it up, it will be converted to the new Visual Studio 2013 format. However, to get it to run we have right-click on the first project

The API
The new refresh() API consists of  two methods that each return a Promise object.

  • Refresh()
    Asynchronously loads the first page of items into this collection and returns a promise that will be fulfilled when the first page is loaded. Existing results will be refreshed on the first page and subsequent pages unless load() is called again.
  • Refresh(navigationPropertyNames)
    Updates the entity with values from the data source if the entity
    is not changed.
    <param name="navigationPropertyNames" type="Array" optional="true">
    . An array of names of navigation properties to be included. An empty array means no properties will be included. If not specified, all reference properties are included.

Sample usage

  • Refresh the Order entity and its Customer, Employee, Shipper

        screen.Order.details.refresh();

  • Refresh only the Order entity

        screen.Order.details.refresh([]);

  • Refresh the Order entity and its Customer

        screen.Order.details.refresh(["Customer"]);

The Problem

Let’s say we have a field on the Order entity that is updated in the save pipeline when an associated OrderDetail record is updated.

In the OrderDetail record, the updating event looks like this:

We can update an OrderDetail record

Save the changes. But the time is unchanged on the screen (even though it has been updated in the database).

The Solution

We can instantly have the entity updated if we use the new refresh() method.

To do so requires us to implement our own code to open the edit screen (so we have an opportunity to implement the refresh code).
We select the Item Tap action for the Orders list.

Select Write my own method.

We then edit the code for the method we created.
We use the following code:

myapp.Main.Order_ItemTap_execute = function (screen) {
    myapp.showAddEditOrder(null, {
        beforeShown: function (addEditOrderScreen) {
            // Set the Order on the AddEditOrder screen
            // to the selected Order on the Main screen
            addEditOrderScreen.Order = screen.Orders.selectedItem;}
        },
        afterClosed: function (addEditScreen, navigationAction) {
            // If the user commits the change,
            // update the selected order on the Main screen
            if (navigationAction === msls.NavigateBackAction.commit) {
 // *****************************************
// The .refresh() method refreshes the Order
screen.Orders.selectedItem.details.refresh();
            }
        }
    });
};

When we update the record we will see the date instantly updated without the need to refresh the entire screen.


European Italy Umbraco Hosting :: Adding New Tab Under uCommerce Admin Sections in Umbraco 6.0.0

clock December 12, 2013 06:50 by author Administrator

What is uCommerce?

uCommerce is an e-commerce offering fully integrated with Umbraco for building online stores. With uCommerce and Umbraco you create unique and powerful e-commerce webshops fully customized to your client's requirements.

uCommerce is completely integrated with the Umbraco membership system. Configure whether you want customers created during checkout for login to review ordering history and more.

  • Use the Umbraco membership to stay in touch with with past customers.
  • Create profiles for your customers automatically when they buy
  • Segment customers using groups
  • View customer profiles in back office
  • Store additional information about your customer on their profile such as sign ups for newsletters
  • Search for customer profiles
  • Maintain e-mail templates with rich text editing capabilities
  • Control who can maintain your store

So, how to adding new tab under uCommerce Admin sections in Umbraco 6.0.0? Steps for adding new tab in uCommerce section :

1. Add new user control for custom tab view


To add new tab first create new user control in your website, go to website in visual studio add new user control where you want as per your defined directory structure. It is good to place new user control under /usercontrols folder in Umbraco website.

So the virtual path for newly created user control will be “../../../usercontrols/TestTab.ascx”.
Inherit newly created user control from Ucommerce.Presentation.Web.Controls.ViewEnabledControl<T>
The generic parameter T must be type of view which you want to load your user control to appear on. Most commonly used views and their types are discussed below.

So if you are inheriting your user control from any of these views you can register for following events.
event EventHandler<EntityCommandEventArgs<T>> Saving;
event EventHandler<EntityCommandEventArgs<T>> Saved;

event EventHandler<EntityCommandEventArgs<T>> Deleting;
event EventHandler<EntityCommandEventArgs<T>> Deleted;

2. Insert New Row For Tab in Database

In uCommerce uCommerce_AdminTab refers to uCommerce_AdminPage for parent page container of your tab(usercontrol). So you have to add your usercontrol entry into uCommerce_AdminTab table and should give the AdminPageId from uCommerceAdminPage table to select on which view or page you going to add your new tab. See the visuals


As per the information in the above table you can insert an entry into uCommerce_AdminTab table for new tab. Build your solution and your new tab is ready under the view you have selected.

Hide/Show custom tab for particular section


As explained earlier your new tab will be visible for view you have selected, Consider an example where you want to do some functionality Completed Orders (uCommerce >> Orders >> Completed Orders) and if you have followed above steps your new tab will be visible for all remaining sections like New Orders, Requires Attention etc.
To hide or show your tab for particular section only, implement ISection interface in your user control and set the Show property as per your requirement.
For ex:


So this will show your custom user control for Completed Orders only.


European HostForLIFE.eu Proudly Launches Entity Framework 6 with FREE Trial Hosting

clock December 11, 2013 06:31 by author Administrator

HostForLIFE.eu offers a variety of cheap and affordable European Windows ASP.NET Shared Hosting Plans to fit any need. No matter whether you’re starting a Blog with WordPress, installing a CMS solution with Drupal, opening a Forum with PHPBB, starting an Online Store with nopCommerce, or any number ventures beyond those mentioned above, our Windows ASP.NET Web Hosting plans are exactly what you’ve been looking for. HostForLIFE.eu is Microsoft No #1 Recommended ASP.NET Host Provider.
Entity Framework 6 (EF6) is an object-relational mapper that enables .NET developers to work with relational data using domain-specific objects. It eliminates the need for most of the data-access code that developers usually need to write.

Entity Framework is now available and there are top features to consider in this minor release:

Features that come for free. These are capabilities that are part of the core. You don’t even have to know they’re there to benefit from them, much less learn any new coding.

Level-setting features. A major enhancement is that Code First now supports mapping to Stored Procedures, something that has been supported by models created in the designer.

Another change is more interesting. With EF6, the EF APIs have been extracted from the .NET Framework; they’re now completely encapsulated in the NuGet package.

EF Designer in this category. It has been moved out of Visual Studio as of the 2013 edition, and instead provided as an extension to Visual Studio.

Ninja features. Support for asynchronous queries and saves, the return of custom Code First conventions, more extensibility using the new DbConfiguration type, support for mocking in unit tests, configurable retries on spotty connections, and even more.

For complete information about this new product, please visit our site at http://www.hostforlife.eu


Visual Studio Hosting - HostForLIFE.eu - Spain :: Integrating PayPal With Visual Studio LightSwitch

clock December 10, 2013 05:35 by author Administrator

This example application shows how you can integrate a complex API such as PayPal Adaptive Payments with Visual Studio LightSwitch.

The Sample Application

You can test out the sample application at:

https://paypalstore.lightswitchhelpwebsite.com/HTMLClient/

(use your user name and password of your LightSwitchHelpWebsite.com account)

Note: All transactions are real and your PayPal account will be debited $2.00. However, please  do not complete a transaction and then reverse the charges, that will cause me quite a hassle.

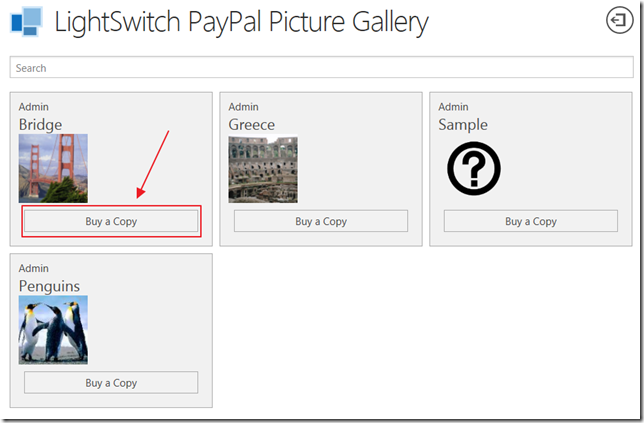
A user can browse the available pictures and purchase a copy by clicking the Buy a Copy button.

  • They are taken to a page where they can click the Buy Now button.

  • They are taken to the PayPal site where they can pay.

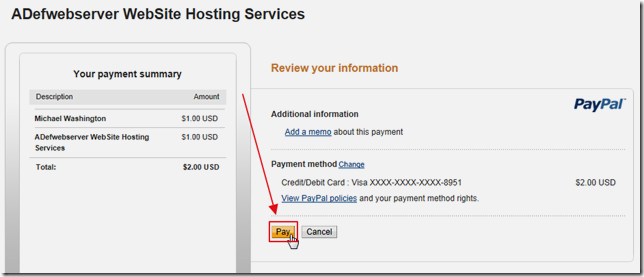
  • They can use a credit card (if the merchant account has that option), check, or their PayPal account.

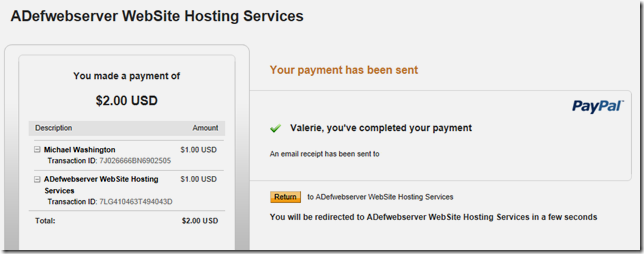
  • After making payment they see a confirmation.


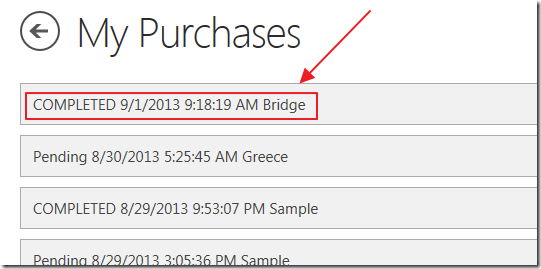
  • They are taken back to the application, to the My Purchases page.

Clicking on a purchase record will take them to a page where they can download the picture, if the payment has cleared.


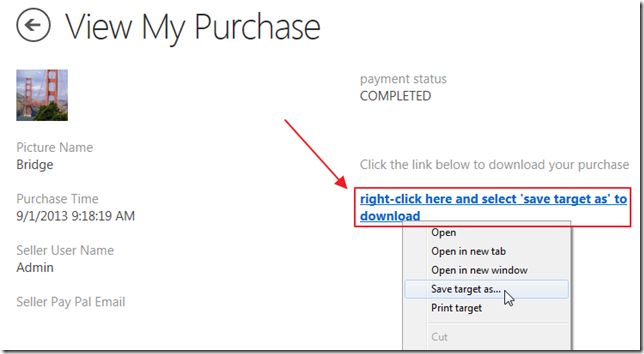
  • If the payment has not cleared, it will say so and display any error messages. Once payment has cleared this page will allow them to download the picture.

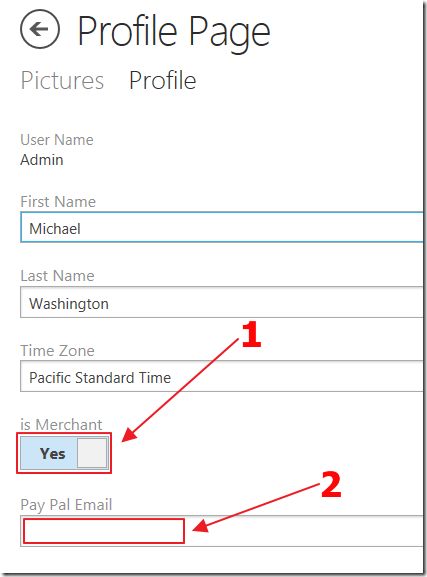
  • Any user can upload their own pictures, indicate that they are a Merchant, and enter their PayPal account.

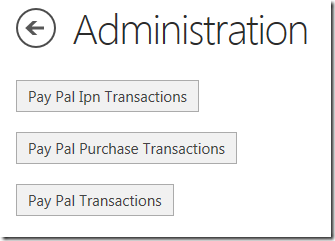
An administrator can see and diagnose all transactions. The administrator is defined when the application is published using the Visual Studio LightSwitch publishing wizard.

The administrator PayPal account is also configured in the web.config file (this is covered in the next section).

The PayPal API

Also note, the PayPal IPN notifications, will only work if the application has been published using the using the Visual Studio LightSwitch publishing wizard and is at a location that can be reached by the PayPal servers.


The code in the sample LightSwitch application uses the PayPal Adaptive Payments Classic API: https://developer.paypal.com/webapps/developer/docs/classic/adaptive-payments/gs_AdaptivePayments/. You can get a complete overview of PayPal Adaptive Payments at this link: https://developer.paypal.com/webapps/developer/docs/classic/adaptive-payments/integration-guide/APIntro/.

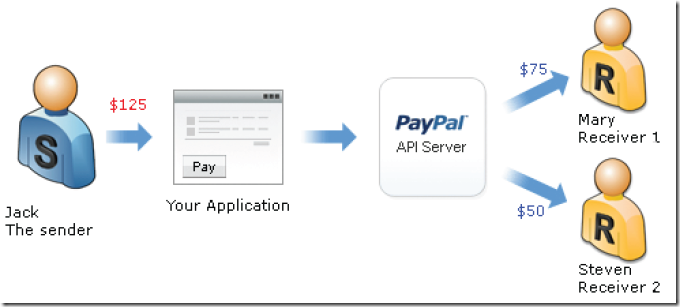
Specifically it uses the Pay API call to make a parallel payment: https://developer.paypal.com/webapps/developer/docs/classic/api/adaptive-payments/Pay_API_Operation/.

It also uses the PayPal IPN Classic API to determine when a payment has been completed: https://developer.paypal.com/webapps/developer/docs/classic/products/instant-payment-notification/.

Running The Sample Application

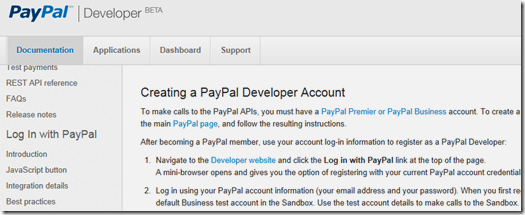
  • You will also need to go to: https://apps.paypal.com to create a PayPal Classic Application (this is because at the time of this writing the Adaptive Payments API is not available using the newer REST Services API).

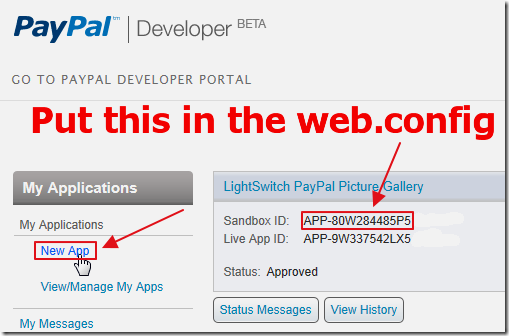
  • Create a new application. This will create a Sandbox ID that you will need to also put in the web.config of the sample app.

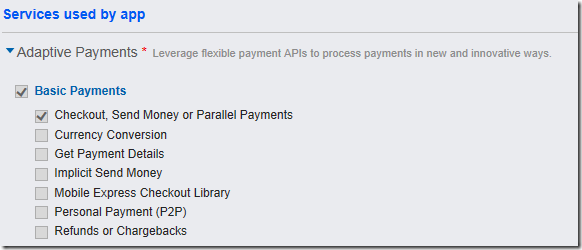
  • When you create your application, use the settings in the image above.

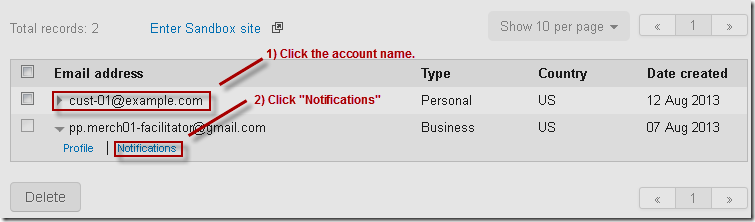
You will need to create PayPal Sandbox test accounts: https://developer.paypal.com/webapps/developer/docs/classic/lifecycle/ug_sandbox/#accounts

The merchant test account will need to be entered in the web.config of the LightSwitch application.

  • The sample transactions will need three accounts and no two can be the same so you will need to create two additional test accounts (besides the test merchant account that will be created for you) to use to test the application.

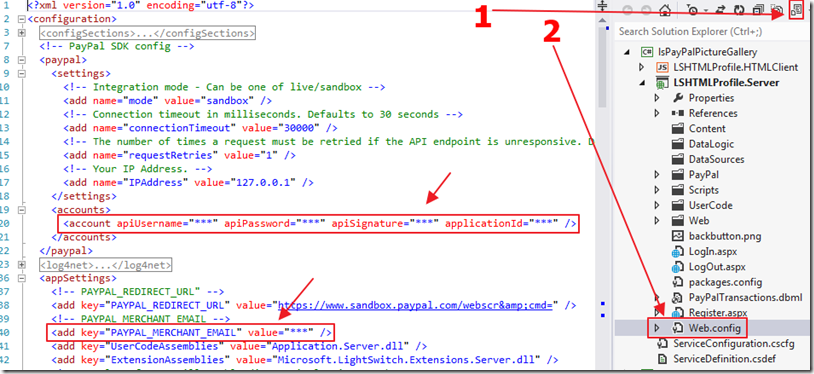
Open the sample LightSwitch application (available on the downloads page), switch to file view, and open the Web.config, and enter the values in the spaces marked ***.

The application should now work.

If it doesn’t work for you:

Also note: the PayPal IPN notifications will only work if the application has been published using the using the Visual Studio LightSwitch publishing wizard and is at a location that can be reached by the PayPal servers.

When the sample application was created, I used the PayPal Nuget package to install the needed binaries: https://www.nuget.org/packages/PayPalCoreSDK.

Exploring The Sample Application

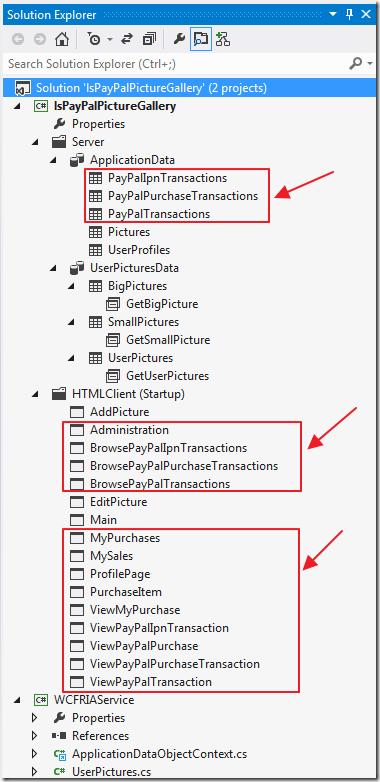
The PayPal version adds additional tables and screens.

Note that important code is implemented to properly secure the PayPal tables:

     // PayPalPurchaseTransactions
        #region PayPalPurchaseTransactions
        partial void PayPalPurchaseTransactions_Filter(ref Expression<Func<PayPalPurchaseTransaction, bool>> filter)
        {
            // Only an Admin can see the entire table
            if (!(this.Application.User.HasPermission(Permissions.SecurityAdministration)))
            {
                // Users can see any Transction where they are the buyer or the seller
                filter = e => e.PurchaserUserName == this.Application.User.Identity.Name
                    || e.SellerUserName == this.Application.User.Identity.Name;
            }
        }
        partial void PayPalPurchaseTransactions_Inserting(PayPalPurchaseTransaction entity)
        {
            // Set time and IP Address
            var context = System.Web.HttpContext.Current;
            entity.PurchaseTime = DateTime.Now;
            entity.PurchaseIPAddress = context.Request.UserHostAddress;
            // Payment Status is always set to Pending
            entity.payment_status = "Pending";
        }
        partial void PayPalPurchaseTransactions_Updating(PayPalPurchaseTransaction entity)
        {
            // An update can only be made by the orginal user
            if (!(entity.PurchaserUserName == this.Application.User.Identity.Name
                || entity.SellerUserName == this.Application.User.Identity.Name
                || this.Application.User.HasPermission(Permissions.SecurityAdministration)))
            {
               throw new Exception(string.Format("Only buyer, seller or administrator can update!"));
            }
            // Payment Status is always set to Pending
            // IPN handler updated this value directly outside of oData
            entity.payment_status = "Pending";
        }
        partial void PayPalPurchaseTransactions_CanDelete(ref bool result)
        {
            // Only an Admin can access the table (.ashx file has an override)
            result = this.Application.User.HasPermission(Permissions.SecurityAdministration);
        }
        #endregion
        // PayPalIpnTransactions
        #region PayPalIpnTransactions
        partial void PayPalIpnTransactions_CanDelete(ref bool result)
        {
            // Only an Admin can access the table (.ashx file has an override)
            result = this.Application.User.HasPermission(Permissions.SecurityAdministration);
        }
        partial void PayPalIpnTransactions_CanInsert(ref bool result)
        {
            // Only an Admin can access the table (.ashx file has an override)
           result = this.Application.User.HasPermission(Permissions.SecurityAdministration);
        }
        partial void PayPalIpnTransactions_CanUpdate(ref bool result)
        {
            // Only an Admin can access the table (.ashx file has an override)
            result = this.Application.User.HasPermission(Permissions.SecurityAdministration);
        }
        partial void PayPalIpnTransactions_CanRead(ref bool result)
        {
            // Only an Admin can access the table (.ashx file has an override)
            result = this.Application.User.HasPermission(Permissions.SecurityAdministration);
        }
        #endregion
        // PayPalTransactions
        #region PayPalTransactions
        partial void PayPalTransactions_CanDelete(ref bool result)
        {
            // Only an Admin can access the table (.ashx file has an override)
            result = this.Application.User.HasPermission(Permissions.SecurityAdministration);
        }
        partial void PayPalTransactions_CanInsert(ref bool result)
        {
            // Only an Admin can access the table (.ashx file has an override)
            result = this.Application.User.HasPermission(Permissions.SecurityAdministration);
        }
        partial void PayPalTransactions_CanRead(ref bool result)
        {
            // Only an Admin can access the table (.ashx file has an override)
            result = this.Application.User.HasPermission(Permissions.SecurityAdministration);
        }
        partial void PayPalTransactions_CanUpdate(ref bool result)
        {
            // Only an Admin can access the table (.ashx file has an override)
            result = this.Application.User.HasPermission(Permissions.SecurityAdministration);
        }
        #endregion 

The Screen

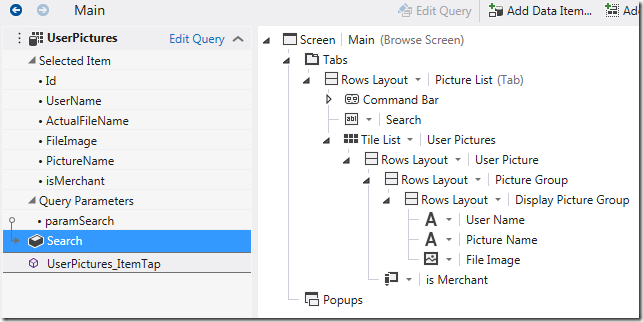
  • The Main screen is the screen customers use to search for and purchase copies of pictures.
  • The following code shows the Buy a Copy button if the person who uploaded the picture is a Merchant:

myapp.Main.isMerchant_render = function (element, contentItem) {
    // Show button if isMerchant
    if (contentItem.value == true) {
        // Get the UserPicture
        var objUserPicture = contentItem.parent;
       element.innerHTML =
         "<button type='button'>Buy a Copy</button>";
    };
};

  • When the Buy a Picture button is clicked the following code runs that calls the Adaptive Payments handler that contacts PayPal to generate a PayKey:

myapp.Main.UserPictures_ItemTap_execute = function (screen)

{    // Get the selected Picture
    var objUserPicture = screen.UserPictures.selectedItem;
    // Get selected selectedPictureId
    selectedPictureId = screen.UserPictures.selectedItem.Id;  
   // Show the UserPicture
    myapp.showPurchaseItem(objUserPicture, {
        beforeShown: function (PurchaseItemScreen) {
            msls.promiseOperation(CallAdaptivePaymentsHandler)
                .then(function PromiseSuccess(AdaptivePaymentsHandlerResult) {
                    // Parse the JSON returned
                    var objPayPalResponse = jQuery.parseJSON(AdaptivePaymentsHandlerResult);
                    // Set the PayPal response
                    PurchaseItemScreen.PayPalRedirectUrl = objPayPalResponse.PayPalRedirectUrl
                        + "_ap-payment&paykey="
                        + objPayPalResponse.PayPalPaykey;
                    PurchaseItemScreen.PayPalPaykey = objPayPalResponse.PayPalPaykey;
                    PurchaseItemScreen.PayPalPaymentExecStatus =
objPayPalResponse.PayPalPaymentExecStatus;
                    PurchaseItemScreen.PayPalError = objPayPalResponse.PayPalError;
                    PurchaseItemScreen.PayPalErrorMessage = objPayPalResponse.PayPalErrorMessage;
               });
        }
    });
};


  • The following code is the Adaptive Payments handler that contacts PayPal and returns a PayKey:

using System;
using System.Data;
using System.Web;
using System.Collections;
using System.Web.Services;
using System.Collections.Generic;
using System.Collections.Specialized;
using PayPal;
using PayPal.Exception;
using PayPal.Util;
using PayPal.AdaptivePayments;
using System.Configuration;
using PayPal.AdaptivePayments.Model;
using System.Linq;
using Microsoft.LightSwitch.Server;
namespace LightSwitchApplication
{
    [Serializable]
    public class PayPalResponse
    {
        public string PayPalRedirectUrl { get; set; }
        public string PayPalPaykey { get; set; }
        public string PayPalPaymentExecStatus { get; set; }
        public bool PayPalError { get; set; }
        public string PayPalErrorMessage { get; set; }
    }
    public class adaptivepaymentshandler : IHttpHandler
    {
        public void ProcessRequest(HttpContext context)
        {
            Pay(context);
        }
        public bool IsReusable
        {
            get
            {
                return false;
            }
        }
        /// <summary>
        /// Handle Pay API calls
        /// </summary>
        /// <param name="context"></param>
        private void Pay(HttpContext context)
        {
            // Get the PictureID
            int UserPicturesId = Convert.ToInt32(context.Request.Params["UserPicturesId"]);
            // Global values
            int PayPalPurchaseTransactionId = -1;
            string PayPalRedirectUrl = ConfigurationManager.AppSettings["PAYPAL_REDIRECT_URL"];
            string SellerPayPalEmail = "";
            string SellerUserName = "";
            // Instantiate PayPalResponse class
            PayPalResponse objPayPalResponse = new PayPalResponse();
            objPayPalResponse.PayPalPaykey = " ";
            objPayPalResponse.PayPalPaymentExecStatus = " ";
            objPayPalResponse.PayPalRedirectUrl = PayPalRedirectUrl;
            objPayPalResponse.PayPalErrorMessage = " ";
            objPayPalResponse.PayPalError = false;
            using (var serverContext =
                ServerApplicationContext.CreateContext()
                )
            {
                // Insert a record in the Transaction table
                var objPayPalTransaction =
                    serverContext.DataWorkspace.ApplicationData.PayPalPurchaseTransactions.AddNew();
                // Get the Picture
                var objPicture = (from Pictures in serverContext.DataWorkspace.ApplicationData
                                      .Pictures.GetQuery().Execute()
                                  where Pictures.Id == UserPicturesId
                                  select Pictures).FirstOrDefault();
                if (objPicture == null)
                {
                    // No Picture found
                    objPayPalResponse.PayPalError = true;
                    objPayPalResponse.PayPalErrorMessage =
                        string.Format("UserPicturesId {0} not found.", UserPicturesId);
                }
                else
                {
                    // Get the Merchant
                    var objUserProfiles = (from UserProfiles in serverContext.DataWorkspace.ApplicationData
                                               .UserProfiles.GetQuery().Execute()
                                           where UserProfiles.UserName == objPicture.UserName
                                           select UserProfiles).FirstOrDefault();
                    if (objUserProfiles == null)
                    {
                        // No Seller Found
                        objPayPalResponse.PayPalError = true;
                        objPayPalResponse.PayPalErrorMessage =
                            string.Format("UserName {0} does not have a UserProfile record.", objPicture.UserName);
                    }
                    else
                    {
                        // Set SellerUserName
                        SellerUserName = objUserProfiles.UserName;
                        if (objUserProfiles.PayPalEmail.Length < 5)
                        {
                            // Seller does not have a PayPal Email set
                            objPayPalResponse.PayPalError = true;
                            objPayPalResponse.PayPalErrorMessage =
                                string.Format("UserName {0} does not have a PayPal Email set.", objPicture.UserName);
                        }
                        else
                        {
                            // Get values needed to construct PayPal request
                            SellerPayPalEmail = objUserProfiles.PayPalEmail;
                            objPayPalTransaction.payment_status = "Pending";
                            objPayPalTransaction.PayPalError = false;
                            objPayPalTransaction.PayPalRedirectUrl = PayPalRedirectUrl;
                            objPayPalTransaction.PurchaserUserName = Application.Current.User.Name;
                            objPayPalTransaction.SellerPayPalEmail = SellerPayPalEmail;
                            objPayPalTransaction.SellerUserName = objUserProfiles.UserName;
                            // Associate the Picture to the PayPalTransaction
                            objPayPalTransaction.Picture = objPicture;
                            // Save the record so we get a Id to use in the PayPal request
                            serverContext.DataWorkspace.ApplicationData.SaveChanges();
                            // set PayPalPurchaseTransactionId
                            PayPalPurchaseTransactionId = objPayPalTransaction.Id;
                        }
                    }
                }
                // Proceed if no errors
                if (!objPayPalResponse.PayPalError)
                {
                    string currentPath =
                        System.Web.HttpContext.Current.Request.Url.OriginalString
                        .Replace(@"/PayPal/adaptivepaymentshandler.ashx", "");
                    ReceiverList receiverList = new ReceiverList();
                    receiverList.receiver = new List<Receiver>();
                    string strActionType = "PAY";
                    string currencyCode = "USD";
                    string cancelUrl = string.Format(@"{0}/HTMLClient/?mode=cancel", currentPath);
                    string returnUrl = String.Format(@"{0}/HTMLClient/?mode=return", currentPath);
                    string IpnURL = String.Format(@"{0}/PayPal/IPNListener.aspx", currentPath);
                    Receiver Receiver1 = new Receiver(Decimal.Parse("1.0"));
                    Receiver1.email = SellerPayPalEmail;
                    Receiver1.primary = false;
                    Receiver1.paymentType = "SERVICE";
                    receiverList.receiver.Add(Receiver1);
                    Receiver Receiver2 = new Receiver(Decimal.Parse("1.0"));
                    Receiver2.email = ConfigurationManager.AppSettings["PAYPAL_MERCHANT_EMAIL"];
                    Receiver2.primary = false;
                    Receiver2.paymentType = "SERVICE";
                    receiverList.receiver.Add(Receiver2);
                    PayRequest req = new PayRequest(new RequestEnvelope("en_US"),
                        strActionType,
                        cancelUrl,
                        currencyCode,
                        receiverList,
                        returnUrl);
                    // IPN Url (only enable with a published internet accessable application)
                    req.ipnNotificationUrl = IpnURL; 
                   // set optional parameters
                    //(Optional) Whether to reverse parallel payments if an error occurs with a payment.
                    //Allowable values are:
                    //true – Each parallel payment is reversed if an error occurs
                    //false – Only incomplete payments are reversed (default)
                    req.reverseAllParallelPaymentsOnError = true;
                    //(Optional) A unique ID that you specify to track the payment.
                    //Note: You are responsible for ensuring that the ID is unique.
                    //Maximum length: 127 characters
                    req.trackingId = PayPalPurchaseTransactionId.ToString();
                    // (Optional) The payer of PayPal fees. Allowable values are:
                    //    SENDER – Sender pays all fees (for personal, implicit simple/parallel payments;
                    //    do not use for chained or unilateral payments)
                    //    PRIMARYRECEIVER – Primary receiver pays all fees (chained payments only)
                    //    EACHRECEIVER – Each receiver pays their own fee (default, personal and unilateral payments)
                    //    SECONDARYONLY – Secondary receivers pay all fees
                    //    (use only for chained payments with one secondary receiver)
                    // req.feesPayer = "EACHRECEIVER";
                    // Calll PayPal to get PayKey          
                    AdaptivePaymentsService service = new AdaptivePaymentsService();
                    PayResponse resp = null;
                    try
                    {
                        resp = service.Pay(req);
                    }
                    catch (System.Exception e)
                    {
                        objPayPalResponse.PayPalError = true;
                        objPayPalResponse.PayPalErrorMessage = e.Message;
                        // Write to the database ********
                        objPayPalTransaction.PayPalError = true;
                        objPayPalTransaction.PayPalErrorMessage = e.Message;
                        serverContext.DataWorkspace.ApplicationData.SaveChanges();
                        OutputResponse(context, objPayPalResponse);
                    // Check for errors
                    if ((resp.responseEnvelope.ack == AckCode.FAILURE) ||
                        (resp.responseEnvelope.ack == AckCode.FAILUREWITHWARNING))
                    {
                        string strError = "";
                        objPayPalResponse.PayPalError = true;
                        foreach (var error in resp.error)
                        {
                            strError = strError + " " + error.message;
                        }
                        objPayPalResponse.PayPalErrorMessage = strError;
                        // Write to the database ********
                        objPayPalTransaction.PayPalError = true;
                        objPayPalTransaction.PayPalErrorMessage = strError;
                        serverContext.DataWorkspace.ApplicationData.SaveChanges();
                    }
                    else
                    {
                        objPayPalResponse.PayPalPaykey = resp.payKey;
                        objPayPalResponse.PayPalPaymentExecStatus = resp.paymentExecStatus;
                        // Write to the database ********
                        objPayPalTransaction.PayPalPaykey = resp.payKey;
                        objPayPalTransaction.PayPalPaymentExecStatus = resp.paymentExecStatus;
                        serverContext.DataWorkspace.ApplicationData.SaveChanges();
                    }
                }
            }
            // Return Response
            OutputResponse(context, objPayPalResponse);
        }
        private static void OutputResponse(HttpContext context, PayPalResponse objPayPalResponse)
        {
            // Create JavaScriptSerializer
            System.Web.Script.Serialization.JavaScriptSerializer jsonSerializer =
                new System.Web.Script.Serialization.JavaScriptSerializer();
            // Output as JSON
            context.Response.Write(jsonSerializer.Serialize(objPayPalResponse));
            return;
        }
    }
}


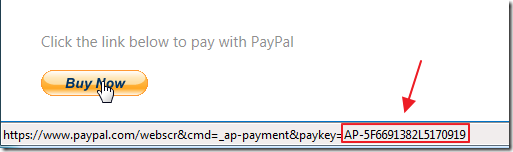
  • When the user clicks the Buy Now button they are taken to PayPal with the PayKey that has all the details of the transaction.
  • When the payment has been processed the following code listens for the IPN notification (that was set in the Adaptive Payments handler):

Try
    {
        byte[] parameters = Request.BinaryRead(HttpContext.Current.Request.ContentLength);
        if (parameters.Length > 0)
        {
            IPNMessage ipn = new IPNMessage(parameters);
            bool isIpnValidated = ipn.Validate();
            string transactionType = ipn.TransactionType;
            NameValueCollection map = ipn.IpnMap;
            if (isIpnValidated)
            {
                string connString =
                System.Web.Configuration.WebConfigurationManager
                .ConnectionStrings["_IntrinsicData"].ConnectionString;
                // Connect to the database
                PayPalTransactionsDataContext db = new LinqToSQL.PayPalTransactionsDataContext(connString);
                // Log the PayPal data received
                var objPayPalIpnTransaction = new LinqToSQL.PayPalIpnTransaction();
                string PayPalPayKey = ipn.IpnValue("pay_key"); ;
                string PayPalStatus = ipn.IpnValue("status");
                objPayPalIpnTransaction.transaction_type = ipn.IpnValue("transaction_type");
                objPayPalIpnTransaction.status = ipn.IpnValue("status");
                objPayPalIpnTransaction.sender_email = ipn.IpnValue("sender_email");
                objPayPalIpnTransaction.action_type = ipn.IpnValue("action_type");
                objPayPalIpnTransaction.payment_request_date = ipn.IpnValue("payment_request_date");
                objPayPalIpnTransaction.reverse_all_parallel_payments_on_error
                   ipn.IpnValue("reverse_all_parallel_payments_on_error");
                objPayPalIpnTransaction.return_url = ipn.IpnValue("return_url");
                objPayPalIpnTransaction.cancel_url = ipn.IpnValue("cancel_url");
                objPayPalIpnTransaction.ipn_notification_url = ipn.IpnValue("ipn_notification_url");
                objPayPalIpnTransaction.pay_key = ipn.IpnValue("pay_key");
                objPayPalIpnTransaction.memo = ipn.IpnValue("memo");
                objPayPalIpnTransaction.fees_payer = ipn.IpnValue("fees_payer");
                objPayPalIpnTransaction.trackingId = ipn.IpnValue("trackingId");
                objPayPalIpnTransaction.preapproval_key = ipn.IpnValue("preapproval_key");
                objPayPalIpnTransaction.reason_code = ipn.IpnValue("reason_code");
                objPayPalIpnTransaction.currencyCode = ipn.IpnValue("currencyCode");
                objPayPalIpnTransaction.approved = ipn.IpnValue("approved");
                objPayPalIpnTransaction.charset = ipn.IpnValue("charset");
                objPayPalIpnTransaction.transaction_0_id = ipn.IpnValue("transaction[0].id");
                objPayPalIpnTransaction.transaction_0_status = ipn.IpnValue("transaction[0].status");
                objPayPalIpnTransaction.transaction_0_id_for_sender
ipn.IpnValue("transaction[0].id_for_sender");
                objPayPalIpnTransaction.transaction_0_status_for_sender_txn =
                  ipn.IpnValue("transaction[0].status_for_sender_txn");
                objPayPalIpnTransaction.transaction_0_refund_id = ipn.IpnValue("transaction[0].refund_id")
                objPayPalIpnTransaction.transaction_0_refund_amount =
                    ipn.IpnValue("transaction[0].refund_amount");
                objPayPalIpnTransaction.transaction_0_refund_account_charged
                    ipn.IpnValue("transaction[0].refund_account_charged");
                objPayPalIpnTransaction.transaction_0_receiver = ipn.IpnValue("transaction[0].receiver");
                objPayPalIpnTransaction.transaction_0_invoiceId = ipn.IpnValue("transaction[0].invoiceId");
                objPayPalIpnTransaction.transaction_0_amount = ipn.IpnValue("transaction[0].amount");
                objPayPalIpnTransaction.transaction_0_is_primary_receiver
ipn.IpnValue("transaction[0].is_primary_receiver");
                objPayPalIpnTransaction.transaction_1_id = ipn.IpnValue("transaction[1].id");
                objPayPalIpnTransaction.transaction_1_status = ipn.IpnValue("transaction[1].status");
                objPayPalIpnTransaction.transaction_1_id_for_sender ipn.IpnValue("transaction[1].id_for_sender");
                objPayPalIpnTransaction.transaction_1_status_for_sender_txn = ipn.IpnValue("transaction[1].status_for_sender_txn");
                objPayPalIpnTransaction.transaction_1_refund_id = ipn.IpnValue("transaction[1].refund_id");
                objPayPalIpnTransaction.transaction_1_refund_amount = ipn.IpnValue("transaction[1].refund_amount");
                objPayPalIpnTransaction.transaction_1_refund_account_charged = ipn.IpnValue("transaction[1].refund_account_charged");
                objPayPalIpnTransaction.transaction_1_receiver = ipn.IpnValue("transaction[1].receiver");
                objPayPalIpnTransaction.transaction_1_invoiceId = ipn.IpnValue("transaction[1].invoiceId");
                objPayPalIpnTransaction.transaction_1_amount = ipn.IpnValue("transaction[1].amount");
                objPayPalIpnTransaction.transaction_1_is_primary_receiver = ipn.IpnValue("transaction[1].is_primary_receiver");
                // Save the record
                db.PayPalIpnTransactions.InsertOnSubmit(objPayPalIpnTransaction);
                db.SubmitChanges();
                // Only do the following if the status is COMPLETED
                if (PayPalStatus == "COMPLETED")
                {
                    // Start a Transaction log record
                    var objPayPalTransaction = new LinqToSQL.PayPalTransaction();
                    // Search for related PayPalPurchaseTransaction
                    var result = (from PayPalPurchaseTransactions in db.PayPalPurchaseTransactions
                                    where PayPalPurchaseTransactions.PayPalPaykey == PayPalPayKey
                                    select PayPalPurchaseTransactions).FirstOrDefault();
                    if (result != null)
                    {
                        // Update PayPalPurchaseTransaction
                        result.payment_status = "COMPLETED";
                        // Make a log entry                               
                        objPayPalTransaction.LogDateTime = DateTime.No
                        objPayPalTransaction.pay_key = PayPalPayKey;
                        objPayPalTransaction.LogData = String.Format(
                            "IPN Received for pay_key: {0} - Updated payment to COMPLETED", PayPalPayKey);
                    }
                    else
                    {
                        // Make a log entry                               
                        objPayPalTransaction.LogDateTime = DateTime.Now;
                        objPayPalTransaction.pay_key = PayPalPayKey;
                        objPayPalTransaction.LogData = String.Format(
                            "IPN Received for pay_key: {0} - Associated payment not found!", PayPalPayKey);
                    }
                    // Save the record
                    db.PayPalTransactions.InsertOnSubmit(objPayPalTransaction);
                    db.SubmitChanges();
                }
            }
        }
    }
    catch (System.Exception ex)
    {
        string connString =
            System.Web.Configuration.WebConfigurationManager
            .ConnectionStrings["_IntrinsicData"].ConnectionString;
        // Connect to the database
        PayPalTransactionsDataContext db = new LinqToSQL.PayPalTransactionsDataContext(connString);
        // Start a Transaction log record
        var objPayPalTransaction = new LinqToSQL.PayPalTransaction();
        // Make a log entry                               
        objPayPalTransaction.LogDateTime = DateTime.Now;
        objPayPalTransaction.pay_key = "";
        objPayPalTransaction.LogData = String.Format(
            "Error in {0} : {1}", this.GetType().Name, ex.Message);
        // Save the record
        db.PayPalTransactions.InsertOnSubmit(objPayPalTransaction);
        db.SubmitChanges();
        return;
    }


Linq to Sql is used because the call from PayPal is unauthenticated and the LightSwitch application is running under forms authentication. Entity Framework or ADO .Net could have also been used.

(you must have Visual Studio 2012 (or higher) installed to run the code)


European SQL 2008 Hosting - Amsterdam :: Tips to Improve SQL Server Database Design and Performance

clock September 17, 2013 11:13 by author Administrator

Best performance is the main concern to develop a successful application. Focus of some key points which keeping in mind we can improve the database performance and tune it accordingly. A good database design provides best performance during data manipulation which results into the best performance of an application. During database designing and data manipulation we should consider the following key points:

Don’t have to type out the columns
If you’re using SQL Server Management Studios (SSMS) 2008 or higher, you can tell SSMS to script out select statements for you. To do this, right-click the table, go to Script Table As – Select To – New Query Editor Window . You can alternatively script to the clipboard if you already have a script open and just want to paste in there . This will open up a new window with your select statement.

A bonus (or down side) is that SQL Server automatically wraps each column with brackets, so if your column names have odd characters (such as spaces) this will always work. Another bonus is consistency. Using this method you will always be sure to have all of the columns in the table, so if you’re forgetful this method is perfect for you.

Fine Tune SSMS Options
SQL Server Management Studios has a lot of options to play with. One option that I have disabled is the “Use [database]” statement that you get whenever you script out a table. To change this I went to Tools – Options. Then went to SQL Server Object Explorer – Scripting, and changed “Script USE [database]” to false.

Use EXISTS instead of IN
Does practice to use EXISTS to check existence instead of IN since EXISTS is faster than IN.

 -- Avoid
SELECT Name,Price FROM tblProduct
where ProductID IN (Select distinct ProductID from tblOrder)
--Best practice
SELECT Name,Price FROM tblProduct
where ProductID EXISTS (Select distinct ProductID from tblOrder)


Create Clustered and Non-Clustered Indexes

Does practice to create clustered and non clustered index since indexes helps in to access data fastly. But be careful, more indexes on a tables will slow the INSERT,UPDATE,DELETE operations. Hence try to keep small no of indexes on a table.

Choose Appropriate Data Type

Choose appropriate SQL Data Type to store your data since it also helps in to improve the query performance. Example: To store strings use varchar in place of text data type since varchar performs better than text. Use text data type, whenever you required storing of large text data (more than 8000 characters). Up to 8000 characters data you can store in varchar.

Avoid NULL in Fixed-Length Field
Does practice to avoid the insertion of NULL values in the fixed-length (char) field. Since, NULL takes the same space as desired input value for that field. In case of requirement of NULL, use variable-length (varchar) field that takes less space for NULL.

Avoid * in SELECT Statement
Does practice to avoid * in Select statement since SQL Server converts the * to columns name before query execution. One more thing, instead of querying all columns by using * in select statement, give the name of columns which you required.

-- Avoid
SELECT * FROM tblName
--Best practice
SELECT col1,col2,col3 FROM tblName

Keep Clustered Index Small
Does practice to keep clustered index as much as possible since the fields used in clustered index may also used in nonclustered index and data in the database is also stored in the order of clustered index. Hence a large clustered index on a table with a large number of rows increase the size significantly.

Use Schema name before SQL objects name
Does practice to use schema name before SQL object name followed by "." since it helps the SQL Server for finding that object in a specific schema. As a result performance is best.
 
--Here dbo is schema name
SELECT col1,col2 from dbo.tblName
-- Avoid
SELECT col1,col2 from tblName


SET NOCOUNT ON

Does practice to set NOCOUNT ON since SQL Server returns number of rows effected by SELECT,INSERT,UPDATE and DELETE statement. We can stop this by setting NOCOUNT ON like as:

CREATE PROCEDURE dbo.MyTestProc
AS
SET NOCOUNT ON
BEGIN
.
.
END


Summary
Expose some key point to improve your SQL Server database performance. hope after reading this article you will be able to use these tips with in your Sql Server database designing and manipulation.


European Ms. Visual Studio LightSwitch Hosting - France :: Tips How to Build App in LightSwitch Application

clock September 10, 2013 08:20 by author Administrator

LightSwitch is a Rapid Development environment that will allow technical and somewhat-technical people the ability to create light weight Line of Business applications. While many developers don’t think LightSwitch will be useful for creating apps, we think it can be very beneficial to use in the right circumstances.

Microsoft® Visual Studio® LightSwitch™ is a new streamlined development environment for designing data-centric business applications and helps you to build data-centric applications quickly, through visual means. LightSwitch business applications are multi-tiered, featuring a client application and a combination of LINQ, WCF RIA Services and the Entity Framework to implement the application services tier.

Benefits of using LightSwitch?
There are many benefits of using LightSwitch as shown in the below list

  • You can create an application with just few clicks and no code or coding only in the data models or substantial code within all parts of the application.
  • Based on permission, LightSwitch support distinct audiences end-users (View & Edit Data), administrative (maintain certain master data) and Super-users (granted access to most or all of the data and functionality).
  • Support built-in Business Types include like (Email, PhoneNumber, money,..etc), and partners can create new Business Types.
  • Enable Debug mode, and allows the screen to be edited interactively while the application is running.
  • Enable adding custom business rules to any field in the screen.
  • ou can create custom controls and embed sophisticated behaviors there.
  • LightSwitch produces desktop applications or pulls down and executed implicitly by navigating to a URL.
  • Enables you to deploy your LightSwitch on Cloud and Azure as simple as running a wizard.

Start building the App
Now let’s start building our application, I am going to list every thing in details starting from opening Visual studio 2012 until running the application. we will go throw the following steps.

Step 1 : Creating the Application

Creating new LightSwitch application is very simple, if you’re familiar with any old version of Visual Studio as follows:

Open VS 2012 –> New project –> Select LightSwitch from project Template list –> Select LightSwitch application (c#), and finally we will write the project name LighSwitchsubscriptionApp –> press Ok

Step 2 : Creating & Defining Data tables and relationships

The start point to LightSwitch application is creating Data Table and you can do this task through four ways:

  • Click the Create new table link in the start up project page “Start with data” which called [you project name] Designer
  • Go to Visual Studio menu bar Select Project –> Add table
  • Right click Project Name in solution explorer then select Add table
  • Connect to an exist data source published on (Database, Sharepoint, OData Services, WCF RIA Service) as mentioned in step 2 and 3, but select Add data source instead of Add Table option, and create Subscriber table as shown in below figure

The above picture, it contains Useremail field with Data type Email, this is one of the new features of LightSwitch , that you can create new field with new Business Types like (Email, Money, Phone, web address).

- In addition, you can add New filed of static choice list by selecting choicelist link from right side properties of any string field, for example, we will create choicelist for Gender(male, female).
- Usually any registration module needs dropdown list of country field, but using LightSwitch makes the difference for you, we are not going to create new control and write code to bind this control from database, we are going to create new table of countries and link it to our Subscriber table and link these two tables, by following the below steps:

  • Create new table called Country with one columns(contryDesc).
  • Then click Relationshin, button in the toolbar.
  • Finally build the relation between the subscriber and country tables as shown below.

Step 3 : Building Screens & Running the Application

Now, we are getting ready to Build the screens corresponding to Entities, simply you click the Screen button from the toolbar on the subscriber & Countries Table Design forms, this will open Add ‘New screen’ Dialog then select the highlighted option showing in figure below, and finally press Ok button.

- Repeat same process above for country entity.
- Finally, we can run the application by pressing f5 key, we will see screen as shown in figure below:

- Now, let’s go a head and review above screen as listed below:

Box 1 ,represent two tabs for all entity screens we have created .
Box 2 ,represent all actions available for this gridview Add, Delete, Edit, Search .
Box 3, represent the Dialog screen that opens when you select Add button.
Box 4, Showing Required fields marked as Bold.
Box 5, Showing Country list that I have entered in country entity.
Box 6, includes main actions for this screen ( Save , Refresh).

- There is another very important feature here, as you can see on right bottom of the screen link [Design Screen], this link allows you to edit the screen Design on the execution mode, if and only if, you have run the application in Debug mode.
- Eventually, we did not finish all features of LightSwitch, but we have other features that I will list them soon in other posts, I was just trying to show the power of using Lightswitch without writing any line of code.


Press Release :: European HostForLIFE.eu Proudly Launches ASP.NET MVC 5 Hosting - Russia

clock August 28, 2013 10:29 by author Administrator

European Windows and ASP.NET hosting specialist, HostForLIFE.eu, has announced the availability of new hosting plans that are optimized for the latest update of the Microsoft ASP.NET Model View Controller (MVC) technology. The MVC web application framework facilitates the development of dynamic, data-driven websites.

The latest update to Microsoft’s popular MVC (Model-View-Controller) technology,  ASP.NET MVC 5 adds sophisticated features like single page applications, mobile optimization, adaptive rendering, and more. Here are some new features of ASP.NET MVC 5:

- ASP.NET Identity
- Bootstrap in the MVC template
- Authentication Filters
- Filter overrides

HostForLIFE.eu is Microsoft’s number one Recommended Windows and ASP.NET Spotlight Hosting Partner in Europe for its support of Microsoft technologies that include WebMatrix, WebDeploy, Visual Studio 2012, ASP.NET 4.5, ASP.NET MVC 4.0, Silverlight 5, and Visual Studio Lightswitch.

HostForLIFE.eu hosts its servers in top class data centers that is located in Amsterdam to guarantee 99.9% network uptime. All data center feature redundancies in network connectivity, power, HVAC, security, and fire suppression.

In addition to shared web hosting, shared cloud hosting, and cloud server hosting, HostForLIFE.eu offers reseller hosting packages and specialized hosting for Microsoft SharePoint 2010 and 2013. All hosting plans from HostForLIFE.eu include 24×7 support and 30 days money back guarantee.

For more information about this new product, please visit http://www.HostForLIFE.eu

About HostForLIFE.eu:

HostForLIFE.eu is Microsoft No #1 Recommended Windows and ASP.NET Hosting in European Continent. HostForLIFE.eu service is ranked the highest top #1 spot in several European countries, such as: Germany, Italy, Netherlands, France, Belgium, United Kingdom, Sweden, Finland, Switzerland and many top European countries.

HostForLIFE.eu number one goal is constant uptime. HostForLIFE.eu data center uses cutting edge technology, processes, and equipment. HostForLIFE.eu has one of the best up time reputations in the industry.

HostForLIFE.eu second goal is providing excellent customer service. HostForLIFE.eu technical management structure is headed by professionals who have been in the industry since it's inception. HostForLIFE.eu has customers from around the globe, spread across every continent. HostForLIFE.eu serve the hosting needs of the business and professional, government and nonprofit, entertainment and personal use market segments.


SharePoint 2013 Cloud Hosting Explained

clock November 30, 2012 09:38 by author Administrator

SharePoint Cloud hosting gives companies the ability to share data in real time. This makes it possible for employees to collaborate with each other and share data, content, ideas, essentially, whatever they’d like. This type of collaboration can occur between locations, departments and even time zones, which is in part, one of the reasons why it is in such high demand and companies are willing to make big-time investments in order to utilize it.

HostForLife.eu
is only a few hosting providers in European region that supports SharePoint 2013 Hosting on a Cloud Server. Price from just €9.99/month, HostForLife.eu gives opportunity to everyone to try to host their SharePoint site on a cloud server.

When searching for SharePoint Cloud hosting, companies should be sure that whatever hosting company they choose to work with, is willing to create a system that is tailored-made to their particular needs, if necessary. Some hosting companies will allow businesses to pay as they go or give them the option of purchasing a license. It will also be extremely important that all of a business’ data is stored on servers that are secure.


The very best hosting companies will offer support 24 hours a day, 7 days a week. They will also provide around-the-clock monitoring by trained IT techs that are able to detect and address any issues that come up. Having around-the-clock support is very important and extremely valuable. Businesses must be extremely protective of their data. If it were to be lost or suddenly became inaccessible, this could cause a tremendous amount of problems and could even negatively affect a company’s bottom line.


Another feature of quality SharePoint Cloud hosting is built-in disaster recovery coupled with continuous backups and data protection. This will ensure that a company’s data is always protected even during inclement weather. Application access from anywhere on the globe is important as well, if the hosting company is based in a country different the one the client they are servicing is located.


SharePoint is a great data management system. In fact, it is one of the most utilized systems of its type. It is feature-packed and very robust. However, to get the most out of it, it is important that the company using it is well-studied in all things related to SharePoint, has undergone proper training and has good hosting. Cloud hosting provides businesses with essentially everything they need so that that their data management, courtesy of SharePoint, functions optimally.


Because small businesses are typically very dependent on being able to access their data, it is extremely important that they use the right hosting. Quality third-party, Cloud hosting will offer around-the-clock-support, qualified IT staff on hand to detect and fix any problems, continuous backups and disaster protection and recovery. This type of hosting is ideal and will help businesses keep their data and documents safe, secure and accessible


European WebMatrix Hosting - Amsterdam :: How does Web Deployment with VS 10 & MSDeploy Work?

clock February 28, 2012 06:21 by author Administrator

In VS 10 we use MSDeploy behind the scenes to deploy your entire web application along with all of its dependencies like IIS Settings, DB, web content etc to any destination server.

MSDeploy is a new technology specially designed to serve the purpose of deploying web applications seamlessly across IIS Servers. My hope is to give you a CONCEPTUAL high level overview to understand how web deployment with VS10 & MSDeploy really works.

In case of web deployment or replication across server farms what you really require is to take the web and its dependencies from one box to another. To further over simplify there is a source (your dev box) and there is a destination (your web server), the source needs to be replicated on to the destination and that is what we are trying to achieve (with of course a lot more details behind the scene :-)

MSDeploy uses this simple concept of taking the source and applying it on to the destination. Let us try to understand what all are possible sources:

Source:

-
If you want to deploy the site you are developing on your dev box then now the site you are developing on the dev box becomes the source.
-
If you have your web content stored in the source control and you have a build server which is set up for automatic deployment then the build server becomes the source.
-
If you have a MSDeploy web package given to you by someone and you are trying to install it on your dev box then the web package becomes the source.

Destination:

-
If you are deploying a web to a test server then the test server is the destination.
-
If you are creating a web package out of your web site using MSDeploy then the web package becomes the destination.
-
If you are deploying to your own dev box for testing purposes then in this case your dev box itself becomes the destination.

Well the concepts of source and destination are pretty simple but the reason why they are so interesting is because when you set up your deployment settings in Visual Studio then VS creates something that we call as Source Manifest and feeds to MSDeploy. Check out the figure below which gives you an idea of how VS 10 will produce your web package:


Source Manifest is a simple XML which instructs MSDeploy on what all Providers to invoke on the source machine. So what is a MSDeploy Provider?

A MSDeploy provider is a simple object which MSDeploy engine invokes to do two major CONCEPTUAL tasks:

1. On Source Machine to GET the right content from its place

e.g. if you had Database attached to your web then at source DB Provider will be called to pull out your data and schema and convert it into SQL Scripts which will then go into the web package.

2. On Destination Machine to PUT the right content in its place

e.g. if there were SQL scripts in your web package then at destination DB Provider will be called to run the SQL command and the SQL scripts to create and set up the database

MSDeploy comes with a lot of pre-built providers like:

-
IIS Settings providers for IIS 5.1 (for XP), IIS 6.0 (for Win2K3) & IIS 7.0(for Vista & Win2K8)
-
DB Provider for MS SQL Server
-
GAC
-
COM
-
Registry
-
etc etc

Based on your project settings Visual Studio creates a source manifest which is fed to MSDeploy to create package or deploy your web application. So on the source box below is how MSDeploy works:


Along with creating the source manifest, Visual Studio also creates destination manifest for you. Check the below diagram:


When you are ready to deploy then on the destination you can feed the web package and the destination manifest to MSDeploy to deploy your web site. In the destination manifest you can change the values like “IIS Application Name”, “DB connection strings” etc.


This is how you can use web packages on any machine with MSDeploy and by configuring your deployment options in the destination manifest you can go and and easily recreate your webs.

It is not possible for someone to come up with every possible provider that everyone needs so there will be an extensibility model by which you can write your own providers and register it with MSDeploy engine.

Visual Studio is also made extensible to allow you to hook into the packaging and publishing process to call your custom MSDeploy providers in the source manifest.

The most interesting pieces is that with IIS Manager and Visual Studio 2010 UI, you will not really need to know all these details, things will just work but I thought it is often interesting to know how things work behind the scenes.

I hope this conceptual overview helps you get the perspective on how web deployment with VS 2010 and MSDeploy will work!!


About HostForLIFE.eu

HostForLIFE.eu is European Windows Hosting Provider which focuses on Windows Platform only. We deliver on-demand hosting solutions including Shared hosting, Reseller Hosting, Cloud Hosting, Dedicated Servers, and IT as a Service for companies of all sizes.

We have offered the latest Windows 2016 Hosting, ASP.NET Core 2.2.1 Hosting, ASP.NET MVC 6 Hosting and SQL 2017 Hosting.


Tag cloud

Sign in