European Windows 2012 Hosting BLOG

BLOG about Windows 2012 Hosting and SQL 2012 Hosting - Dedicated to European Windows Hosting Customer

SQL Server Hosting - HostForLIFE :: Using SSIS to Automate Table Creation

clock December 19, 2024 07:32 by author Peter

In this article, we will learn how to create a database table in SQL Server using the SSIS package.

As we know, data is growing massively, and we need to have the capability to extract data from numerous sources such as Oracle, Excel files, and SQL Server databases. SSIS provides integration and workflow solutions through which we can connect with multiple sources. We can build inflow and outflow of data and build pipelines through SSIS packages.

In order to work on SSIS, you need to install Sql Server Data Tools (SSDT) and the Integration Service component. I have used the SSDT 2022 version.

Now, let’s explore more and learn how we can create a table in SQL Server using the SSIS package.

We need to follow below steps:
Step 1. Firstly, create a new SSIS package by right-clicking in Solution Explorer.  A new SSIS Package1.dtsx is created, which we can see in the snippet below.

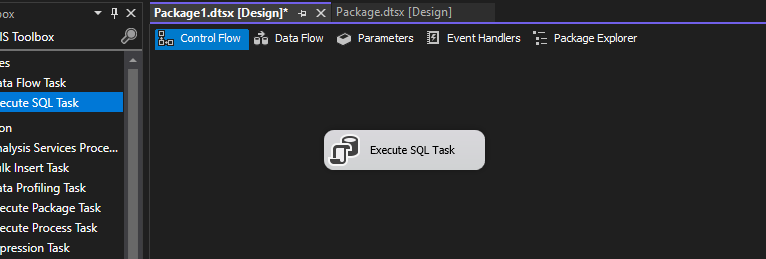
Step 2. Now go to the SSIS toolbox, select Execute SQL Task, and drag and drop it to the new SSIS package. Below is the snippet.

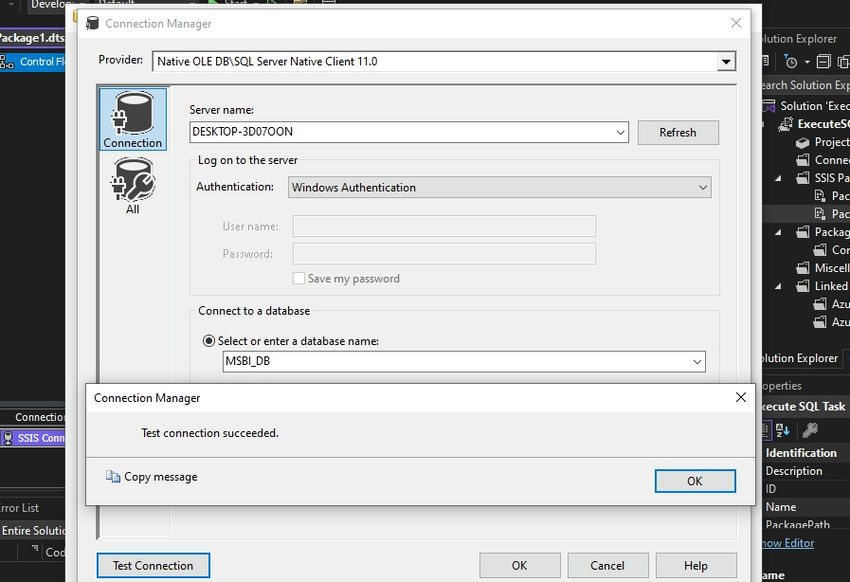
Step 3. Now, establish a new connection and make sure to test the connection.
Step 4. Now consider the script below and put this in the SQLStatement section in the Task Editor.
create table employee_details
  (emp_id int,
   emp_name varchar(50),
   salary int)

  insert into employee_details values(101,'Christina','90000')
  insert into employee_details values(102,'Aman','40000')
  insert into employee_details values(103,'James','45000')
  insert into employee_details values(104,'Jack','80000')
  insert into employee_details values(105,'Jamal','87000')
  insert into employee_details values(106,'Lisa','82000')
  insert into employee_details values(107,'Karan','45000')
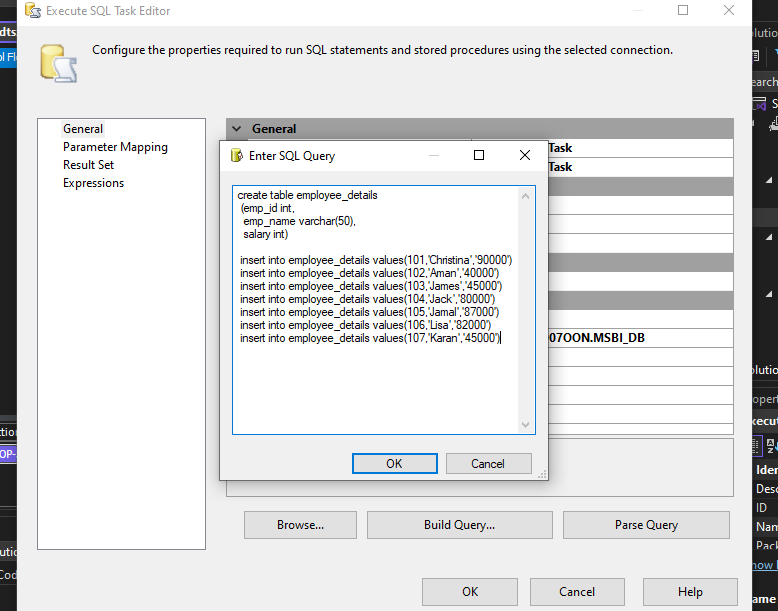
After establishing the connection and entering the script, we can see below the red mark is gone.
Step 5. Now, execute the package by hitting the start button.
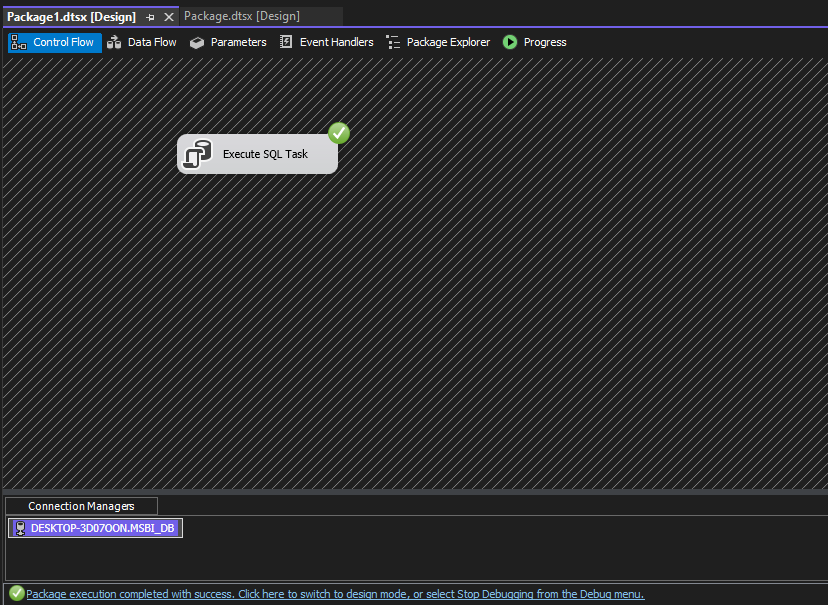
We can see in the above screenshot that the SQL task was executed successfully.

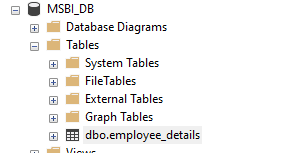
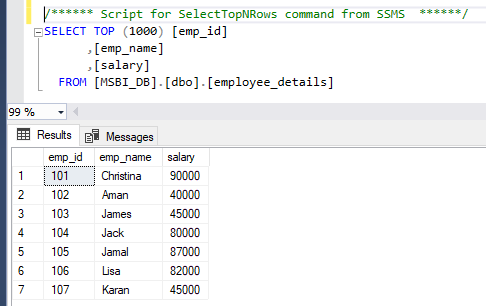
Step 6. Now, we will see in the SQL Server using SSMS that the employee_details table is created. Below is the screenshot.
Summary
You have learned today how to create a new table using the SSIS task. The benefit of using SSIS is automation since we can run packages either on-demand or using the scheduler. We can further extend this with the help of project parameters. I hope you liked the article. Please let me know your feedback/ suggestions in the comments section below.

HostForLIFE.eu SQL Server 2022 Hosting
HostForLIFE.eu is European Windows Hosting Provider which focuses on Windows Platform only. We deliver on-demand hosting solutions including Shared hosting, Reseller Hosting, Cloud Hosting, Dedicated Servers, and IT as a Service for companies of all sizes.


SQL Server Hosting - HostForLIFE :: Example of a SQLite Database with.NET

clock December 11, 2024 07:35 by author Peter

SQLite is a file-based relational database management system that is lightweight and ideal for small Web applications, development and testing, and mobile applications such as iOS and Android apps. It is a serverless, self-contained database that works nicely with.NET applications.

To use SQLite in your.NET application, install the "System.Data.SQLite" package from Nuget or run the command below in the terminal.
Install-Package System.Data.SQLite

SQLiteConnection class is used to make connection strings, create SQLite DB files, handle queries, and manage connections from the SQLite database engine. Here, we will take the Create, update, read, delete (CURD) operation example code with C#.
using System;
using System.Data.SQLite;

class Program
{
    static void Main()
    {
        // Create a new database file
        SQLiteConnection.CreateFile("ExampleDatabase.sqlite");

        // Connect to the database
        using (var connection = new SQLiteConnection("Data Source=ExampleDatabase.sqlite;Version=3;"))
        {
            connection.Open();

            // Create a table
            string createTableQuery = "CREATE TABLE IF NOT EXISTS Users (Id INTEGER PRIMARY KEY, Name TEXT, Age INTEGER)";
            using (var command = new SQLiteCommand(createTableQuery, connection))
            {
                command.ExecuteNonQuery();
            }

            // Insert data
            string insertQuery = "INSERT INTO Users (Name, Age) VALUES ('aaa', 15)";
            using (var command = new SQLiteCommand(insertQuery, connection))
            {
                command.ExecuteNonQuery();
            }

            // Read data
            string selectQuery = "SELECT * FROM Users";
            using (var command = new SQLiteCommand(selectQuery, connection))
            using (var reader = command.ExecuteReader())
            {
                while (reader.Read())
                {
                    Console.WriteLine($"Id: {reader["Id"]}, Name: {reader["Name"]}, Age: {reader["Age"]}");
                }
            }

            // Update data
            string updateQuery = "UPDATE Users SET Age = 31 WHERE Name = 'Alice'";
            using (var command = new SQLiteCommand(updateQuery, connection))
            {
                command.ExecuteNonQuery();
            }

            // Delete data
            string deleteQuery = "DELETE FROM Users WHERE Name = 'Alice'";
            using (var command = new SQLiteCommand(deleteQuery, connection))
            {
                command.ExecuteNonQuery();
            }
        }
    }
}


Once after executing the code, the SQLite file will be created in the build location. Using online SQLite Viewer SQLite database and table able to view in this Link


HostForLIFE.eu SQL Server 2022 Hosting
HostForLIFE.eu is European Windows Hosting Provider which focuses on Windows Platform only. We deliver on-demand hosting solutions including Shared hosting, Reseller Hosting, Cloud Hosting, Dedicated Servers, and IT as a Service for companies of all sizes.


SQL Server Hosting - HostForLIFE :: JSON Data Handling in SQL Server

clock December 4, 2024 08:28 by author Peter

Managing 100 columns in a table is difficult in real-time projects; in these cases, we must add JSON to the SQL table columns and then manage them.

Example
Suppose we have some Application settings that need to be set up from the database, and it has very complex settings that keep changing so instead of creating multiple columns for those settings, we can club all settings or configurations into one JSON format and save them to a single Sql table column.

SQL Server provides support for handling JSON data, allowing you to store JSON in columns and perform operations on it. This can be particularly useful when dealing with semi-structured or unstructured data. Here are some examples to illustrate how to read JSON from SQL Server columns.
To handle JSON data in SQL Server

    Store JSON in NVARCHAR(MAX) or VARCHAR(MAX) columns.
    Insert JSON using regular INSERT statements.
    Read and Parse JSON using JSON_VALUE, JSON_QUERY, and OPENJSON:
        JSON_VALUE: Extracts a scalar value from JSON.
        JSON_QUERY: Extracts an object or array.
        OPENJSON: Parses JSON and returns a table of key-value pairs.
    Modify JSON using JSON_MODIFY to update or add properties.
    Aggregate Data into JSON using the FOR JSON clause.

Storing JSON Data
JSON data is typically stored in columns of type NVARCHAR(MAX) or VARCHAR(MAX).
Create table
CREATE TABLE ProductsData (
    ProductID INT PRIMARY KEY,
    ProductName NVARCHAR(50),
    ProductDetails NVARCHAR(MAX) -- JSON data stored in this column
);


Insert JSON on ProductDetails column
INSERT INTO ProductsData (ProductID, ProductName, ProductDetails)
VALUES
    (1, 'Laptop',
        '{
            "Brand": "Dell",
            "Specifications": {
                "Processor": "Intel i7",
                "RAM": "16GB",
                "Storage": "512GB SSD"
            }
        }'),
    (2, 'Smartphone',
        '{
            "Brand": "Apple",
            "Specifications": {
                "Model": "iPhone 12",
                "Storage": "128GB"
            }
        }');


Simple Select
SELECT
    ProductID,
    ProductName,
    ProductDetails
FROM
    ProductsData;


Reading JSON Data
You can read JSON data from the table and parse it using built-in functions such as JSON_VALUE, JSON_QUERY, and OPENJSON.Read SQL JSON ColumnSELECT
    ProductID,
    ProductName,
    JSON_VALUE(ProductDetails, '$.Brand') AS Brand,
    JSON_VALUE(ProductDetails, '$.Specifications.Processor') AS Processor
FROM
    ProductsData;

Extract Nested Objects or Arrays with JSON_QUERY
SELECT
    ProductID,
    ProductName,
    JSON_QUERY(ProductDetails, '$.Specifications') AS Specifications
FROM
    Products;

Expand JSON Arrays with OPENJSON

SQL
-- Insert data with JSON array
INSERT INTO ProductsData (ProductID, ProductName, ProductDetails)
VALUES
(3, 'Tablet',
'{
    "Brand": "Samsung",
    "Models": [
        {"Model": "Galaxy Tab S7", "Storage": "256GB"},
        {"Model": "Galaxy Tab S6", "Storage": "128GB"}
    ]
}');

-- Select data and expand JSON array
SELECT
    ProductID,
    ProductName,
    Models.Model,
    Models.Storage
FROM
    ProductsData
CROSS APPLY OPENJSON(ProductDetails, '$.Models')
WITH (
    Model NVARCHAR(50) '$.Model',
    Storage NVARCHAR(50) '$.Storage'
) AS Models;

Aggregating Data into JSON Format
SQL Server allows you to convert query results into JSON format using the FOR JSON clause.

SQL
SELECT
    ProductID,
    ProductName,
    ProductDetails
FROM
    ProductsData
FOR JSON PATH;

Conclusion
We have learned ways to read JSON from SQL Server columns. Thanks!

HostForLIFE.eu SQL Server 2022 Hosting
HostForLIFE.eu is European Windows Hosting Provider which focuses on Windows Platform only. We deliver on-demand hosting solutions including Shared hosting, Reseller Hosting, Cloud Hosting, Dedicated Servers, and IT as a Service for companies of all sizes.


About HostForLIFE.eu

HostForLIFE.eu is European Windows Hosting Provider which focuses on Windows Platform only. We deliver on-demand hosting solutions including Shared hosting, Reseller Hosting, Cloud Hosting, Dedicated Servers, and IT as a Service for companies of all sizes.

We have offered the latest Windows 2016 Hosting, ASP.NET Core 2.2.1 Hosting, ASP.NET MVC 6 Hosting and SQL 2017 Hosting.


Tag cloud

Sign in