I'll go over the Rank and Dense_Rank Functions in SQL Servers with examples in this article. In SQL Server, the RANK and DENSE_RANK procedures were introduced. Once more, these two procedures are utilized to return consecutive numbers beginning at 1 in accordance with the ORDER BY clause's ordering of the rows. Before attempting to comprehend how these functions differ from one another, let's first examine these functions in further detail using a few instances.
Note: If there are two records with identical data, both rows will have the same rank.
RANK Function in SQL Server
The following is the syntax for using the RANK function in SQL Server. As you can see, like the Row_Number function, here also the Partition By clause is optional while the Order By Clause is mandatory.
The PARTITION BY clause is basically used to partition the result set into multiple groups. As it is optional, and if you did not specify the PARTITION BY clause, then the RANK function will treat the entire result set as a single partition or group. The ORDER BY clause is required, and this clause is used to define the sequence in which each row is going to assign its RANK i.e. number. If this is not clear at the moment, then don’t worry. We will try to understand this with some examples.
Examples to understand Rank and Dense_Rank function in SQL Server.
We are going to use the following Employees table to understand the RANK and DENSE_RANK functions.
Please use the following SQL Script to create and populate the Employees table with the required test data.
Create Table Employees
(
Id INT PRIMARY KEY,
Name VARCHAR(50),
Department VARCHAR(10),
Salary INT,
)
Go
Insert Into Employees Values (1, 'James', 'IT', 80000)
Insert Into Employees Values (2, 'Taylor', 'IT', 80000)
Insert Into Employees Values (3, 'Pamela', 'HR', 50000)
Insert Into Employees Values (4, 'Sara', 'HR', 40000)
Insert Into Employees Values (5, 'David', 'IT', 35000)
Insert Into Employees Values (6, 'Smith', 'HR', 65000)
Insert Into Employees Values (7, 'Ben', 'HR', 65000)
Insert Into Employees Values (8, 'Stokes', 'IT', 45000)
Insert Into Employees Values (9, 'Taylor', 'IT', 70000)
Insert Into Employees Values (10, 'John', 'IT', 68000)
Go
RANK Function without PARTITION
Let us see an example of the RANK function in SQL Server without using the PARTITION BY Clause. When we did not specify the PARTITION BY Clause, then the RANK function will treat the entire result set as a single partition and give consecutive numbering starting from 1 except when there is a tie.
The following is an example of the RANK function without using the PARTITION BY clause. Here we use the Order By Clause on the Salary column. So, it will give the rank based on the Salary column.
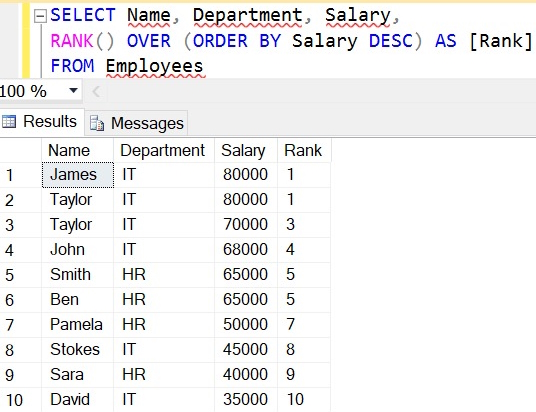
SELECT Name, Department, Salary,
RANK() OVER (ORDER BY Salary DESC) AS [Rank]
FROM Employees
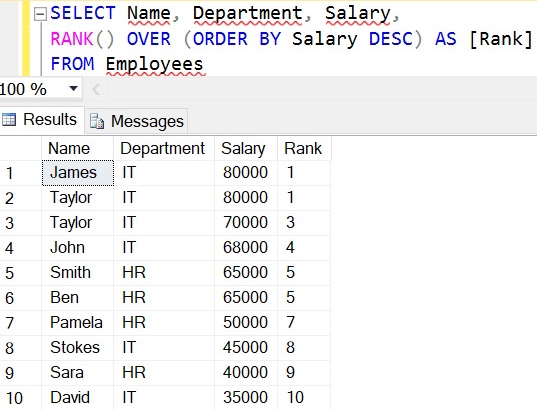
Once you execute the above query, you will get the following output. As you can see in the below output, there will be no partition, and hence all the rows are assigned with consecutive sequences starting from 1 except when there is a tie i.e. when the salary is 8000 and 65000, it gives the same rank to both the rows.
The Rank function in SQL Server skips the ranking(s) when there is a tie. As you can see in the above output, Ranks 2 and 6 are skipped as there are 2 rows at rank 1 as well as 2 rows at rank 5. The third row gets rank 3 and the 7th row gets rank 7.
RANK Function with PARTITION BY clause in SQL Server
Let us see an example of the RANK function using the PARTITION BY clause in SQL Server. When you specify the PARTITION BY Clause, then the result set is partitioned based on the column that you specify in the PARTITION BY clause. Please have a look at the following image to understand this better. As you can see we have specified Department in the Partition By clause and Salary in the Order By clause.
As in the Employees table, we have two departments (IT and HR). So, the Partition By Clause will divide all the records into two partitions or two groups. One partition is for IT department employees and another partition is for HR department employees. Then in each partition, the data is sorted based on the Salary column. The RANK function then gives an integer sequence number starting from 1 to each record in each partition except when there is a tie. In the case of a tie, it gives the same rank and then skips the ranking.
Now execute the following code and you will get the output as we discussed in the previous image.
SELECT Name, Department, Salary,
RANK() OVER (
PARTITION BY Department
ORDER BY Salary DESC) AS [Rank] FROM Employees
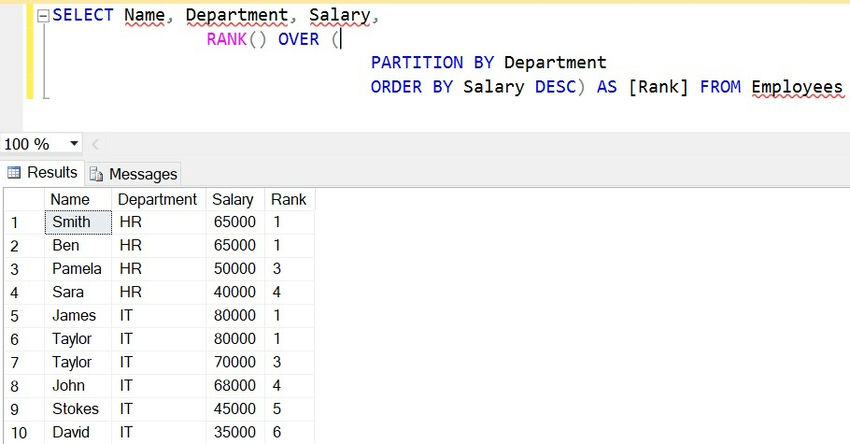
So, in short, The RANK function Returns an increasing unique number for each row starting from 1 and for each partition. When there are duplicates, the same rank is assigned to all the duplicate rows, but the next row after the duplicate rows will have the rank it would have been assigned if there had been no duplicates. So the RANK function skips rankings if there are duplicates.
DENSE_RANK Function in SQL Server
The following is the syntax for using the DENSE_RANK function. As you can see, like the RANK function, here also the Partition By clause is optional while the Order By Clause is mandatory.
The PARTITION BY clause is optional and it is used to partition the result set into multiple groups. If you did not specify the PARTITION BY clause, then the DENSE_RANK function will treat the entire result set as a single partition. The ORDER BY clause is mandatory and it is used to define the sequence in which each row is going to assign with their DENSE_RANK i.e. number. Let us understand how to use the DENSE_RANK function in SQL Server with some examples.
DENSE_RANK Function without PARTITION BY clause in SQL Server
Let us see an example of the DENSE_RANK function without using the PARTITION BY Clause. As we already discussed, if we did not specify the PARTITION BY Clause, then the DENSE_RANK function will treat the entire result set as a single partition and give consecutive numbering starting from 1 except when there is a tie.
The following is an example of the DENSE_RANK function without using the PARTITION BY clause. Like the RANK function, here we also apply for the Order By Clause on the Salary column. So, it will give the rank based on the Salary column.
SELECT Name, Department, Salary,
DENSE_RANK() OVER (ORDER BY Salary DESC) AS [Rank]
FROM Employees
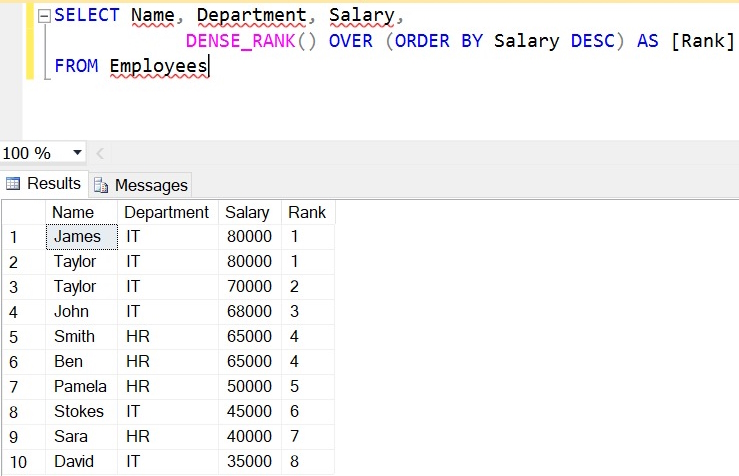
When you execute the above SQL Query, it will give you the following output. As you can see in the output, there will be no partition, and hence all the rows are assigned with consecutive sequences starting from 1 except when there is a tie i.e. when the salary is 8000 and 65000, it gives the same rank to both the rows.
Unlike the Rank function, the DENSE_RANK function will not skip the ranking(s) when there is a tie. As you can see in the above output, we have two rows with rank 1 and the next immediate row rank is 3 and this is the only difference between RANK and DENSE_RANK function in SQL Server.
DENSE_RANK Function with PARTITION BY clause in SQL Server
Let us see an example of the DENSE_RANK function in SQL Server using the PARTITION BY Clause. Like the RANK function, it will also partition the result set based on the column that you specify in the PARTITION BY Clause. In order to understand this better, please have a look at the following diagram. As you can see we have specified the Department column in the Partition By clause and Salary column in the Order By clause.
As we have two departments i.e. IT and HR, so, the Partition By Clause will divide all the data into two partitions. One partition is going to hold the IT department employees while the other partition is going to hold the HR department employees. Then in each partition, the records are sorted based on the Salary column. The DENSE_RANK function is then applied on each record in each partition and provides sequence numbers starting from 1 except when there is a tie. In the case of a tie, it gives the same rank without skipping the ranking.
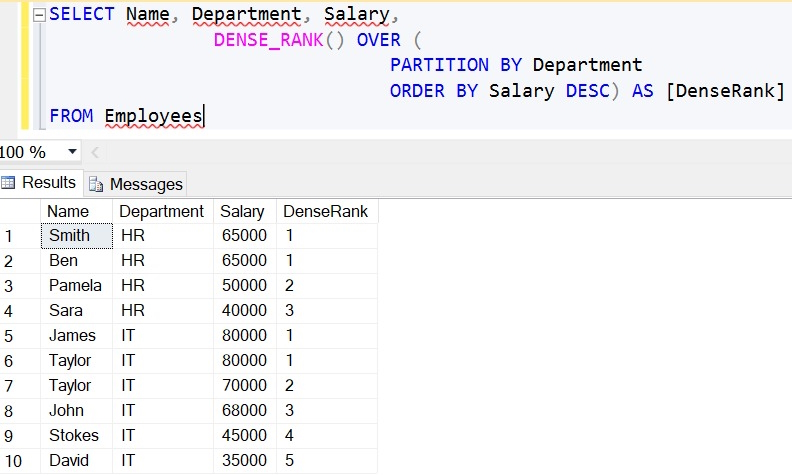
Now execute the below SQL Script and you should get the output as we discussed in the previous image.
SELECT Name, Department, Salary,
DENSE_RANK() OVER (
PARTITION BY Department
ORDER BY Salary DESC) AS [DenseRank]
FROM Employees
What is the difference between Rank and Dense_Rank functions in SQL Server?
As we already discussed the one and only difference is Rank function skips ranking(s) if there is a tie whereas the Dense_Rank will not skip the ranking.
The Real-time examples of RANK and DENSE_RANK Functions in SQL Server:
If you are attending any interview, then one famous question is being asked in almost all interviews i.e. find the nth highest salary. Both the RANK and DENSE_RANK functions can be used to find nth highest salary. However, when to use which function basically depends on what you want to do when there is a tie. Let us understand this with an example.
Suppose, there are 2 employees with the FIRST highest salary, then there might be 2 business cases as follows.
If your business requirement is not to produce any result for the SECOND highest salary then you have to use the RANK function.
If your business requirement is to return the next Salary after the tied rows as the SECOND highest Salary, then you have to use the DENSE_RANK function.
Fetch the 2nd Highest Salary using the RANK function
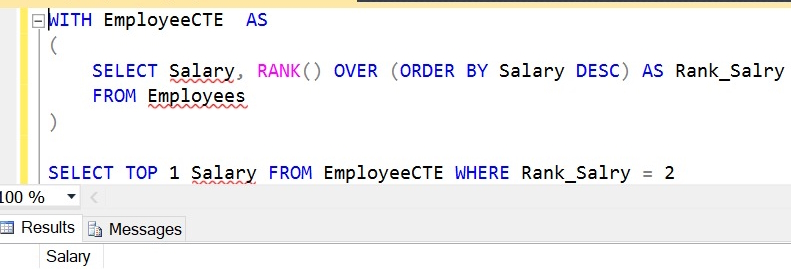
Since, in our Employees table, we have 2 employees with the FIRST highest salary (80000), the Rank() function will not return any data for the SECOND highest Salary. Please execute the SQL script below and see the output.
-- Fetch the 2nd Hight Salary
WITH EmployeeCTE AS
(
SELECT Salary, RANK() OVER (ORDER BY Salary DESC) AS Rank_Salry
FROM Employees
)
SELECT TOP 1 Salary FROM EmployeeCTE WHERE Rank_Salry = 2
Fetch the 2nd Highest Salary using DENSE_RANK Function
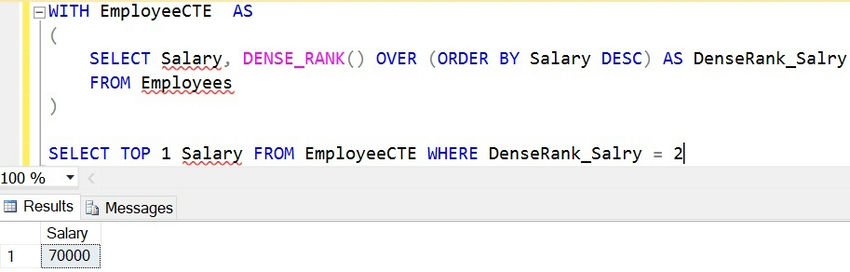
As we have 2 Employees with the FIRST highest salary i.e. 80000, the Dense_Rank() function will return the next Salary after the tied rows as the SECOND highest Salary i.e. 70000. Please execute the following SQL Script and see the output.
-- Fetch the 2nd Hight Salary
WITH EmployeeCTE AS
(
SELECT Salary, DENSE_RANK() OVER (ORDER BY Salary DESC) AS DenseRank_Salry
FROM Employees
)
SELECT TOP 1 Salary FROM EmployeeCTE WHERE DenseRank_Salry = 2
Example to find the Highest Salary Department
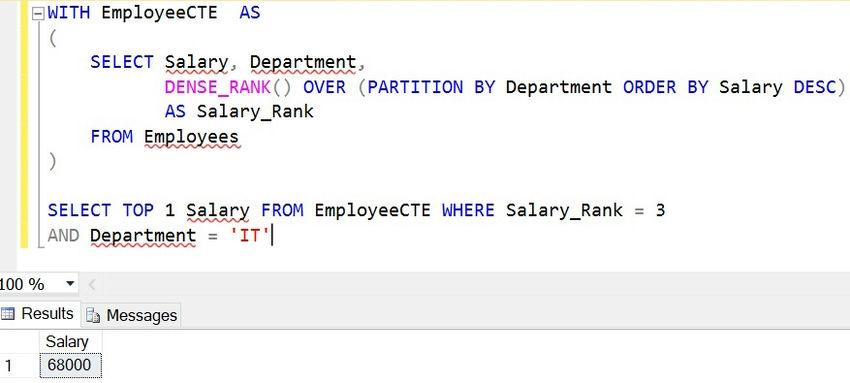
You can also use the RANK and DENSE_RANK functions in SQL Server to find the nth highest Salary department-wise. For example, if someone asks you to find the 3rd highest salary of the IT Department, then you can use the DENSE_RANK function as shown below.
WITH EmployeeCTE AS
(
SELECT Salary, Department,
DENSE_RANK() OVER (PARTITION BY Department ORDER BY Salary DESC)
AS Salary_Rank
FROM Employees
)
SELECT TOP 1 Salary FROM EmployeeCTE WHERE Salary_Rank = 3
AND Department = 'IT'
To put it briefly, the DENSE_RANK function yields an increasing unique number for each division and row beginning at 1. If there are duplicates, all of the duplicate rows are given the same rank; no levels are skipped. This indicates that the subsequent row in the series will have the next rank after the duplicate rows.
HostForLIFE.eu SQL Server 2022 Hosting
HostForLIFE.eu is European Windows Hosting Provider which focuses on Windows Platform only. We deliver on-demand hosting solutions including Shared hosting, Reseller Hosting, Cloud Hosting, Dedicated Servers, and IT as a Service for companies of all sizes.