What is SQL Server CDC?
SQL Server CDC, or Change Data Capture, is a technology used by Microsoft SQL Server to systematically record all changes made to a database. It records events such as inserts, updates, and deletes within a specific timeframe, as well as any changes to the database structure. CDC, unlike SQL Server Change Tracking, scans transaction logs for data changes and stores the results in a separate table or database. Notably, CDC uses minimum server resources and does not delay transactions with locks or reads, distinguishing it from other tracking approaches.
The use of SQL CDC functionality is especially useful when transferring or replicating data from a SQL Server database to data lakes or warehouses such as S3, Redshift, Azure Synapse, SQL Server, Databricks, PostgreSQL, BigQuery, or Snowflake. This feature enables effective replication of incremental data, ensuring that the data lake or warehouse is consistently updated, and it also serves as a centralized hub for accessing data from many SQL Server repositories.
SQL Server, a relational database management system built by Microsoft, is a critical tool for efficiently storing and retrieving data, and it is widely used by applications for this purpose. Notably, SQL Server versions after 2008 include Change Data Capture (CDC) capabilities.
SQL Server Change Data Capture or CDC points to note
- Enabling this functionality requires sysadmin privileges. (Data Migration 101).
- This functionality is not supported in SQL Server Web, Express, and Standard editions when migrating to Databricks. (Easy Migration Method).
- CDC must be enabled both at the database level and the table level for all relevant tables. (Debezium CDC Explained).
- To utilize Change Data Capture, you must initiate the SQL Server Agent. (Change Data Capture Types and CDC Automation)
How to enable CDC in SQL Server?
At DB level
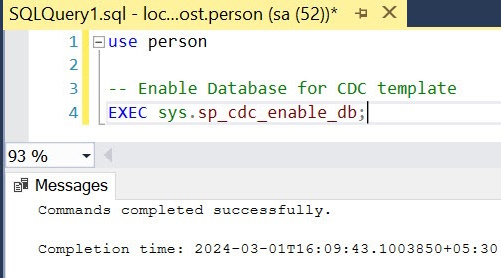
To activate Change Data Capture (CDC) for a particular table to facilitate auditing, the initial step involves enabling CDC at the database level. This action necessitates a member of the SYSADMIN fixed server role to utilize the sys.sp_cdc_enable_db system stored procedure.
Use <databasename>;
EXEC sys.sp_cdc_enable_db;
Example
At Table level
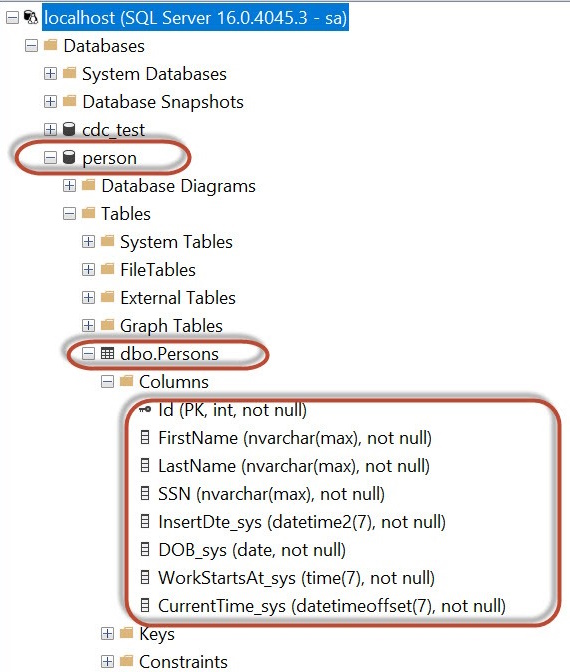
Create a Table. example, person.
CREATE TABLE [dbo].[Persons](
[Id] [int] IDENTITY(1,1) NOT NULL,
[FirstName] [nvarchar](max) NOT NULL,
[LastName] [nvarchar](max) NOT NULL,
[SSN] [nvarchar](max) NOT NULL,
NOT NULL,
[DOB_sys] [date] NOT NULL,
NOT NULL,
[CurrentTime_sys] [datetimeoffset](7) NOT NULL,
CONSTRAINT [PK_Persons] PRIMARY KEY CLUSTERED
(
[Id] ASC
)WITH (PAD_INDEX = OFF, STATISTICS_NORECOMPUTE = OFF, IGNORE_DUP_KEY = OFF, ALLOW_ROW_LOCKS = ON, ALLOW_PAGE_LOCKS = ON, OPTIMIZE_FOR_SEQUENTIAL_KEY = OFF) ON [PRIMARY]
) ON [PRIMARY] TEXTIMAGE_ON [PRIMARY]
Example
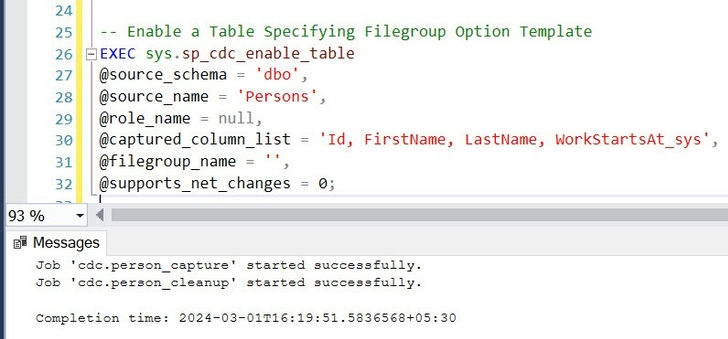
Once CDC is enabled at the database level, subsequent activation for tracking and auditing DML changes on specific tables can be conducted by a member of the db_owner fixed database role. This is achieved through the sys.sp_cdc_enable_table system stored procedure, offering options to customize the tracking process:
- Captured Columns: By default, all columns in the source table are tracked. However, for privacy or performance considerations, a subset of columns can be specified using the @captured_column_list parameter.
- Change Table Filegroup: The change table is typically placed in the default filegroup of the database. However, for control over placement, the @filegroup_name parameter allows specifying a particular filegroup for the change table. It's advisable to allocate change tables to a separate filegroup from source tables for better management.
- Access Control: Access to the change data can be regulated using a designated role, which can be an existing fixed server role or a database role. If the specified role doesn't exist, it's automatically created. Users require SELECT permission on all captured columns, and if a role is specified, users outside of sysadmin or db_owner roles must also be members of the specified role.
- Support for Net Changes: If @supports_net_changes is set to 1, a net changes function is generated for the capture instance. This function returns only one change for each distinct row changed within a specified interval. To enable net changes queries, the source table must have a primary key or unique index, and if an index is used, it must be specified using the @index_name parameter.
- Primary Key Handling: If change data capture is enabled on a table with an existing primary key, subsequent changes to the primary key are not allowed without first disabling CDC. If there is no primary key at the time of enabling the CDC, any subsequent addition of a primary key is ignored.
Overall, these options offer flexibility in configuring CDC to suit specific auditing requirements and access control policies within the database environment.
USE <databasename>
GO
EXEC sys.sp_cdc_enable_table
@source_schema = ‘<schema_name>’,
@source_name = ‘<table_name>’,
@captured_column_list = ‘<column_list>,’
@supports_net_changes = 0,
@filegroup_name = ‘’
@role_name = null,
@supports_net_changes = 0;
Example
In SQL Server, how can I verify if CDC is enabled on a table?
Verify that the connection user has access; this query should not return an empty result.
EXEC sys.sp_cdc_help_change_data_capture

Check if CDC has been enabled at the database level.
USE master
GO
select name, is_cdc_enabled
from sys.databases
where name = ‘<databasename>’
GO
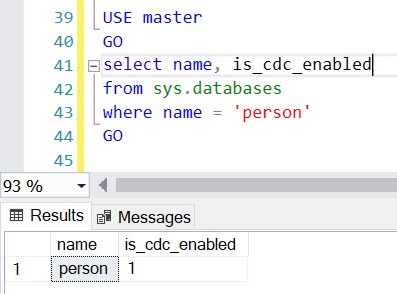
If is_cdc_enabled is 0 then CDC is not enabled for the database.
If is_cdc_enabled is 1 then CDC is already enabled for the database name.
Check if CDC is enabled at the table level.
USE databasename
GO
SELECT name, type, type_desc, is_tracked_by_cdc
FROM sys.tables
WHERE name = '<table_name>'
GO
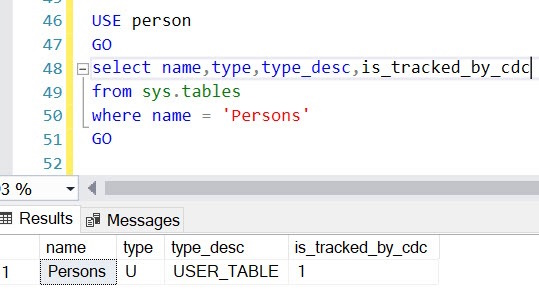
If is_tracked_by_cdc = 1 then CDC is enabled for the table.
If is_tracked_by_cdc = 0 then CDC is not enabled for the table.
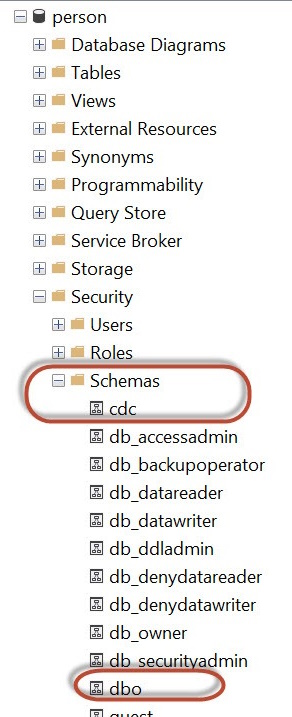
Once, CDC is enabled at the Database level, you will see that a schema with the name ‘cdc’ has been created.

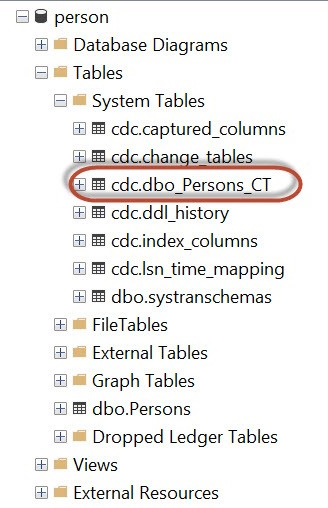
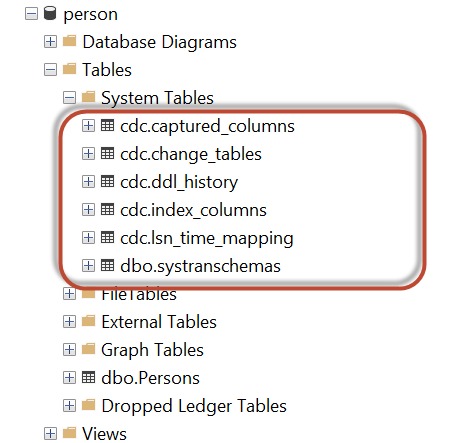
Once CDC is enabled on the table, a number of system tables will be created under the CDC schema of the database to store the CDC-related information. These tables include the following
CDC.captured_columns table that contains the list of captured columns.
CDC.change_tables table that contains the list of tables that are enabled for capture.
CDC.ddl_history table that records the history of all the DDL changes since capture data was enabled.
CDC.index_columns table that contains all the indexes that are associated with the change table.
CDC.lsn_time_mapping table that is used to map the LSN number with the time and finally one change table for each CDC-enabled table that is used to capture the DML changes on the source table, as shown below.
and the SQL Agent jobs associated with the CDC-enabled table, the capture and cleanup jobs, will be created like below:
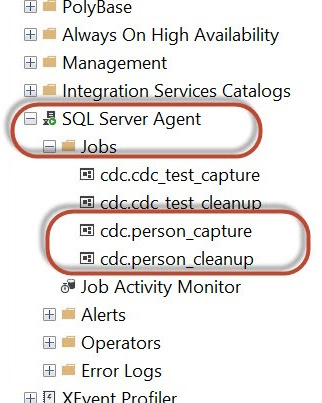
For Change Data Capture (CDC) to operate effectively, it relies on the presence of a running SQL Server Agent within the SQL Server instance. Upon enabling CDC for a database table, the system automatically generates two SQL Server Agent jobs tailored for that specific database.
- The first job is responsible for populating the database change tables with pertinent change information retrieved from the transaction log.
- The second job is tasked with maintaining the cleanliness of the change tables by routinely purging records older than a predefined retention period, typically set to 3 days.
CDC's functionality hinges on the SQL Server Transaction Log as its primary data source for detecting and capturing changes. Whenever a modification occurs within the database, this alteration is promptly recorded within the Transaction Log file.
Furthermore, it's noteworthy that upon job creation, they are automatically activated, ensuring the seamless operation of the CDC without the need for manual intervention.
When CDC is enabled on any table, it usually captures the data of all the columns. During INSERT or DELETE operations, it is necessary to capture all the data, but in UPDATE operations, only the data of the updated columns are required. CDC is not yet advanced enough to provide this kind of dynamic column selection, but CDC can let you select the columns from which data changes should be captured from the beginning.
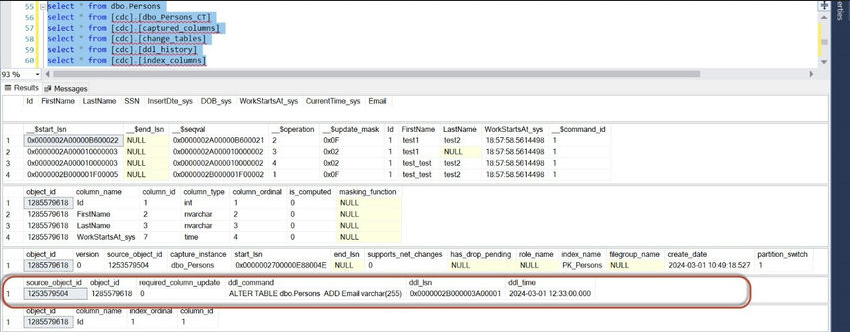
Before we start, let us select from a couple of tables and observe their content.
select * from dbo.Persons;
select * from [cdc].[dbo_Persons_CT];
select * from [cdc].[captured_columns];
select * from [cdc].[change_tables];
select * from [cdc].[ddl_history];
select * from [cdc].[index_columns];
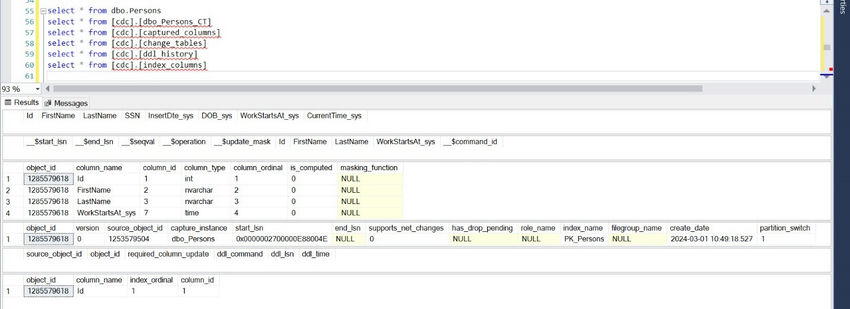
Column _$operation of table CDC.captured_columns table contains a value that corresponds to DML Operations. Following is a quick list of values and their corresponding meaning.
- Delete Statement= 1
- Insert Statement= 2
- Value before Update Statement= 3
- Value after Update Statement= 4
It is important to understand the Update mask column in the tracking table. It is named _$update_mask. The value displayed in the field is hexadecimal but is stored as binary.
In our example, we have three different operations. INSERT and DELETE operations are done on the complete row, not individual columns. These operations are listed marked masked with 0x1F translated in binary as 0b11111, which means all five table columns.
In our example, we had an UPDATE on only two columns – the second and fifth. This is represented with 0x12 in hexadecimal value ( 0b10010 in binary). Here, this value stands for the second and fifth values if you look at it from the right as a bitmap. This is a valuable way of determining which columns are being updated or changed.
The tracking table shows two columns containing the suffix lsn, i.e., _$start_lsn and _$end_lsn. These two values correspond to the Log Sequential Number. This number is associated with the committed transaction of the DML operation on the tracked table.
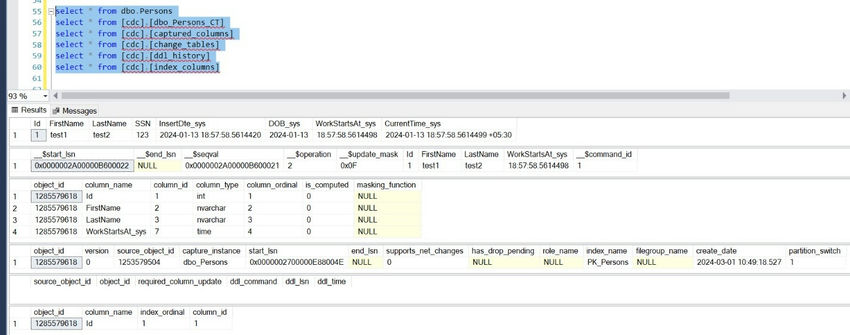
Now, let's try to Insert some data into the table and check, what all the data above tables returns.
INSERT INTO [dbo].[Persons]
([FirstName],[LastName],[SSN],[InsertDte_sys],[DOB_sys],[WorkStartsAt_sys],[CurrentTime_sys])
VALUES
('test1'
,'test2'
,'123'
,'2024-01-13 18:57:58.5614420'
,'2024-01-13'
,'18:57:58.5614498'
,'2024-01-13 18:57:58.5614499 +05:30');
Once, Data is inserted into dbo. Person table, we can see a row added to that table. As part of CDC enabled on this table, even CDC.dbo_persons_ct table got a row added with the operation. 2 which is for Insert operation and it captured the CDC-enabled columns.
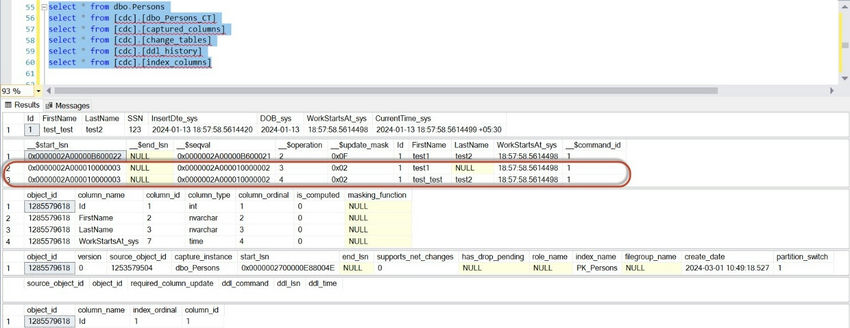
Now, let's try to Update some values in the Person table and check the result in the CDC table.
update [dbo].[Persons]
SET [FirstName] = 'test_test'
where Id = 1;
After updating the value in dbo. person table, the same was reflected in the table. But in the CDC table, 2 rows were added with operations,3,4. So whenever an Update happens, 2 rows will be captured as part of the CDC process.
Value before Update Statement= 3
Value after Update Statement= 4
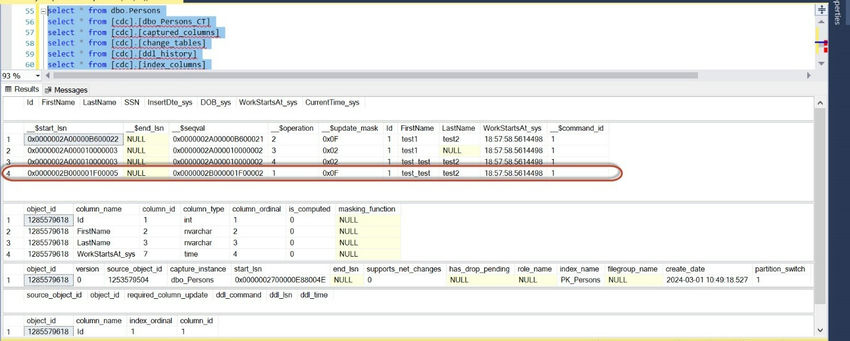
Now, let's try Delete the value and check the CDC table.
Delete from dbo.Persons where Id = 1;
Once, data is deleted from the table, the CDC table will have a row added with option,1 which is for the delete operation.
Now, let us try to Alter the table and check how the CDC will work.
ALTER TABLE dbo.Persons
ADD Email varchar(255);
Once, the table is altered the CDC.ddl_history table captures the schema update.
Retrieve Captured Data of Specific Time Frame
Often, one is asked for data to be tracked over a time interval. If you look at the tracking data, no time is captured. It always provides all the information. However, a few fields can help us, i.e., _$start_lsn. LSN stands for the Last Sequence Number. An LSN uniquely identifies every record in the transaction log. They are always incrementing numbers.
LSN numbers are always associated with time, and their mapping can be found after querying system table cdc.lsn_time_mapping. This table is one of the tables that was created when the Person database was enabled for CDC. You can run this query to get all the data in the table cdc.lsn_time_mapping.
SELECT * FROM cdc.lsn_time_mapping
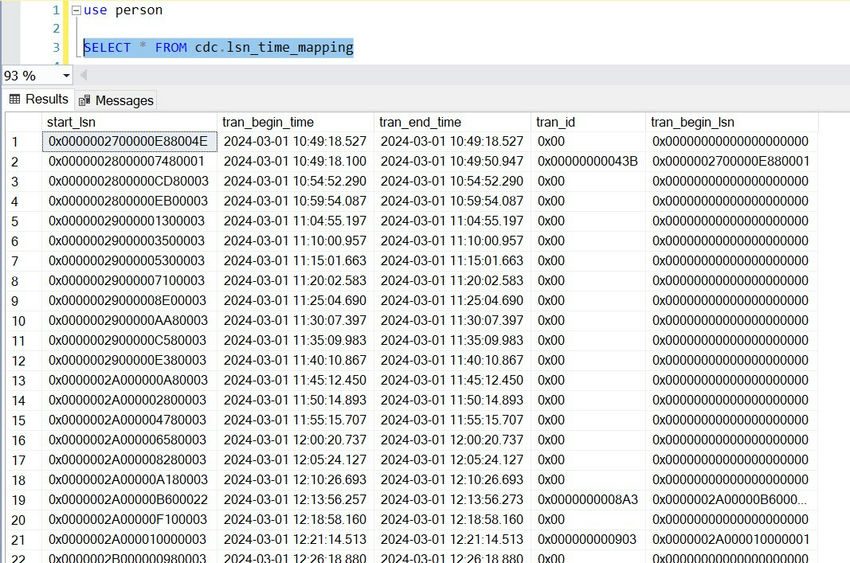
When this query is run, it will give us all the rows of the table. Finding the necessary information from all the data is a little difficult. The usual case is when we must inspect a change that occurred in a particular period.
We can find the time that corresponds to the LSN by using the system function sys.fn_cdc_map_time_to_lsn. If we want all the changes done yesterday, we can run this function as described below, and it will return all the rows from yesterday.
Querying the change tables is not recommended by Microsoft. Instead, you can query the CDC.fn_cdc_get_all_changes system function associated with the CDC-enabled table. Before we run this query, let us explore table-valued functions (TVF) in the database. You can see that there are new TVFs created with schema cfc. These functions were created when table-level CDC was enabled.
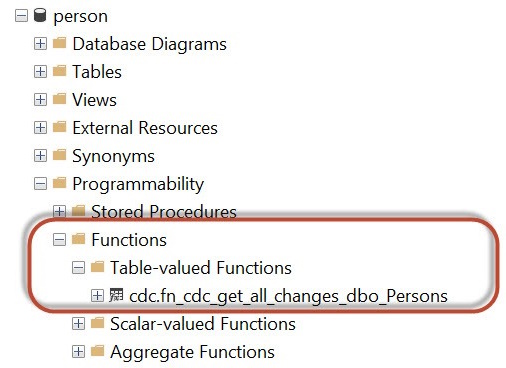
The function cdc.fn_cdc_get_all_changes_dbo_Persons can be used to get events that occurred over a particular period. You can run this T-SQL script to get events during any specific period.
The following query should retrieve the data modified in the past 24 hours.
USE person
GO
DECLARE @begin_time DATETIME, @end_time DATETIME, @begin_lsn BINARY(10), @end_lsn BINARY(10);
SELECT @begin_time = GETDATE()-1, @end_time = GETDATE();
SELECT @begin_lsn = sys.fn_cdc_map_time_to_lsn('smallest greater than', @begin_time);
SELECT @end_lsn = sys.fn_cdc_map_time_to_lsn('largest less than or equal', @end_time);
SELECT *
FROM cdc.fn_cdc_get_all_changes_dbo_Persons(@begin_lsn,@end_lsn,'all')
GO
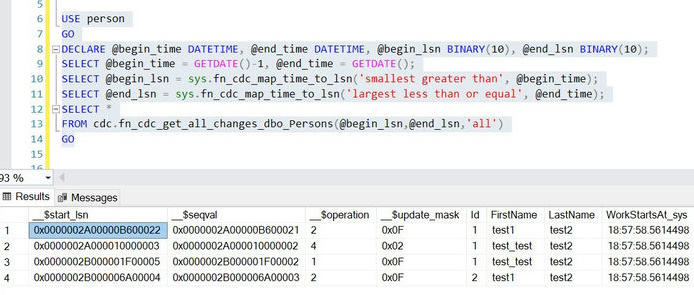
We have used relational operations in the function sys.fn_cdc_map_time_to_lsn. There can be a total of four different relational operations available to use in that function:
- largest less than
- largest less than or equal
- smallest greater than
- smallest greater than or equal
This way, the captured data can be queried easily and query based on time intervals.
Disabling CDC
Disabling this feature is very simple. As we have seen earlier, if we have to enable CDC, we have to do this in two steps – at the table level and the database level; In the same way, when we have to disable this feature, we can do this at the same two levels. Let us see both of them one after one.
Disabling Change Data Capture on a table
For dropping any table tracking, we need three values: the Source Schema, the Source Table name, and the Capture Instance.
However, we do not know the name of the Source Schema, the Source Table name, and the Capture Instance. We can retrieve it very easily by running the following T-SQL Query.
USE database;
GO
EXEC sys.sp_cdc_help_change_data_capture
GO
This will return a result that contains all the three required information for disabling CDC on a table.

The Change Data Capture can be easily disabled on a specific table using the sys.sp_cdc_disable_table system stored procedure, as shown below.
USE person
EXEC sys.sp_cdc_disable_table
@source_schema = 'dbo',
@source_name = 'Persons',
@capture_instance = 'dbo_Persons'
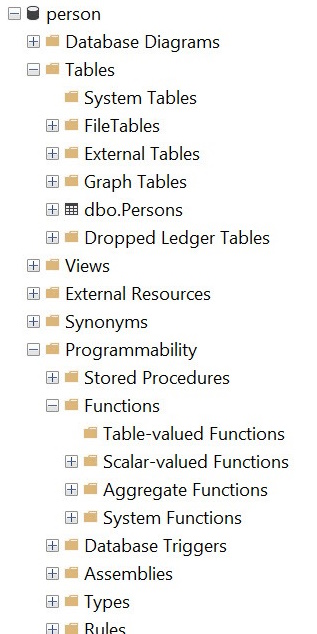
Once Change Data Capture is disabled on any table, it drops the Change Data Capture table as well as all the functions that were associated with it. It also deletes all the rows and data related to this feature from all the system tables and changes relevant data in catalog views.
The CDC.dbo_persons_ct table has been deleted.
Disabled CDC at the database level
disabled completely at the database level, without the need to disable it on CDC-enabled tables one by one, using the sys.sp_cdc_disable_db system stored procedure, as shown below:
USE person
GO
sys.sp_cdc_disable_db
GO
Once CDC is disabled at the Database level, then all tables, and functions related to CDC will be deleted.
SQL Server Change Data Capture, Pros and Cons
Challenges of SQL Server CDC
- While SQL Server Change Data Capture (CDC) offers valuable functionality for tracking data changes, it does come with some limitations. Although it utilizes I/O and incurs a minor overhead on server resources, it doesn't directly impact the tables themselves, nor does it introduce locks or reads that could impede transaction performance. However, in scenarios where tables experience high volumes of DML activity, SQL Server CDC may not be the most efficient solution for real-time data replication.
- Setting up CDC can be more complex compared to alternative mechanisms, and ongoing intervention by database administrators may be necessary, particularly for managing transaction logs in transactional replication scenarios.
- It's important to note that CDC functionality is not supported in SQL Server Web, Express, and Standard editions. Therefore, organizations exploring alternatives for SQL Server to Snowflake migration or considering Postgres CDC should be aware of these limitations and explore other options accordingly.
Benefits of SQL Server CDC
- One of the significant advantages of SQL Server Change Data Capture (CDC) is its flexibility in supporting tables without a primary key. Unlike many other replication mechanisms from SQL Server that necessitate tables to have a primary key, CDC can efficiently handle tables lacking this constraint. This capability proves particularly beneficial for scenarios requiring incremental data capture and real-time replication, even when primary keys are absent from the tables intended for replication, making it an ideal solution for SQL Server to Snowflake migration scenarios.
- Moreover, CDC's functionality extends seamlessly to environments utilizing Always On Availability Groups on SQL Server. The CDC data is reliably replicated to the replicas, ensuring consistent data synchronization across the entire environment. This feature further enhances CDC's utility and compatibility within complex SQL Server deployment architectures.
SQL Server Change Data Capture Limitations (Challenges with custom coding)
- While the native SQL Server Change Data Capture (CDC) functionality effectively captures data changes, leveraging it for SQL replication to a Data Warehouse or Data Lake typically entails significant coding efforts. This coding involves processing and utilizing the captured changes efficiently, which can add complexity to the replication process, as highlighted in the SQL Server to Snowflake migration process.
- Furthermore, beyond ensuring reliability and robustness, ongoing maintenance becomes a critical concern for enterprises utilizing CDC. Issues such as data integrity, handling new tables, and accommodating various data types require continuous attention and management, as observed in the migration journey from SQL Server to Postgres.
- In addition to data management challenges, the development of alerting and monitoring solutions also necessitates manual coding efforts. However, hand-coding these solutions may not offer a quick time to value, and they can incur substantial expenses in terms of development and maintenance.
- Overall, while SQL Server CDC provides valuable change capture capabilities, enterprises must contend with the complexities of coding, ongoing maintenance, and the development of monitoring solutions, which can potentially hinder the efficiency and cost-effectiveness of their data replication and migration processes.
Increase Maxscans and/or max trans for lower latency
If the workload surpasses the capabilities of CDC with default parameters or if latency becomes unacceptably high, adjusting certain parameters can help mitigate these issues. Consider increasing maxscans and/or maxtrans by a factor of 10 or reducing the polling interval to 1 to alleviate workload constraints. Monitor query performance, workload, and latency for change tables closely during these adjustments. If latency remains a concern despite these changes, further increasing maxtrans may be necessary, but continue to monitor the impact on performance, workload, and latency. Ideally, when SQL Server CDC effectively handles the workload, latency should not significantly exceed the polling interval.
Insert/Delete vs. Update
How many rows does the DML operation create per transaction?
During SQL Server Change Data Capture (CDC), each INSERT operation on a table results in the creation of one row in the change table. However, an UPDATE operation generates two rows in the change table: one representing the data before the update and another for the data after the update. If a row is immediately inserted and then updated, three rows are created in the change table. It's advisable to avoid using CDC for tables prone to frequent large updates or situations where immediate updates follow inserts.
CDC meticulously tracks INSERT, UPDATE, and DELETE operations on the database table, recording comprehensive information about these changes in a corresponding mirrored table with an identical column structure. Additional columns in the change table include.
__$start_lsn and __$end_lsn: Indicating the commit log sequence number (LSN) assigned by the SQL Server Engine to the recorded change.
__$seqval: Reflecting the order of the change relative to others within the same transaction.
__$operation: Identifying the operation type (1 = delete, 2 = insert, 3 = update before, 4 = update after).
__$update_mask: A bit mask specifying the updated columns.
This detailed information facilitates monitoring of database changes for security or auditing purposes or facilitates incremental loading of changes from the OLTP source to the target OLAP data warehouse using T-SQL or ETL methods.
Run the Cleanup job efficiently to remove deleted entries
To initiate the cleanup process for removing deleted entries in SQL Server Change Data Capture (CDC), the stored procedure sp_MScdc_cleanup_job is executed. This procedure retrieves the retention and threshold settings for the cleanup job from the cdc_jobs table in the msdb database.
The configurable threshold value specifies the maximum number of deleted entries that can be removed in a single statement. When dealing with large thresholds, there's a possibility of lock escalation, which could potentially impact application response time and increase CDC job latency. Therefore, it's recommended to schedule the cleanup process during non-peak hours or when the workload is minimal to mitigate any adverse effects on application performance.
By automating CDC cleanup tasks, organizations can effectively manage the maintenance of CDC environments, ensuring data integrity and optimal performance.
Monitor transaction log file storage
SQL Server Change Data Capture (CDC) can be impacted by the transaction log I/O subsystem. Enabling the CDC in a database significantly increases log file I/O, as the log records remain active until they are processed by the CDC. This prolonged activity can lead to latency issues, as the log space cannot be reused until CDC completes its processing. In high-latency environments, the log disk may grow and become full, which halts CDC from processing further transactions, as CDC relies on logged operations to write changes to the change tables.
To address this issue, one solution is to add another log file on a separate disk. By distributing the log files across multiple disks, the I/O workload can be effectively balanced, mitigating potential bottlenecks and reducing latency in CDC processing. This ensures a smoother operation of CDC and prevents log space exhaustion, allowing the system to efficiently manage data changes while maintaining optimal performance.
Differentiate between the application data and the change data
Typically, the location of the change table in the same filegroup as the application table doesn't significantly impact SQL Server Change Data Capture (CDC) performance. However, in scenarios with heavily loaded I/O subsystems, placing change tables in a file group on separate physical disks can enhance CDC performance.
To ensure optimal performance and maintain a small size for the PRIMARY filegroup, it's advisable to specify a different file group from PRIMARY using the @filegroup_name parameter in the sys.sp_cdc_enable_table stored procedure. This approach helps differentiate between application data and change data, facilitating efficient management and organization of CDC-related resources.
Keep the table cdc.lsn_time_mapping on a separate file-group
In addition to changing tables, it's crucial to consider the impact on the cdc.lsn_time_mapping table, which can also grow significantly due to numerous I/O operations. Whenever sys.sp_cdc_enable_db is executed on a database, this table is created in the default filegroup. To mitigate potential issues, it's recommended to ensure that change data capture metadata, particularly the cdc.lsn_time_mapping table, is stored on a file group other than PRIMARY before executing sys.sp_cdc_enable_db. Once the SQL change data capture metadata tables are created, the default file group can be reverted if necessary. This approach helps manage the size and performance of the CDC metadata tables, promoting efficient operation of the CDC environment.
HostForLIFE.eu SQL Server 2022 Hosting
HostForLIFE.eu is European Windows Hosting Provider which focuses on Windows Platform only. We deliver on-demand hosting solutions including Shared hosting, Reseller Hosting, Cloud Hosting, Dedicated Servers, and IT as a Service for companies of all sizes.
